本文就SpringBoot条件下对@ConfigurationProperties注解的使用场景及方式进行介绍

基本实践
在日常开发实践中,经常需要通过@Value注解读取、加载配置文件中的自定义配置项。当存在大量自定义配置项时,就需要很多个@Value注解一一绑定,显然不够优雅。这里介绍另外一种方式,即通过@ConfigurationProperties注解实现。下面是一个在application.yml中自定义的配置项
1
2
3
4
5
6
7
8
9
10
11
|
employee:
cv:
name:
first-name: Aaron
last-name: Zhu
im:
qq: 123456
tel: 12312341234
country: China
age: 18
|
为了实现将上述若干配置项进行绑定,这里我们定义一个与配置项相对应的EmployeeProperties类。具体地,首先通过@ConfigurationProperties注解的prefix属性指定配置项的共同前缀。然后定义与配置项名称相匹配的字段名称,如下所示。可以看到如果配置项中名称含-短横线,则相应的字段名为驼峰格式,例如EmployeeProperties类的firstName字段。同时对于配置文件中name、im这些配置项,则相应的在EmployeeProperties类中定义Name、Im静态内部类,并将其作为EmployeeProperties类的成员变量
1
2
3
4
5
6
7
8
9
10
11
12
13
14
15
16
17
18
19
20
21
22
23
24
25
26
27
28
29
30
31
32
33
34
35
36
| @ConfigurationProperties(prefix = "employee.cv")
@AllArgsConstructor
@NoArgsConstructor
@Builder
@Data
public class EmployeeProperties {
private Name name;
private Im im;
private String country;
private Integer age;
@AllArgsConstructor
@NoArgsConstructor
@Builder
@Data
public static class Name {
private String firstName;
private String lastName;
}
@AllArgsConstructor
@NoArgsConstructor
@Builder
@Data
public static class Im {
private String qq;
private String tel;
}
}
|
至此就可以通过@EnableConfigurationProperties注解实现对EmployeeProperties类的实例化,当然实例中各字段的值即是来自于配置文件相应的配置项。下面即是一个通过EmployeeProperties实例获取、使用配置的例子。当然也可以在EmployeeProperties类上直接添加@Component注解进行实例化,本质上与此处的@EnableConfigurationProperties注解并无区别
1
2
3
4
5
6
7
8
9
10
11
12
13
14
15
16
17
18
19
20
| @Configuration
@EnableConfigurationProperties( EmployeeProperties.class )
public class EmployeeConfig {
@Autowired
private EmployeeProperties employeeProperties;
@Bean
public Map employeeData() {
Map map = new HashMap();
map.put("first name", employeeProperties.getName().getFirstName() );
map.put("last name", employeeProperties.getName().getLastName() );
map.put("qq", employeeProperties.getIm().getQq() );
map.put("tel", employeeProperties.getIm().getTel() );
map.put("country", employeeProperties.getCountry() );
map.put("age", employeeProperties.getAge() );
return map;
}
}
|
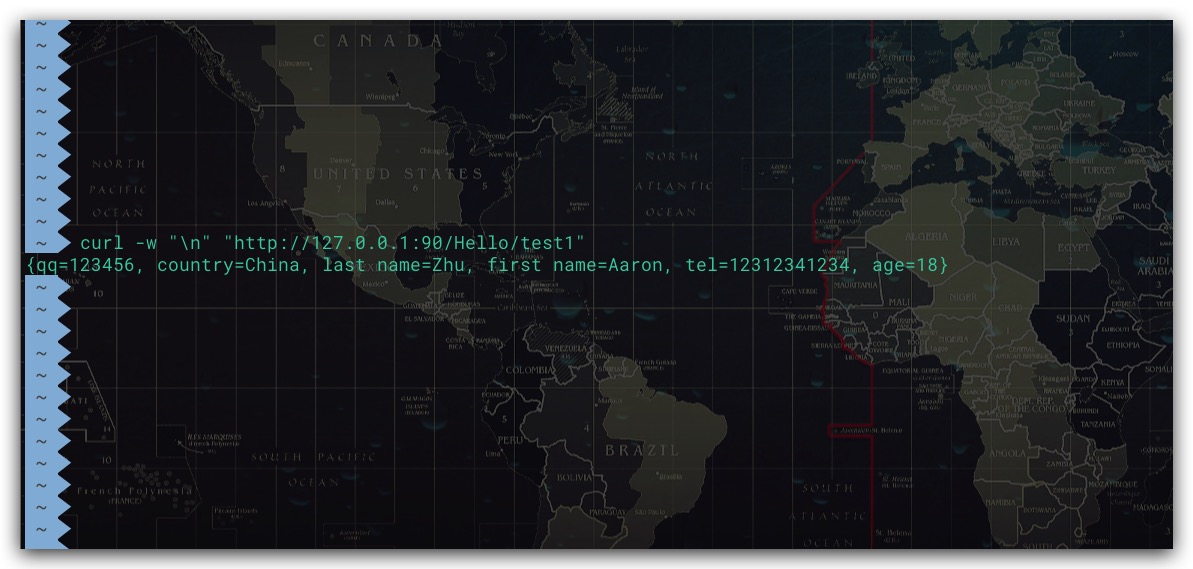
现在来添加一个Controller进行测试、验证
1
2
3
4
5
6
7
8
9
10
11
12
13
14
| @Controller
@ResponseBody
@RequestMapping("Hello")
public class HelloController {
@Autowired
@Qualifier("employeeData")
private Map map;
@RequestMapping("/test1")
public String test1() {
return map.toString();
}
}
|
测试结果如下,符合预期