本文将介绍Java中几种常见的网络编程模型
网络IO模型
对于一个网络IO而言,其操作流程大体可分为两个阶段。这里以read操作为例进行说明,write操作同理
- 数据准备阶段:等待数据从网络中到达,并将数据拷贝到内核的Socket接收缓冲区
- 数据拷贝阶段:将数据从内核空间拷贝到用户空间
对于阻塞IO、非阻塞IO而言,其描述的是在第一个阶段——数据准备阶段,发起IO请求的进程/线程是否会被阻塞。具体地,对于阻塞IO而言,如果内核接收缓冲区没有数据,则进程/线程会一直等待,直到内核接收缓冲区有数据为止;而对于非阻塞IO而言,如果内核接收缓冲区没有数据,则进程/线程会立即返回,而不是一直进行等待。故对于非阻塞IO而言,可通过轮询的方式检查当前是否有数据到达
而对于同步、异步IO而言,其描述的是在第二个阶段——数据拷贝阶段,是否需要由用户线程来执行。具体地,同步IO是由用户线程的内核态来执行第二阶段;而异步IO则是由内核自己完成第二个阶段。在内核完成数据拷贝后通知用户线程,同时将数据以回调的形式传递给用户线程。显然对于同步IO而言,第二个阶段的数据拷贝是由用户线程参与完成的,故在第二个阶段会发生阻塞;而对于异步IO而言,数据拷贝由于是内核自己完成的,故在第二个阶段不会发生阻塞
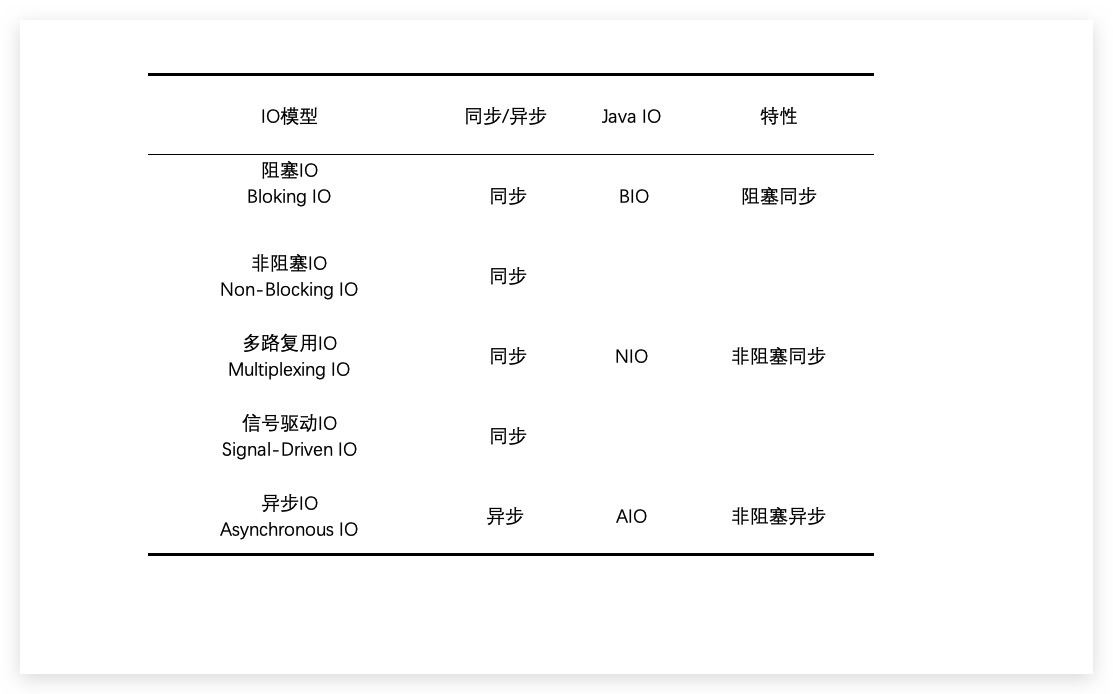
网络IO模型大致可分为两类五种,其中同步IO有四种,异步IO有一种:
- 对于Bloking IO阻塞IO模型而言,其在Java中就是经典的BIO。其特征为阻塞同步IO
- 对于Non-Blocking IO非阻塞IO模型而言,由于需要用户线程不断发起系统调用,频繁地在内核空间与用户空间之间进行切换,性能较低,故很少得到应用
- 相比较Non-Blocking IO非阻塞IO模型,取而代之的是Multiplexing IO多路复用IO技术。其将前者频繁地轮询操作交由操作系统内核来完成,是目前高并发网络应用的主流技术手段。其在Java中对应的就是Java 1.4中引入的NIO,其特征为非阻塞同步IO
- 对于Signal-Driven IO信号驱动IO模型而言,由于其不适用于TCP协议,故也很少被使用
- 对于Asynchronous IO异步IO模型来说,其在Java中对应的就是Java 1.7中引入的AIO,其特征为非阻塞异步IO
BIO
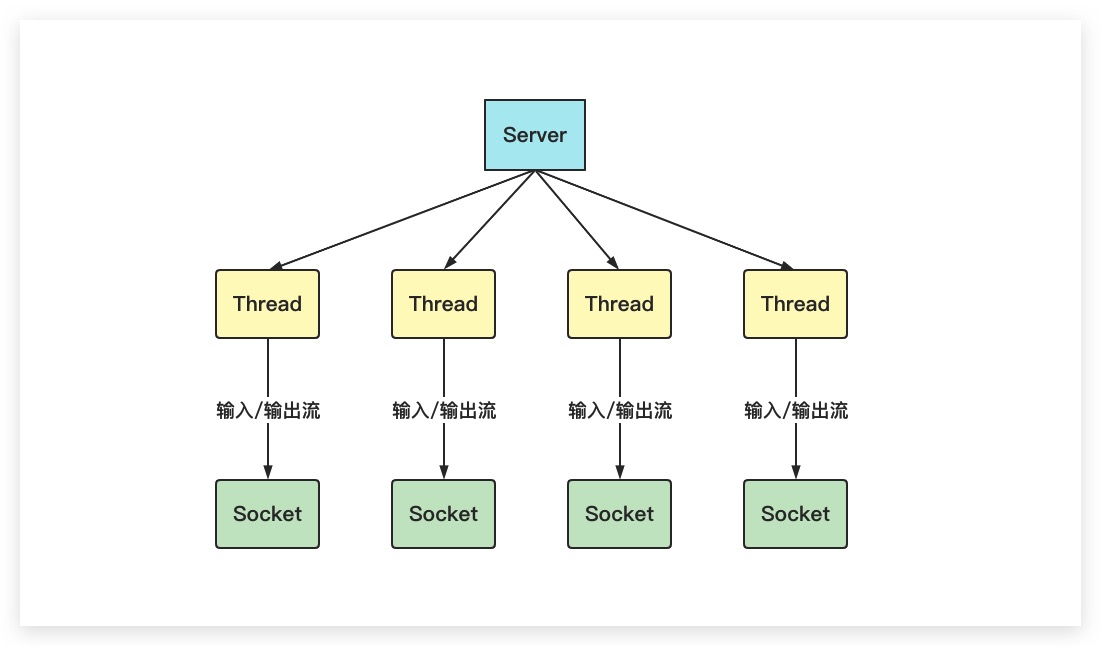
在Java 1.4之前BIO是Java网络编程唯一的选择,其特点是阻塞同步。由于accept、read方法均是阻塞操作。如果没有连接请求,accept方法阻塞;如果无数据可读取,read方法阻塞。故服务端侧需要为每一个客户端连接都提供一个线程。显然在BIO模型下,如果存在大量客户端连接,势必增大服务端的压力。甚至在极端情况下服务端会由于开启的线程过多而最终宕机,故为了保险起见。最佳的实践方式是通过线程池来提供、维护与客户端通信所需的线程
这里给出BIO模型下的服务端编程示例
1
2
3
4
5
6
7
8
9
10
11
12
13
14
15
16
17
18
19
20
21
22
23
24
25
26
27
28
29
30
31
32
33
34
35
36
37
38
39
40
41
42
43
44
45
46
47
48
49
50
51
|
public class Server {
public static void main(String[] args) {
try{
ServerSocket ss = new ServerSocket(9999);
while (true) {
Socket socket = ss.accept();
new MsgHandler( socket ).start();
}
}catch (IOException e) {
System.out.println("[Server]: Happen Exception: "+e.getMessage());
}
}
}
class MsgHandler extends Thread {
private Socket socket;
public MsgHandler(Socket socket) {
this.socket = socket;
}
@Override
public void run() {
try {
InputStream inputStream = socket.getInputStream();
BufferedReader bufferedReader = new BufferedReader( new InputStreamReader(inputStream));
System.out.println("[Server]: 客户端上线");
String msg;
while ( (msg=bufferedReader.readLine()) != null ) {
if( "Bye".equals(msg) ) {
break;
}
System.out.println("[Server]: " + msg);
}
bufferedReader.close();
socket.close();
} catch (Exception e) {
System.out.println("[Server]: Happen Exception: "+e.getMessage());
}
System.out.println("[Server]: 客户端下线");
}
}
|
这里给出BIO模型下的客户端编程示例
1
2
3
4
5
6
7
8
9
10
11
12
13
14
15
16
17
18
19
20
21
22
23
24
25
26
27
28
29
|
public class Client {
public static void main(String[] args) {
try (
Socket socket = new Socket("127.0.0.1", 9999);
PrintStream printStream = new PrintStream(socket.getOutputStream());
Scanner scanner = new Scanner(System.in) ) {
while (true) {
System.out.print("[Client]: 请说:");
String msg = scanner.nextLine();
if( "Bye".equals(msg) ) {
break;
}
printStream.println(msg);
printStream.flush();
}
socket.shutdownOutput();
} catch (Exception e) {
System.out.println("[Client]: Happen Exception: "+e.getMessage());
}
}
}
|
NIO
Java从1.4开始引入了非阻塞同步的NIO。不同于BIO,其支持面向Buffer缓冲区的、基于Channel通道的IO操作。在NIO模型中,有三个核心部分:Buffer缓冲区、Channel通道、Selector选择器
1. Buffer缓冲区
本质上是一块可以读取、写入数据的内存空间,其被包装为NIO Buffer对象。同时为了进一步方便操作,还提供了一组相应的API进行操作、管理。为了方便理解,这里通过实践的方式加强对缓冲区的认识
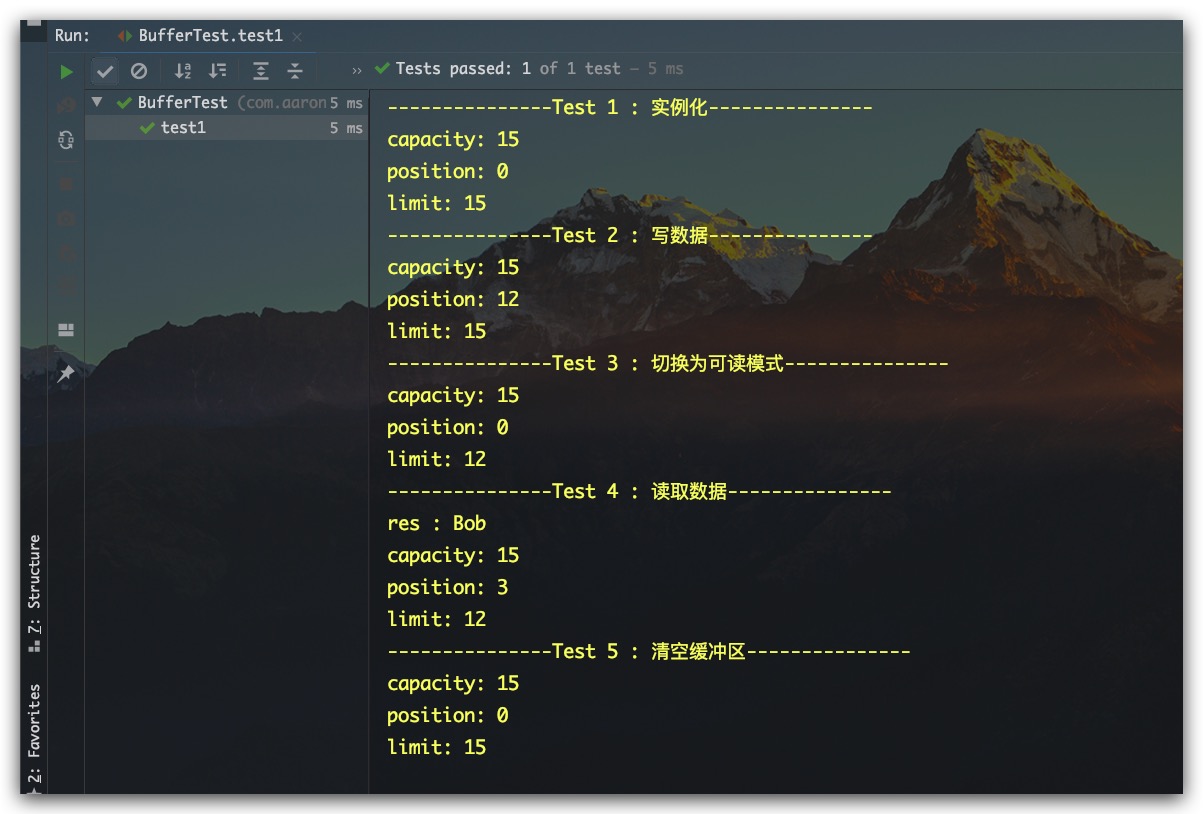
在Buffer中有两个最重要的游标:position、limit。前者表示下一个将要被写入或读取的元素索引,当调用get/put方法时会自动更新。其中,初始化值为0;后者表示读取、写入元素时的界限。当向Buffer写完数据、准备读取时,必须调用flip方法将其切换为可读模式。具体地,其会将buffer的limit设置为pos的值、将pos设置0,以实现从头读取。与此同时,可以通过clear方法将Buffer恢复至初始状态。具体地,将pos的值归零、limit设置为Buffer的容量值。这样即可再次写入数据以覆盖历史数据
1
2
3
4
5
6
7
8
9
10
11
12
13
14
15
16
17
18
19
20
21
22
23
24
25
26
27
28
29
30
31
32
33
34
35
36
37
38
| @Test
public void test1() {
System.out.println("---------------Test 1 : 实例化---------------");
ByteBuffer buffer = ByteBuffer.allocate(15);
System.out.println("capacity: " + buffer.capacity());
System.out.println("position: " + buffer.position());
System.out.println("limit: " + buffer.limit());
System.out.println("---------------Test 2 : 写数据---------------");
String msg = "BobAaronTina";
buffer.put( msg.getBytes() );
System.out.println("capacity: " + buffer.capacity());
System.out.println("position: " + buffer.position());
System.out.println("limit: " + buffer.limit());
System.out.println("---------------Test 3 : 切换为可读模式---------------");
buffer.flip();
System.out.println("capacity: " + buffer.capacity());
System.out.println("position: " + buffer.position());
System.out.println("limit: " + buffer.limit());
System.out.println("---------------Test 4 : 读取数据---------------");
byte[] bytes = new byte[3];
buffer.get( bytes );
String res = new String( bytes );
System.out.println("res : "+res);
System.out.println("capacity: " + buffer.capacity());
System.out.println("position: " + buffer.position());
System.out.println("limit: " + buffer.limit());
System.out.println("---------------Test 5 : 清空缓冲区---------------");
buffer.clear();
System.out.println("capacity: " + buffer.capacity());
System.out.println("position: " + buffer.position());
System.out.println("limit: " + buffer.limit());
}
|
测试结果,如下所示
在Buffer中,可通过mark、reset方法分别实现将当前pos值保存到mark变量中、将pos设置为mark变量的值。与此同时,还可以通过hasRemaining、remaining方法分别实现判断buffer中是否还有剩余元素、返回剩余元素的数量
1
2
3
4
5
6
7
8
9
10
11
12
13
14
15
16
17
18
19
20
21
22
23
24
25
26
27
28
29
30
31
32
33
34
35
36
37
38
39
40
41
42
43
44
45
46
47
48
| @Test
public void test2() {
ByteBuffer buffer = ByteBuffer.allocate(15);
String msg = "USHelloChina";
buffer.put( msg.getBytes() );
buffer.flip();
System.out.println("---------- 第一次读取 ----------");
for (int i=0;i<2;i++) {
char ch = (char) buffer.get();
System.out.println("char : " + ch);
}
System.out.println("position: " + buffer.position());
System.out.println("limit: " + buffer.limit());
System.out.println("---------- 标记位置 ----------");
buffer.mark();
System.out.println("---------- 第二次读取 ----------");
byte[] bytes = new byte[5];
buffer.get( bytes );
String res = new String( bytes );
System.out.println("res : "+res);
System.out.println("Buffer Info: " + buffer.toString());
System.out.println("---------- 回到标记位置 ----------");
buffer.reset();
System.out.println("position: " + buffer.position());
System.out.println("limit: " + buffer.limit());
System.out.println("---------- 第三次读取 ----------");
if ( buffer.hasRemaining() ) {
int size = buffer.remaining();
bytes = new byte[size];
buffer.get( bytes );
res = new String( bytes );
System.out.println("size : "+size);
System.out.println("res : "+res);
System.out.println("Buffer Info: " + buffer.toString());
}
}
|
测试结果,如下所示
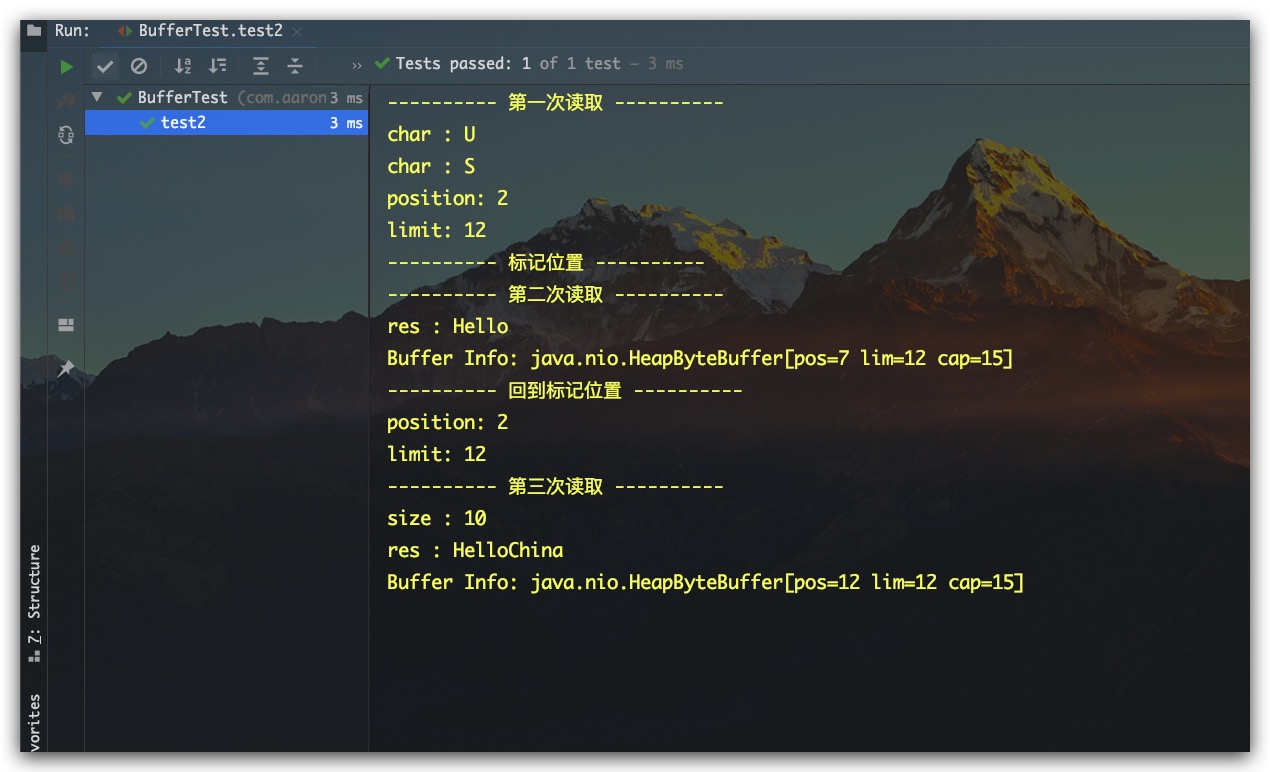
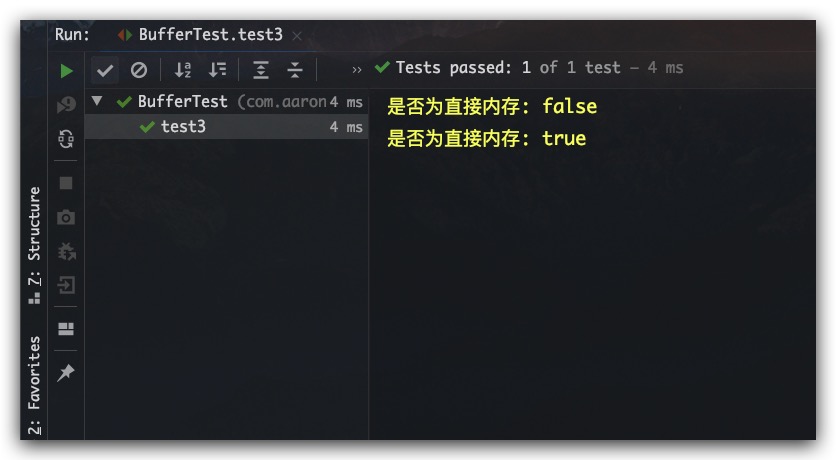
事实上,Buffer实例所使用的内存分为两种:堆内内存(即非直接内存)、堆外内存(即直接内存)
1
2
3
4
5
6
7
8
9
10
11
12
13
14
| @Test
public void test3() {
Buffer buffer1 = ByteBuffer.allocate(15);
boolean b1 = buffer1.isDirect();
System.out.println("是否为直接内存: " + b1);
ByteBuffer buffer2 = ByteBuffer.allocateDirect(15);
boolean b2 = buffer2.isDirect();
System.out.println("是否为直接内存: " + b2);
}
|
测试结果,如下所示
2. Channel通道
相比较传统的单向流(输入流、输出流)而言,通道是双向的。既可以读数据,也可以写数据
3. Selector选择器
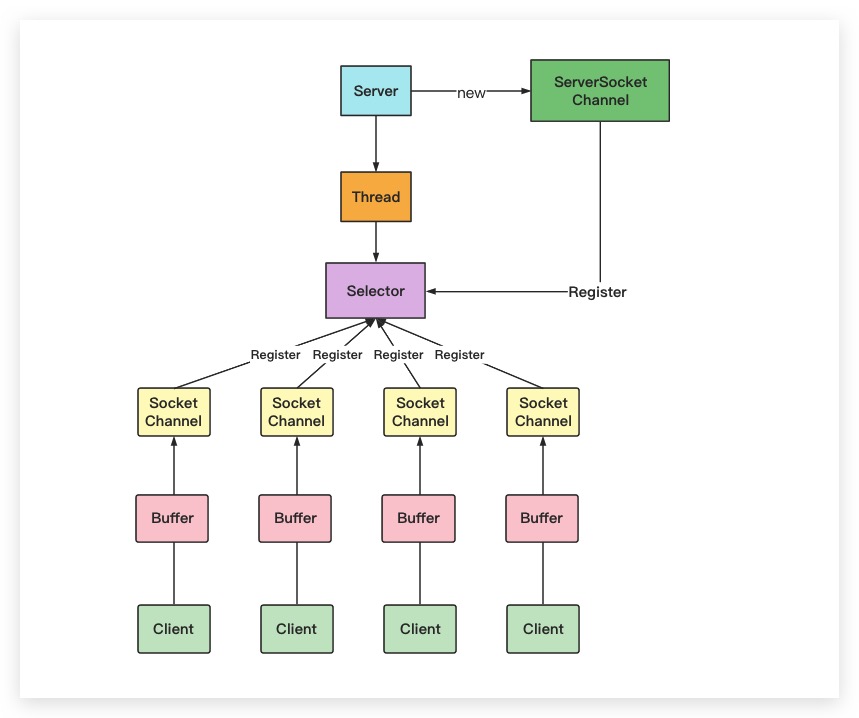
Selector选择器,也被称作为多路复用器,是Java NIO中最重要的部分。其可以同时管理多个通道,并确定其中的哪些通道已经准备好进行读取、写入操作。换言之,利用选择器可以实现通过一个线程管理多个通道,即管理多个客户端连接。NIO模型的示意图如下所示
这里给出NIO模型下的服务端编程示例
1
2
3
4
5
6
7
8
9
10
11
12
13
14
15
16
17
18
19
20
21
22
23
24
25
26
27
28
29
30
31
32
33
34
35
36
37
38
39
40
41
42
43
44
45
46
47
48
49
50
51
52
53
54
55
56
57
58
59
60
61
62
63
64
65
66
67
68
69
70
71
72
73
|
public class Server {
public static void main(String[] args) throws IOException {
ServerSocketChannel serverSocketChannel = ServerSocketChannel.open();
serverSocketChannel.configureBlocking(false);
serverSocketChannel.bind( new InetSocketAddress(8585) );
Selector selector = Selector.open();
serverSocketChannel.register( selector, SelectionKey.OP_ACCEPT);
while ( selector.select()>0 ) {
Iterator<SelectionKey> it = selector.selectedKeys().iterator();
while ( it.hasNext() ) {
SelectionKey selectionKey = it.next();
if( selectionKey.isAcceptable() ) {
System.out.println("[Server]: 客户端上线");
SocketChannel socketChannel = serverSocketChannel.accept();
socketChannel.configureBlocking(false);
socketChannel.register(selector, SelectionKey.OP_READ);
} else if( selectionKey.isReadable() ) {
StringBuilder sb = new StringBuilder();
SocketChannel socketChannel = (SocketChannel) selectionKey.channel();
ByteBuffer buffer = ByteBuffer.allocate(5);
int len = 0;
while ( (len=socketChannel.read(buffer)) > 0 ) {
buffer.flip();
String temp = new String(buffer.array(), 0, len);
sb.append( temp );
buffer.clear();
}
if( len==-1 ) {
selectionKey.cancel();
socketChannel.close();
System.out.println("[Server]: 客户端下线");
}
System.out.println("[Server]: " + sb.toString());
}
it.remove();
}
}
}
}
|
这里给出NIO模型下的客户端编程示例
1
2
3
4
5
6
7
8
9
10
11
12
13
14
15
16
17
18
19
20
21
22
23
24
25
26
27
28
29
30
31
32
33
34
35
36
37
38
39
40
41
42
43
44
45
46
|
public class Client {
public static void main(String[] args) throws IOException {
SocketChannel socketChannel = SocketChannel.open( new InetSocketAddress("127.0.0.1", 8585));
socketChannel.configureBlocking(false);
int bufferSize = 5;
ByteBuffer buffer = ByteBuffer.allocate(bufferSize);
Scanner scanner = new Scanner(System.in);
while (true) {
System.out.print("[Client]: 请说:");
String msg = scanner.nextLine();
if( "Bye".equals(msg) ) {
System.out.println("[Client]: 客户端下线");
break;
}
byte[] bytes = msg.getBytes();
int start = 0;
while ( start < bytes.length ) {
int length = start + bufferSize <= bytes.length ? bufferSize : bytes.length-start;
buffer.put(bytes, start, length);
buffer.flip();
socketChannel.write( buffer );
buffer.clear();
start = start + length;
}
}
socketChannel.close();
}
}
|
AIO
Java从1.7开始引入了非阻塞异步的AIO,作为对NIO的改进、增强,故其也被称为NIO 2.0。其分别引入了服务端异步Socket通道AsynchronousServerSocketChannel、客户端异步Socket通道AsynchronousSocketChannel,前者负责服务端Socket的创建、监听;后者负责客户端消息的读写操作。同时提供了一个CompletionHandler,作为消息处理回调接口
这里给出AIO模型下的服务端编程示例
1
2
3
4
5
6
7
8
9
10
11
12
13
14
15
16
17
18
|
public class Server {
public static void main(String[] args) throws IOException {
AsynchronousServerSocketChannel serverSocketChannel = AsynchronousServerSocketChannel.open();
serverSocketChannel.bind( new InetSocketAddress(9696) );
serverSocketChannel.accept( serverSocketChannel, new ServerHandler() );
while (true) {
}
}
}
|
当接受到客户端的连接请求后,我们需要提供一个相应的CompletionHandler实现类。进行业务逻辑处理。具体地,通过实现completed方法用于接受客户端请求、建立连接后的业务处理逻辑,通过实现failed方法用于进行服务端发生异常的处理逻辑。具体实现如下所示
1
2
3
4
5
6
7
8
9
10
11
12
13
14
15
16
17
18
19
20
21
22
23
24
25
26
27
28
29
30
31
32
33
34
35
36
37
38
39
40
41
42
43
44
45
46
47
48
49
50
51
52
53
54
55
56
57
58
59
|
public class ServerHandler implements CompletionHandler<AsynchronousSocketChannel, AsynchronousServerSocketChannel> {
@Override
public void completed(AsynchronousSocketChannel socketChannel, AsynchronousServerSocketChannel serverSocketChannel) {
serverSocketChannel.accept(serverSocketChannel, this);
ByteBuffer byteBuffer = ByteBuffer.allocate(2048);
socketChannel.read( byteBuffer, byteBuffer, new CompletionHandler<Integer, ByteBuffer>() {
@Override
public void completed(Integer result, ByteBuffer attachment) {
if(result == -1) {
try {
socketChannel.close();
} catch (IOException e) {
System.out.println("[Server]: happen exception, "+e.getMessage());
}
return;
}
attachment.flip();
String msg = new String(attachment.array(), 0, result);
attachment.clear();
System.out.println("[Server]: " + msg);
socketChannel.read(attachment, attachment, this);
}
@Override
public void failed(Throwable exc, ByteBuffer attachment) {
System.out.println("[Server]: happen exception, "+exc.getMessage());
}
} );
}
@Override
public void failed(Throwable exc, AsynchronousServerSocketChannel serverSocketChannel) {
System.out.println("[Server]: happen exception, "+exc.getMessage());
}
}
|
这里给出AIO模型下的客户端编程示例
1
2
3
4
5
6
7
8
9
10
11
12
13
14
15
16
17
18
19
20
21
22
23
24
25
26
27
28
29
30
31
32
33
34
35
36
37
38
|
public class Client {
public static void main(String[] args) throws IOException {
AsynchronousSocketChannel socketChannel = AsynchronousSocketChannel.open();
socketChannel.connect( new InetSocketAddress("127.0.0.1", 9696));
ByteBuffer buffer = ByteBuffer.allocate(1024);
Scanner scanner = new Scanner(System.in);
while (true) {
System.out.print("[Client]: 请说:");
String msg = scanner.nextLine();
if( "Bye".equals(msg) ) {
System.out.println("[Client]: 客户端下线");
break;
}
byte[] bytes = msg.getBytes();
buffer.put( msg.getBytes() );
buffer.flip();
socketChannel.write( buffer );
buffer.clear();
}
socketChannel.close();
}
}
|
参考文献
- 凤凰架构 周志明著


