在行为型设计模式中,Iterator Pattern 迭代器模式可以算是大家平常见的最多的、也是比较简单的一种设计模式了
模式思想
对于集合容器这类东西相信大家都不陌生,而且在日常开发中也是高频使用的。对于不同类型的集合容器而言,比如Set、List、Map等,数据元素在其中的存放方式可谓千差万别。此时如果直接遍历集合容器下的所有元素,显然需要开发者对集合容器的实现细节了解比较清楚。显然这种遍历的姿势既不方便也不优雅。而迭代器模式就是为了解决这一顽疾而出现的。该模式一方面提供了适用于各类型集合容器的统一的元素遍历接口,方便用户使用;另一方面亦可通过统一的接口获取各类型集合容器的迭代器实例。故对于大多数语言而言,基本都提供了相应容器集合的迭代器。该模式中有以下几个角色
- 抽象容器角色:通常在该角色中定义各类型集合容器的共有方法接口,其中包括用于获取迭代器的iterator方法。即本文例子中的Container容器接口
- 具体容器角色:其是抽象容器角色的具体实现,即某种类型的集合容器。其通过实现iterator方法来获取适用于该集合容器的具体迭代器角色的实例。即本文例子中的ArrayContainer数组容器类
- 抽象迭代器角色:其定义了对各类型集合容器进行遍历访问的通用方法接口。即本文例子中的Iterator迭代器接口
- 具体迭代器角色:其是抽象迭代器角色的具体实现,其可实现对某个类型的集合容器中元素的遍历访问。即本文例子中的ArrayContainerIterator数组容器迭代器类
实现
这里我们通过Java来自定义一个数组容器及其迭代器来演示该模式。首先来定义一个抽象容器角色,可以看到其只有一个iterator方法,用于获取容器的迭代器
1
2
3
4
5
6
7
8
9
10
|
public interface Container {
Iterator iterator();
}
|
然后我们来自定义一个数组容器,即所谓的具体容器角色。这里图方便,仅实现一些容器常用的方法。至于删除元素啥的方法,由于麻烦就懒的实现了……
1
2
3
4
5
6
7
8
9
10
11
12
13
14
15
16
17
18
19
20
21
22
23
24
25
26
27
28
29
30
31
32
33
34
35
36
37
38
39
40
41
42
43
44
45
46
47
48
49
50
51
52
53
54
55
56
57
|
public class ArrayContainer implements Container {
private Object[] array;
private int index;
public ArrayContainer(int size) {
array = new Object[size];
index = 0;
}
public boolean add(Object e) {
if( index < array.length ) {
array[index] = e;
index++;
return true;
}
return false;
}
public Object get(int index) {
if( index < array.length ) {
return array[index];
}
return null;
}
public int size() {
return array.length;
}
@Override
public Iterator iterator() {
return new ArrayContainerIterator( this );
}
}
|
现在就让我们来定义抽象迭代器角色,同样由于这里仅用于演示。故只定义了判断集合中是否还有元素的hasNext方法、获取集合中下一个元素的next方法。实际使用中还可以按需添加方法接口,比如获取集合中的第一个元素、获取集合中的最后一个元素、删除迭代器刚刚获取到的元素等等
1
2
3
4
5
6
7
8
9
10
11
12
13
14
15
16
|
public interface Iterator {
boolean hasNext();
Object next();
}
|
好了,现在我们来实现一个用于遍历ArrayContainer容器的具体迭代器角色,即ArrayContainerIterator类
1
2
3
4
5
6
7
8
9
10
11
12
13
14
15
16
17
18
19
20
21
22
23
24
25
26
27
28
29
30
31
32
33
34
35
36
37
38
39
40
|
public class ArrayContainerIterator implements Iterator{
private ArrayContainer arrayContainer;
private int size;
private Integer cursor;
public ArrayContainerIterator(ArrayContainer arrayContainer) {
this.arrayContainer = arrayContainer;
this.size = arrayContainer.size();
this.cursor = 0;
}
@Override
public boolean hasNext() {
if( cursor < size ) {
return true;
}
return false;
}
@Override
public Object next() {
Object e = arrayContainer.get(cursor);
cursor++;
return e;
}
}
|
可以看到在整个迭代器模式下,代码实现都是比较简单的。相信大家直接看源码就可以领会精神了。现在让我们尝试下使用迭代器来遍历访问集合容器吧
1
2
3
4
5
6
7
8
9
10
11
12
13
14
15
16
17
18
19
20
21
22
23
|
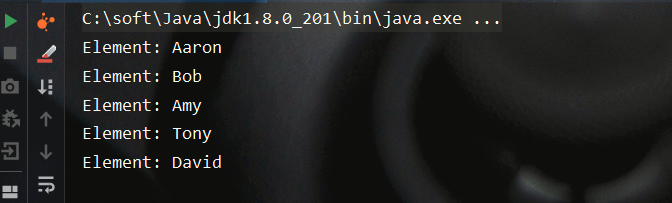
public class IteratorPatternDemo {
public static void main(String[] args) {
ArrayContainer arrayContainer = new ArrayContainer(5);
arrayContainer.add("Aaron");
arrayContainer.add("Bob");
arrayContainer.add("Amy");
arrayContainer.add("Tony");
arrayContainer.add("David");
Iterator iterator = arrayContainer.iterator();
while( iterator.hasNext() ) {
Object e = iterator.next();
System.out.println("Element: " + e);
}
}
}
|
测试结果如下,符合预期
参考文献
- Head First 设计模式 弗里曼著
