Prototype Pattern 原型模式的目的是快速地复制出一个重复的对象实例,其同样是创建型模式的一种。这个被复制的实例即为原型
概述
如果需要创建一个重复的对象实例,常见的方式是通过构造器new并不断调用setXxx方法来实现。这样做一来繁琐不够简洁,二来效率较低。而且不便于在运行时动态改变类的具体实现类型。而 Prototype Pattern 原型模型则可以更好的解决这个问题。在Prototype Pattern 原型模式中,其有两个角色:
- 原型抽象角色:其定义了具体原型角色所需要实现的方法,在Java中可通过接口或抽象类类实现
- 具体抽象原型:其是原型抽象角色的具体实现类,需要在具体的实现类中实现克隆复制的具体方法
基于接口(抽象类)-实现的设计思想,将定义与实现进行了解耦。方便运行时动态改变具体的实现
实现
在Java中天然的支持对实例对象进行克隆复制,只需实现Cloneable接口、重写clone方法即可。而且通过克隆机制创建实例,相比较于构造器的方式而言,大大提高了效率。现在我们通过Java来实现原型模式以更好的理解它。首先定义一个Animal抽象类,其定义了一些共有的方法,并重写了clone方法以通过Java克隆机制的深拷贝实现对原型对象的复制
1
2
3
4
5
6
7
8
9
10
11
12
13
14
15
16
17
18
19
20
21
22
23
24
25
|
@Getter
@Setter
public abstract class Animal implements Cloneable {
private String description;
private String type;
abstract public void getInfo();
public Animal clone() {
Animal animal = null;
try{
animal = (Animal) super.clone();
} catch (CloneNotSupportedException e) {
return null;
}
return animal;
}
}
|
然后定义了Animal的具体实现类——Cat、Dog
1
2
3
4
5
6
7
8
9
10
11
12
13
14
15
16
17
18
19
20
21
22
23
24
25
26
27
28
29
30
31
32
33
34
35
36
37
38
39
40
41
42
43
44
45
46
47
48
49
50
51
|
@Getter
@Setter
public class Cat extends Animal {
private Double catWeight;
public Cat(String description, String type, Double catWeight){
setDescription(description);
setType(type);
this.catWeight = catWeight;
}
@Override
public void getInfo() {
String info = "["+ getType() +"]: " + getDescription() + ", catWeight: " + getCatWeight();
System.out.println(info);
}
@Override
public Cat clone() {
return (Cat) super.clone();
}
}
...
@Getter
@Setter
public class Dog extends Animal {
private Boolean isMale;
public Dog(String description, String type, Boolean isMale){
setDescription(description);
setType(type);
this.isMale = isMale;
}
@Override
public void getInfo() {
String info = "["+ getType() +"]: " + getDescription() + ", isMale: " + getIsMale();
System.out.println(info);
}
@Override
public Dog clone() {
return (Dog) super.clone();
}
}
|
至此,Prototype Pattern 原型模式就已经实现完毕了,可以看到其还是比较简单易懂的。现在我们来测试下
1
2
3
4
5
6
7
8
9
10
11
12
13
14
15
16
17
18
19
20
21
22
23
| public class PrototypePatternDemo1Test {
public static void main(String[] args) {
System.out.println("----------- Test 1 -----------");
Cat cat1 = new Cat("我是一只猫", "Cat", 2.0);
Animal cat2 = cat1.clone();
cat1.getInfo();
cat2.getInfo();
System.out.println(cat1);
System.out.println(cat2);
System.out.println("----------- Test 2 -----------");
Dog dog1 = new Dog("我是一只边牧", "Dog", true);
Animal dog2 = dog1.clone();
dog1.getInfo();
dog2.getInfo();
System.out.println(dog1);
System.out.println(dog2);
}
}
|
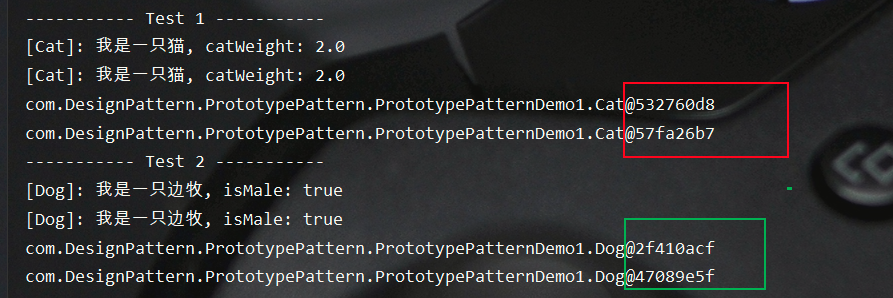
测试结果如下,可以看到原型对象被正确的复制了
参考文献
- Head First 设计模式 弗里曼著
