Java的HashSet、HashMap集合应用及底层原理,相信大家都已经很熟悉了,这里就不再赘述了。这里主要来介绍下如何Java中的LinkedHashMap集合,同时也介绍下基于LinkedHashMap的LinkedHashSet集合、LRU算法实现
LinkedHashMap 插入顺序遍历 LinkedHashMap集合是基于HashMap实现的,所以它具有HashMap的特性。但是我们在使用HashMap遍历的过程中会存在一个显著的问题,其不是按我们的插入顺序进行遍历的,而LinkedHashMap则恰好可以解决这个问题。这里我们结合JDK中LinkedHashMap的源码进行分析。在LinkedHashMap中,其为每个条目entry添加了头指针before、尾指针after,同时在整个Map中维护了链表头head、链表尾。换句话说,LinkedHashMap不仅仅是一个HashMap,同时还在内部维护了一个双向链表以便可以按插入顺序来遍历条目entry
1
2
3
4
5
6
7
8
9
10
11
12
13
14
15
16
17
18
19
20
21
22
23
public class LinkedHashMap <K,V> extends HashMap <K,V> implements Map <K,V>{ ... static class Entry <K,V> extends HashMap .Node<K,V> { Entry<K,V> before, after; Entry(int hash, K key, V value, Node<K,V> next) { super (hash, key, value, next); } } transient LinkedHashMap.Entry<K,V> head; transient LinkedHashMap.Entry<K,V> tail; ... }
这里以添加新条目entry为例说明LinkedHashMap是如何记录保存插入顺序的。LinkedHashMap重载了HashMap的newNode、newTreeNode方法,在每次添加一个新的条目entry时,通过linkNodeLast()方法将其添加到双向链表的尾部来记录保存插入顺序
1
2
3
4
5
6
7
8
9
10
11
12
13
14
15
16
17
18
19
20
21
22
23
24
25
26
27
28
public class LinkedHashMap <K,V> extends HashMap <K,V> implements Map <K,V>{ ... Node<K,V> newNode (int hash, K key, V value, Node<K,V> e) { LinkedHashMap.Entry<K,V> p = new LinkedHashMap .Entry<K,V>(hash, key, value, e); linkNodeLast(p); return p; } TreeNode<K,V> newTreeNode (int hash, K key, V value, Node<K,V> next) { TreeNode<K,V> p = new TreeNode <K,V>(hash, key, value, next); linkNodeLast(p); return p; } private void linkNodeLast (LinkedHashMap.Entry<K,V> p) { LinkedHashMap.Entry<K,V> last = tail; tail = p; if (last == null ) head = p; else { p.before = last; last.after = p; } } ... }
对于遍历,我们以forEach方法为例来进行说明。LinkedHashMap同样重载了HashMap的forEach方法,遍历时依据链表按照从表头到表尾的顺序进行遍历,这样即保证了我们遍历时是按照元素的插入顺序进行遍历的
1
2
3
4
5
6
7
8
9
10
11
12
13
14
public class LinkedHashMap <K,V> extends HashMap <K,V> implements Map <K,V>{ ... public void forEach (BiConsumer<? super K, ? super V> action) { if (action == null ) throw new NullPointerException (); int mc = modCount; for (LinkedHashMap.Entry<K,V> e = head; e != null ; e = e.after) action.accept(e.key, e.value); if (modCount != mc) throw new ConcurrentModificationException (); } ... }
这里我们提供一个简单的Java Demo,来验证其遍历顺序是否和我们的插入顺序一致
1
2
3
4
5
6
7
8
9
10
public class LinkedHashMapTest { public static void testLinkedHashMap1 () { LinkedHashMap<String, Integer> linkedHashMap = new LinkedHashMap <>(); linkedHashMap.put("Bob" ,37 ); linkedHashMap.put("Tony" ,27 ); linkedHashMap.put("Aaron" ,23 ); linkedHashMap.forEach( (k,v) -> System.out.println("K : " + k + " V : " + v ) ); } }
测试结果如下,符合我们的预期
访问顺序遍历 如果研究JDK源码会发现,在LinkedHashMap中,其不仅提供了用于创建Map的常见构造器,还提供了一个 LinkedHashMap(int initialCapacity, float loadFactor, boolean accessOrder) 构造器,其增加了我们对accessOrder字段的控制,该字段用于控制遍历的顺序,其在其它构造器中默认为false,即是按照条目entry插入顺序进行遍历,上文的测试代码也佐证了这一点
1
2
3
4
5
6
7
8
9
10
11
12
13
14
15
16
17
18
19
20
21
22
23
24
25
26
27
28
29
public class LinkedHashMap <K,V> extends HashMap <K,V> implements Map <K,V>{ ... final boolean accessOrder; public LinkedHashMap () { super (); accessOrder = false ; } public LinkedHashMap (int initialCapacity) { super (initialCapacity); accessOrder = false ; } public LinkedHashMap (int initialCapacity, float loadFactor) { super (initialCapacity, loadFactor); accessOrder = false ; } public LinkedHashMap (int initialCapacity, float loadFactor, boolean accessOrder) { super (initialCapacity, loadFactor); this .accessOrder = accessOrder; } ... }
现在我们结合JDK源码,以get方法为例来说明accessOrder字段的作用,可以看到当我们通过get方法访问Map中的某个entry时,如果accessOrder为true时,会将该条目entry移动到链表的最后。与之类似地,当使用put方法对已有的entry进行修改时,同样可以也会调用afterNodeAccess方法
1
2
3
4
5
6
7
8
9
10
11
12
13
14
15
16
17
18
19
20
21
22
23
24
25
26
27
28
29
30
31
32
33
34
35
36
37
38
39
public class LinkedHashMap <K,V> extends HashMap <K,V> implements Map <K,V>{ ... public V get (Object key) { Node<K,V> e; if ((e = getNode(hash(key), key)) == null ) return null ; if (accessOrder) afterNodeAccess(e); return e.value; } void afterNodeAccess (Node<K,V> e) { LinkedHashMap.Entry<K,V> last; if (accessOrder && (last = tail) != e) { LinkedHashMap.Entry<K,V> p = (LinkedHashMap.Entry<K,V>)e, b = p.before, a = p.after; p.after = null ; if (b == null ) head = a; else b.after = a; if (a != null ) a.before = b; else last = b; if (last == null ) head = p; else { p.before = last; last.after = p; } tail = p; ++modCount; } } ... }
这样当我们对其进行遍历即会发现,最近被访问过的元素反而会最后输出。当然很多人会对此感到奇怪,为什么最近使用的entry不是放到表头而是放在表尾,毕竟曾经被访问过的条目entry应该优先被遍历啊。其实是因为Map中添加新元素是添加到链表的表尾。那么对于这个链表而言,表头的元素就是存在其中时间最久的。如果这是一个容量有限的Map时,就可以通过移除表头的条目来释放空间以添加新的条目。一般地,我们认为对于曾经被访问过的条目entry,其下一次依然被访问的概率会较大,故将其移动到表尾将存在时间置零。当然JDK中认为Map的容量是无限的,所以其虽然提供了一个removeEldestEntry方法来判定是否需要移除存在时间最久的条目,但是该方法结果恒为false,即不移除。下文我们会利用这一特性来实现一个基于LinkedHashMap的LRU算法
1
2
3
4
5
6
7
8
9
10
11
12
13
14
15
16
17
18
public class LinkedHashMap <K,V> extends HashMap <K,V> implements Map <K,V>{ ... void afterNodeInsertion (boolean evict) { LinkedHashMap.Entry<K,V> first; if (evict && (first = head) != null && removeEldestEntry(first)) { K key = first.key; removeNode(hash(key), key, null , false , true ); } } protected boolean removeEldestEntry (Map.Entry<K,V> eldest) { return false ; } ... }
这里我们提供一个简单的Java Demo,来验证曾经被访问的元素是否会被移动到链表的最后
1
2
3
4
5
6
7
8
9
10
11
12
13
14
15
16
17
public static void testLinkedHashMap2 () { LinkedHashMap<String, Integer> linkedHashMap = new LinkedHashMap <>(16 ,0.75f ,true ); linkedHashMap.put("Bob" ,37 ); linkedHashMap.put("Tony" ,27 ); linkedHashMap.put("Aaron" ,23 ); System.out.println("------------ Before Access ------------" ); linkedHashMap.forEach( (k,v) -> System.out.println("K : " + k + " V : " + v ) ); linkedHashMap.put("Tony" ,23 ); System.out.println("------------ Access \"Tony\" ------------" ); linkedHashMap.forEach( (k,v) -> System.out.println("K : " + k + " V : " + v ) ); linkedHashMap.get("Bob" ); System.out.println("------------ Access \"Bob\" ------------" ); linkedHashMap.forEach( (k,v) -> System.out.println("K : " + k + " V : " + v ) ); }
测试结果如下,符合我们的预期
LinkedHashSet LinkedHashSet与LinkedHashMap的关系就如同HashSet与HashMap一样。LinkedHashSet内部依然是利用LinkHashMap来实现的,通过key来存储元素,而value则是无效的。值得一提的是,LinkedHashSet只支持按插入顺序进行遍历,即accessOrder字段恒为false,不可修改
LRU算法 一般情况下,内存空间是有限的昂贵的,我们不可能将所有数据全部装进内存中,当内存需要添加新数据而空间已满的情况下,我们就需要通过合适的内存管理算法策略来淘汰一些数据释放以内存空间。这里我们介绍一种常见的内存管理策略——LRU(Least Recently Used,最近最少使用)算法,其依据就是较长时间未被使用的数据其下一次被访问到的概率较低,故我们可以优先淘汰此部分的数据来释放内存
上文我们介绍了LinkedHashMap的accessOrder字段,其为true可以将被访问的数据移动到链表的表尾。这里我们就可以基于此特性来实现一个应用LRU策略的缓存。我们重载removeEldestEntry方法,当发现缓存空间已满时,即删除表头数据来释放空间
1 2 3 4 5 6 7 8 9 10 11 12 13 14 15 16 17 18 19 20 21 public class LRUCache <K,V> extends LinkedHashMap <K,V> { private int cacheSize; public LRUCache (int cacheSize) { super (16 ,0.75f , true ); this .cacheSize = cacheSize; } @Override protected boolean removeEldestEntry (Map.Entry<K, V> eldest) { return this .size() > cacheSize; } }
现在我们编写一个测试用例,来验证其工作状态是否符合我们的预期
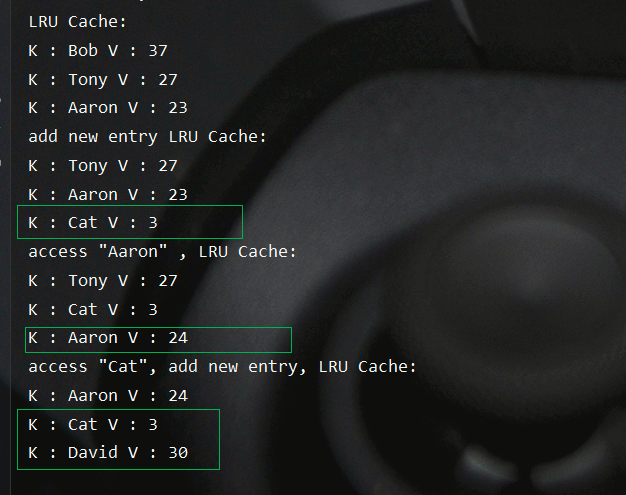
1
2
3
4
5
6
7
8
9
10
11
12
13
14
15
16
17
18
19
20
21
22
23
24
25
26
27
public class LRUCacheTest { public static void testLRUCache () { LRUCache<String, Integer> lruCache = new LRUCache <>(3 ); lruCache.put("Bob" ,37 ); lruCache.put("Tony" ,27 ); lruCache.put("Aaron" ,23 ); System.out.println("LRU Cache:" ); lruCache.forEach( (k,v) -> System.out.println("K : " + k + " V : " + v ) ); lruCache.put("Cat" , 3 ); System.out.println("add new entry LRU Cache:" ); lruCache.forEach( (k,v) -> System.out.println("K : " + k + " V : " + v ) ); lruCache.put("Aaron" , 24 ); System.out.println("access \"Aaron\" , LRU Cache:" ); lruCache.forEach( (k,v) -> System.out.println("K : " + k + " V : " + v ) ); lruCache.get("Cat" ); lruCache.put("David" , 30 ); System.out.println("access \"Cat\", add new entry, LRU Cache:" ); lruCache.forEach( (k,v) -> System.out.println("K : " + k + " V : " + v ) ); } }
测试结果如下