Seata是Spring Cloud Alibaba中一款开源的分布式事务解决方案,本文具体就Seata的AT模式进行介绍、实践

基本原理
在Seata的设计架构中有三个角色,具体如下
- TC(Transaction Coordinator): 事务协调者。维护全局和分支事务的状态,驱动全局事务提交或回滚
- TM(Transaction Manager): 事务管理器。定义全局事务的范围,用于开始、提交、回滚全局事务
- RM(Resource Manager): 资源管理器。管理分支事务处理的资源,与TC通讯以注册分支事务和报告分支事务的状态,并驱动分支事务进行提交或回滚
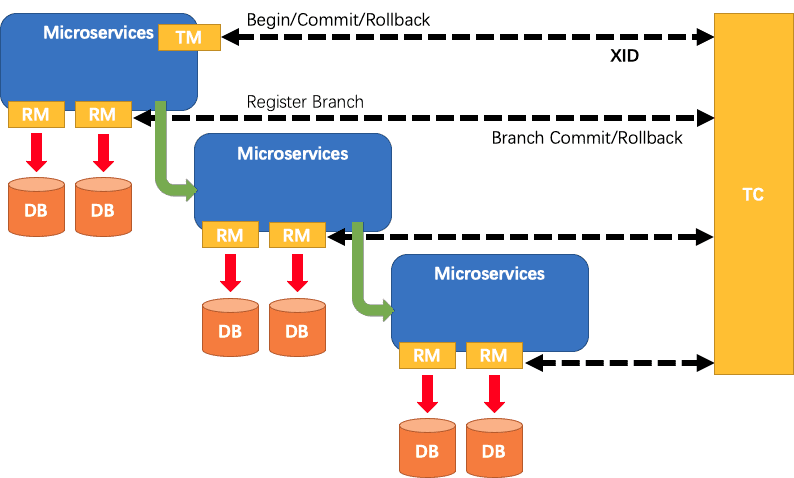
TC是Seata的服务端需独立部署,而TM、RM则是作为Seata的客户端与各微服务进行集成。三者之间的流程关系如下图所示。具体地,Seata的分布式事务模型是基于 2PC(两阶段提交,Tow-Phase Commit) 协议,基本执行流程如下
- TM向TC申请开启一个分布式事务,事务创建成功后会生成一个全局唯一的事务ID,即所谓的XID
- RM向TC注册分支事务,汇报资源准备状态
- TM通知TC 提交/回滚 分布式事务,事务一阶段结束
- TC汇总各分支事务信息,决定分布式事务是提交还是回滚
- TC通知所有RM 提交/回滚 资源,分布式事务的二阶段结束
具体地,Seata支持AT、TCC、Saga、XA四种模式。这里就AT模式进行展开说明,其是一种无侵入的分布式事务解决方案,使得开发者只需关注自己的业务SQL即可。Seata会自动进行二阶段的提交/回滚。流程如下
- 一阶段: Seata对业务SQL进行拦截、语义解析,进而确定业务SQL需要操作的相关业务数据记录。然后在执行业务SQL前,将相关业务数据记录保存为Before Image。在执行业务SQL后,再将其保存成After Image。并最终生成行锁。上述操作会在一个数据库的本地事务内完成,以保证一阶段操作的原子性

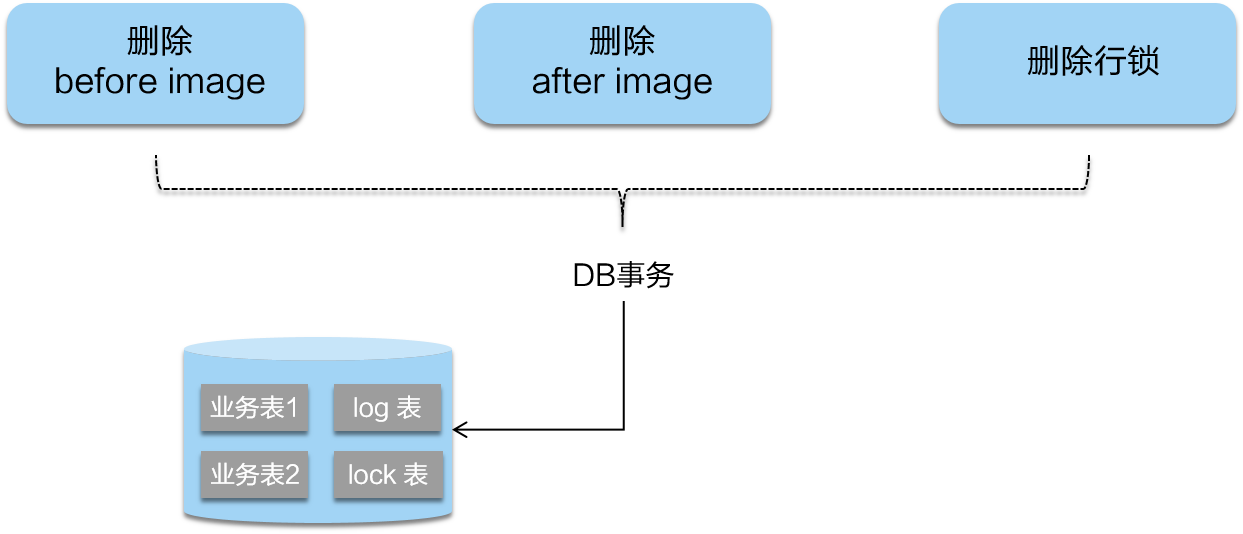
- 二阶段提交: 二阶段提交时,因为业务SQL在一阶段已经提交至各数据库。故Seata只需将一阶段保存的快照数据和行锁删掉,完成数据清理即可
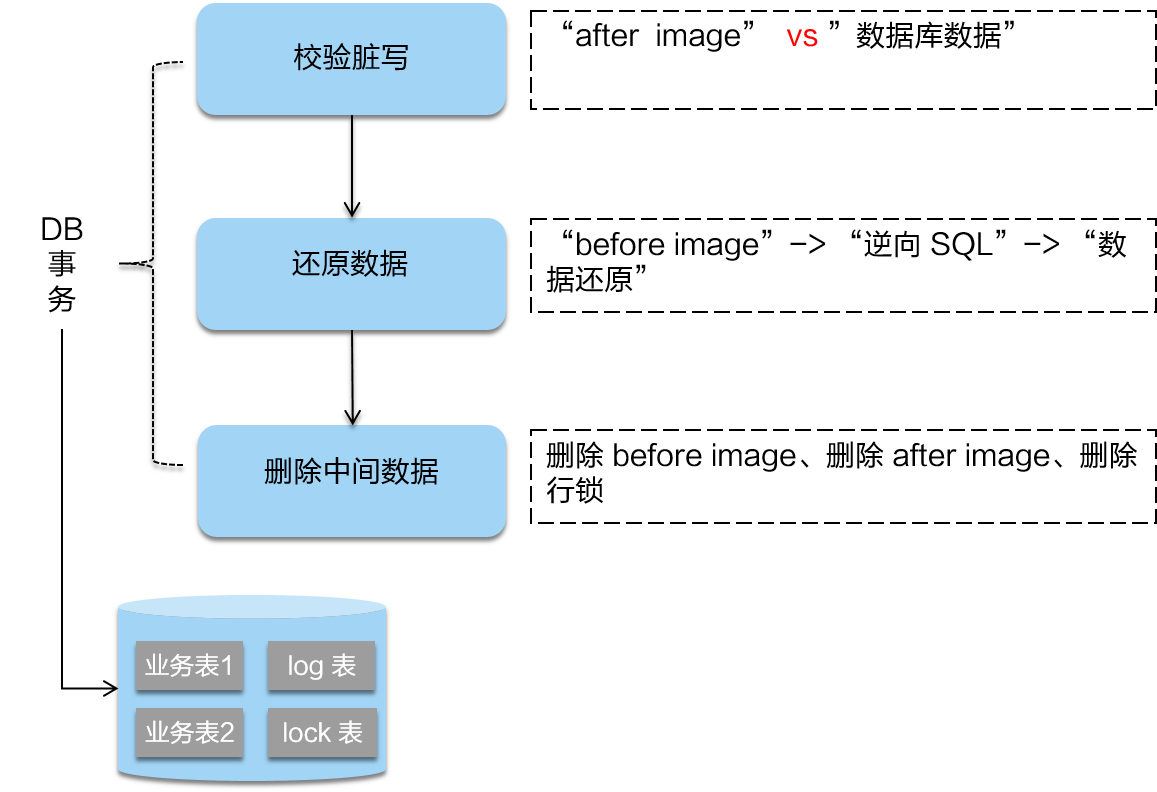
- 二阶段回滚: 二阶段回滚时,首先需要对数据库当前相关的数据与After Image进行比对,如果完全一致,这说明未发生脏写。即没有被除当前全局事务之外的其他操作修改过,可以放心进行回滚。而具体回滚则是通过Before Image生成逆向SQL来进行反向补偿,并最终删除相应快照数据和行锁
基于Seata AT模式的实践
搭建Seata Server环境
基于Docker Compose的服务部署
Seata Server事实上就是上文提到的事务协调者TC。这里通过Docker Compose来进行部署,如下所示。可以看到我们不仅创建了Seata Server服务,还创建了MySQL、Nacos服务。后面会一一进行解释
1
2
3
4
5
6
7
8
9
10
11
12
13
14
15
16
17
18
19
20
21
22
23
24
25
26
27
28
29
30
31
32
33
34
35
36
37
38
39
40
41
42
43
44
45
46
47
48
49
|
version: '3.8'
services:
Seata-Service-1:
image: seataio/seata-server:1.3.0
container_name: Seata-Service-1
ports:
- "9091:8091"
networks:
seata_service_net:
ipv4_address: 120.120.120.21
depends_on:
- MySQL-Service-1
- Nacos-Service-1
MySQL-Service-1:
image: mysql:5.7
container_name: MySQL-Service-1
ports:
- "9306:3306"
environment:
MYSQL_ROOT_PASSWORD: 12345
networks:
seata_service_net:
ipv4_address: 120.120.120.22
Nacos-Service-1:
image: nacos/nacos-server:1.4.2
container_name: Nacos-Service-1
ports:
- "9848:8848"
environment:
MODE: standalone
networks:
seata_service_net:
ipv4_address: 120.120.120.23
networks:
seata_service_net:
ipam:
config:
- subnet: 120.120.120.0/24
|
配置Seata Server的持久化
Seata-Server支持多种持久化方式包括文件、DB、Redis等,默认为文件File。这里我们使用刚刚部署MySQL-Service-1服务进行持久化。进入Seata-Service-1容器,修改/seata-server/resources下的file.conf文件,将存储模式修改为db,同时修改相应的数据库连接信息。如下所示,可以看到这里datasource我们选择了druid

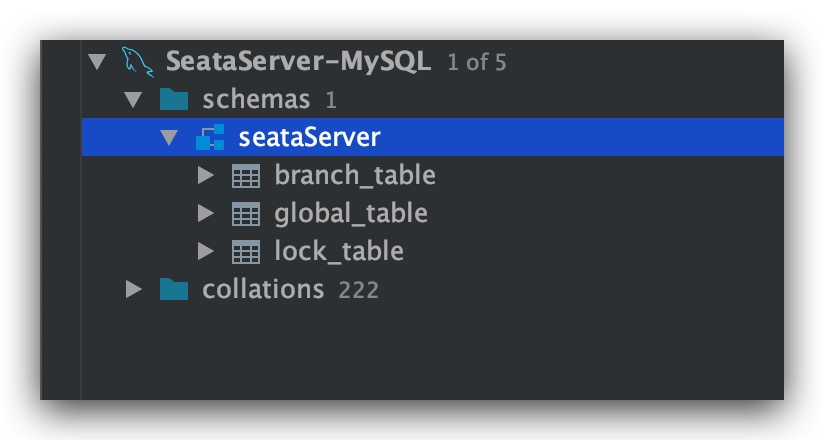
然后,通过数据库客户端连接MySQL-Service-1实例。首先创建file.conf文件中所连接的数据库seataServer,然后在该数据库中执行建表语句。其中SQL脚本可通过Github进行获取,地址如下所示
1
2
|
https://github.com/seata/seata/blob/1.3.0/script/server/db/mysql.sql
|
效果如下所示
配置Seata Server的注册中心、配置中心
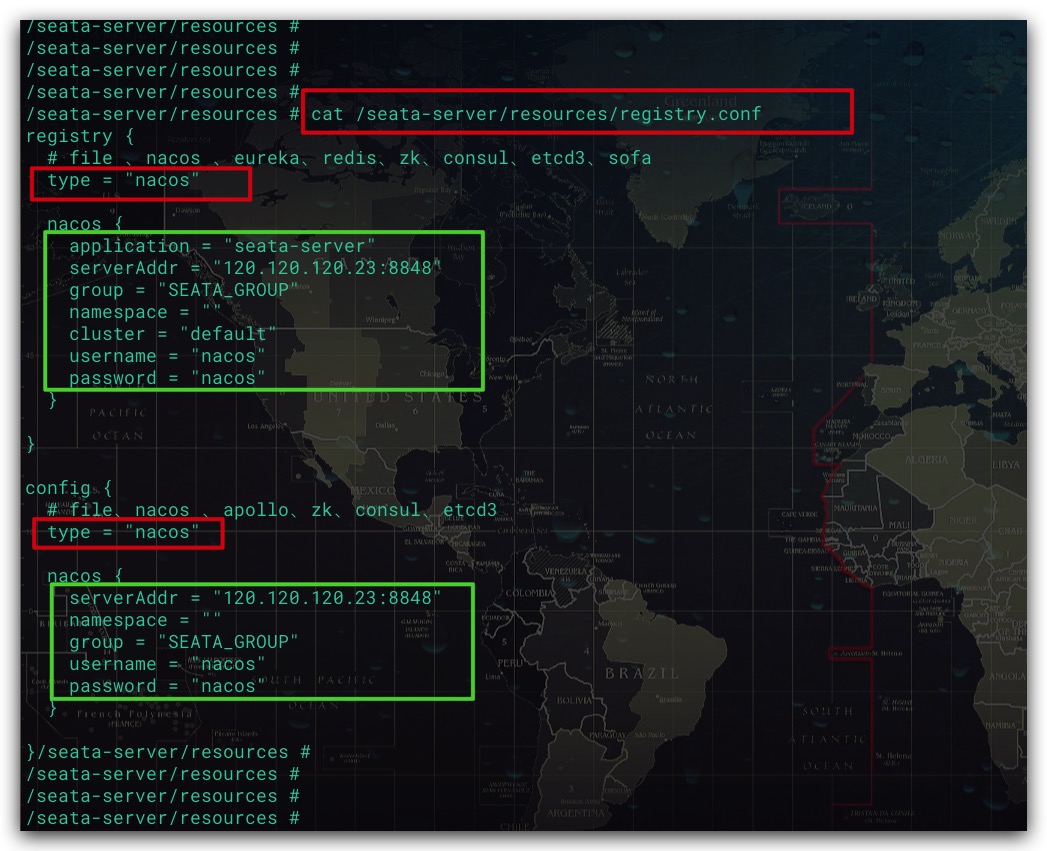
前面提到,我们还创建了一个Nacos容器,即Nacos-Service-1实例。其是用于作为整个分布式环境的配置中心、注册中心。同样进入Seata-Service-1容器,修改/seata-server/resources下的registry.conf文件。将注册中心、配置中心均设置Nacos。详细配置如下所示
导入配置信息至Nacos
事实上对于Seata而言,其配置信息支持两种形式:本地文件、配置中心。对于后者而言,我们需要将Seata的相关配置项导入到配置中心。同样,我们需要通过Github来下载配置文件config.txt及相应的导入脚本nacos-config.sh
1
2
3
4
5
|
https://github.com/seata/seata/blob/1.3.0/script/config-center/config.txt
https://github.com/seata/seata/blob/1.3.0/script/config-center/nacos/nacos-config.sh
|
对于配置文件config.txt而言,有以下两点需要注意
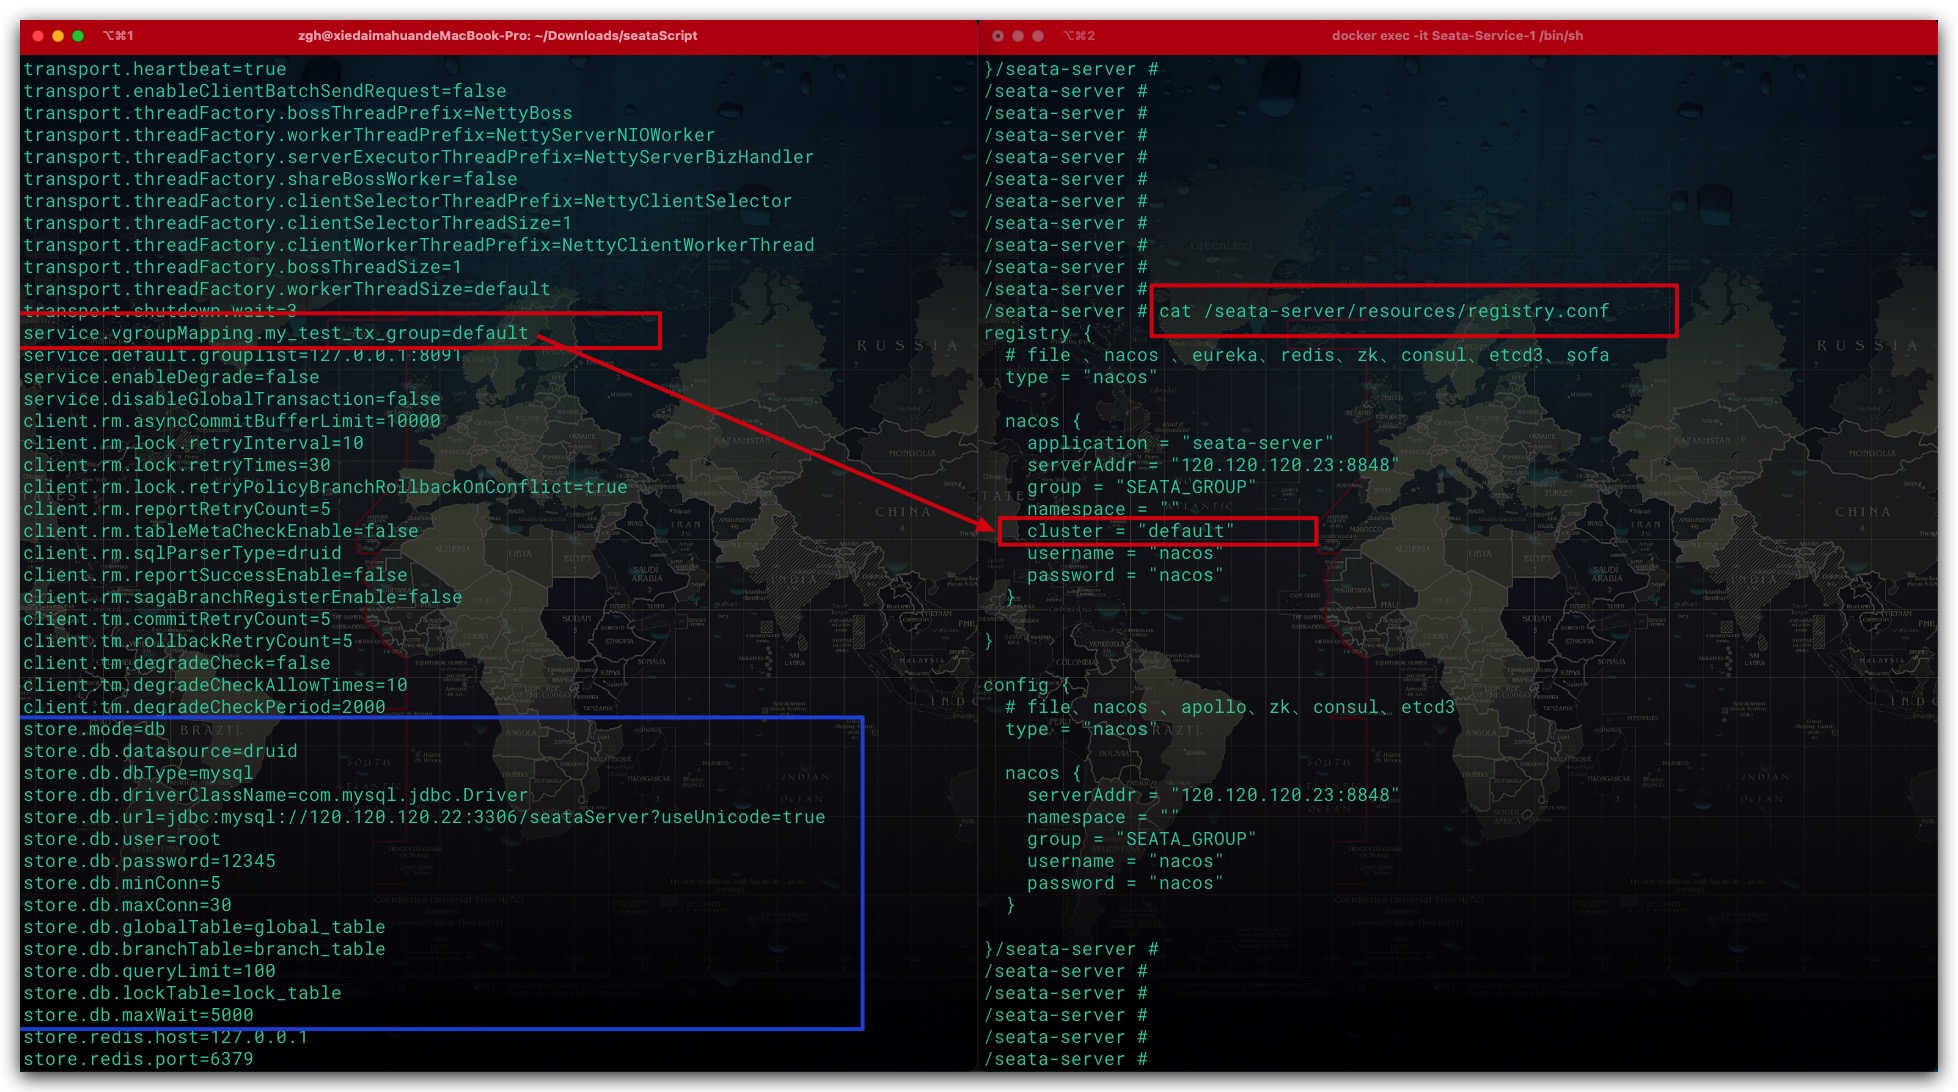
- 将配置项store.mode存储模式修改为db,同时修改以store.db为前缀的相关配置项,保证其与file.conf文件中相关数据库的配置一致
- 配置项service.vgroupMapping.my_test_tx_group=default的含义是,事务分组my_test_tx_group使用名为default的Seata Server集群。换言之,my_test_tx_group即为事务分组的名称,支持自定义。这里我们直接使用默认的事务分组名。而Seata Server集群名default实际上就是来自registry.conf文件的cluster配置项
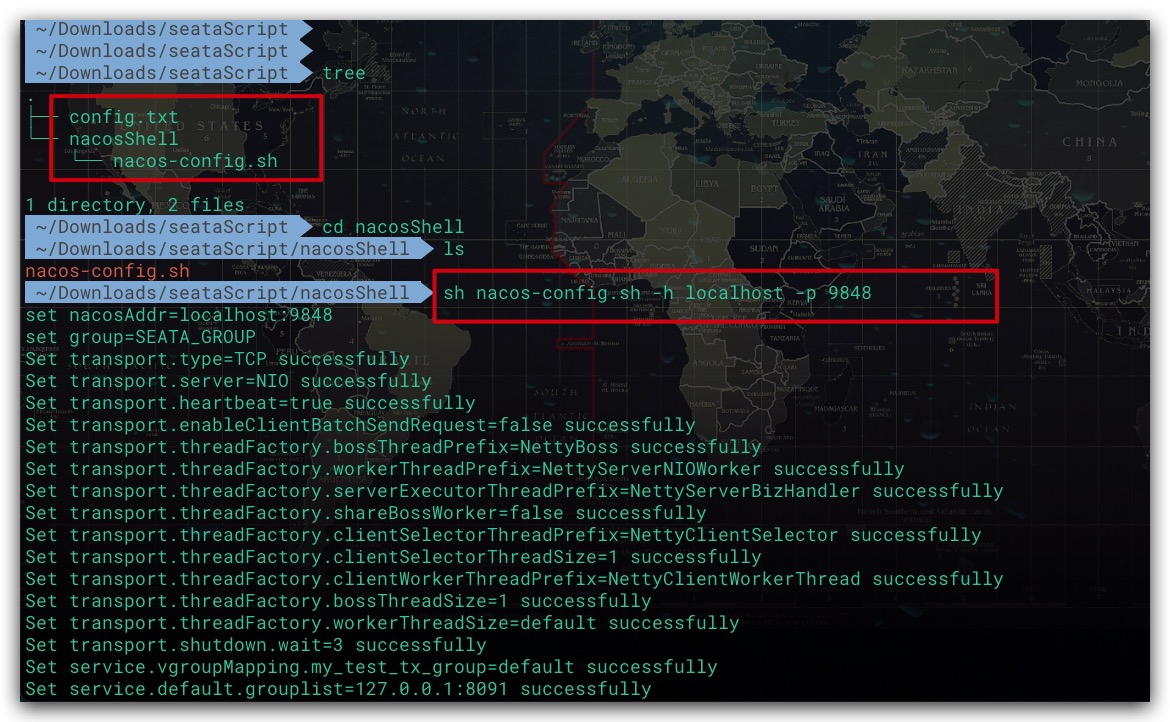
在完成配置文件config.txt的修改后,即可利用Shell脚本导入至Nacos中。值得一提的是,配置文件config.txt应与Shell脚本的上一级目录保持平行。然后在Shell脚本所在目录中执行如下命令即可
1
2
|
sh nacos-config.sh -h localhost -p 9848
|
该Shell脚本支持的选项如下所示
- -h: Nacos服务的IP地址,默认为localhost
- -p: Nacos服务的Port端口,默认为8848
- -g: Nacos分组名,默认为SEATA_GROUP
- -t: Nacos命名空间ID。默认为“”,即使用public命名空间
- -u: Nacos服务的用户名
- -w: Nacos服务的密码
效果如下所示
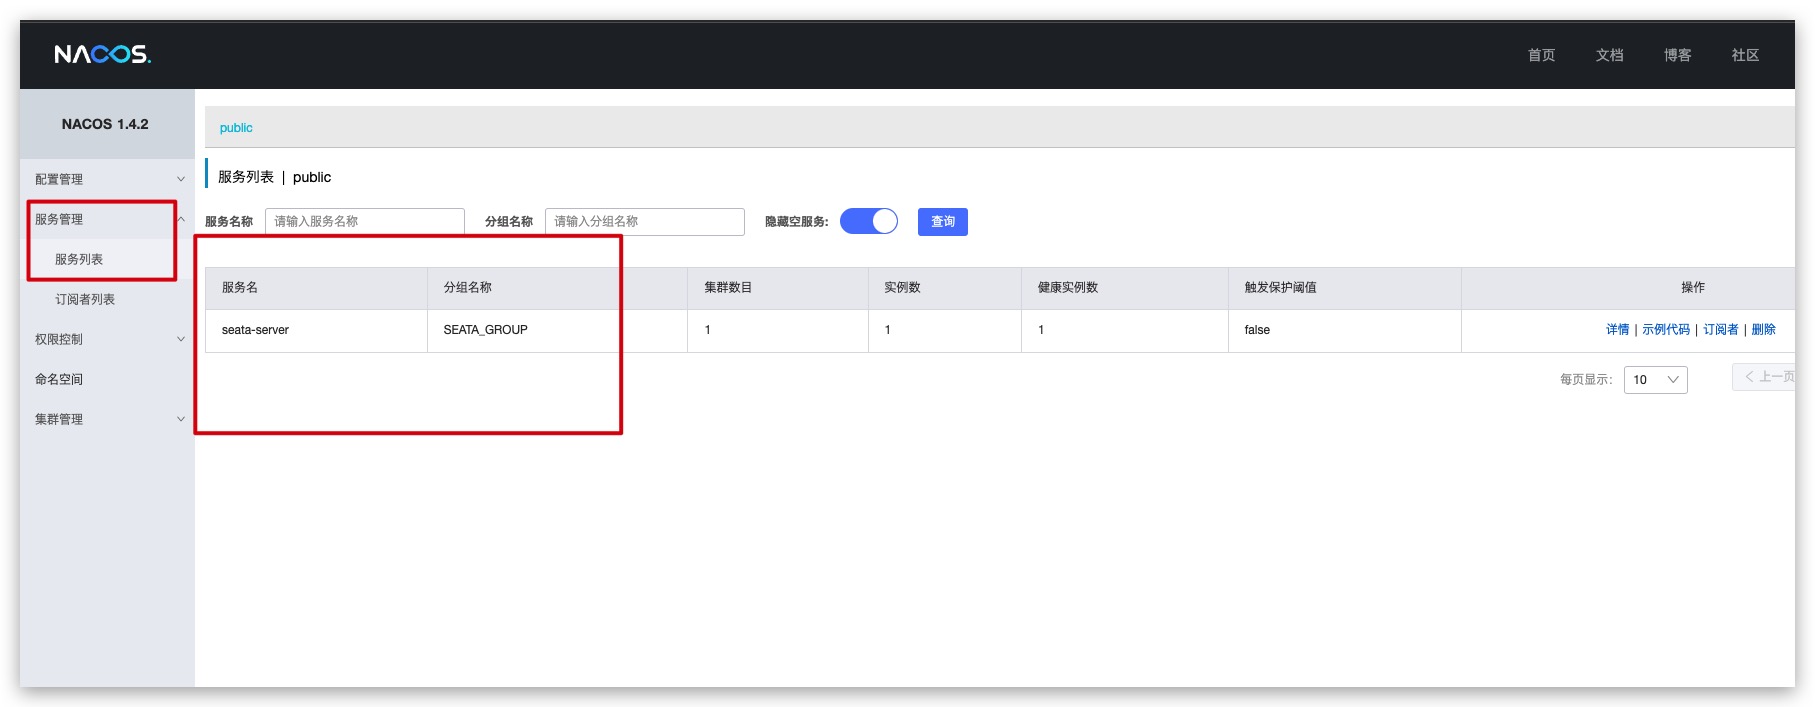
至此,Seata server相关环境及配置就完成了。最后,重启Seata-Service-1容器以让修改生效即可。通过Nacos的Web管理页面可以看到,Seata服务已经注册到Nacos
搭建order服务
POM依赖
这里通过SpringBoot搭建一个微服务——order服务。这里给出关键性的依赖及版本,如下所示
1
2
3
4
5
6
7
8
9
10
11
12
13
14
15
16
17
18
19
20
21
22
23
24
25
26
27
28
29
30
31
32
33
34
35
36
37
38
39
40
41
42
43
44
45
46
47
48
49
50
51
52
53
54
55
56
57
58
59
60
61
62
63
64
65
66
67
68
69
70
71
72
73
74
75
76
77
78
79
80
| <dependencyManagement>
<dependencies>
<dependency>
<groupId>org.springframework.boot</groupId>
<artifactId>spring-boot-dependencies</artifactId>
<version>2.3.2.RELEASE</version>
<type>pom</type>
<scope>import</scope>
</dependency>
<dependency>
<groupId>org.springframework.cloud</groupId>
<artifactId>spring-cloud-dependencies</artifactId>
<version>Hoxton.SR8</version>
<type>pom</type>
<scope>import</scope>
</dependency>
<dependency>
<groupId>com.alibaba.cloud</groupId>
<artifactId>spring-cloud-alibaba-dependencies</artifactId>
<version>2.2.3.RELEASE</version>
<type>pom</type>
<scope>import</scope>
</dependency>
</dependencies>
</dependencyManagement>
<dependencies>
<dependency>
<groupId>com.alibaba.cloud</groupId>
<artifactId>spring-cloud-starter-alibaba-seata</artifactId>
<exclusions>
<exclusion>
<groupId>io.seata</groupId>
<artifactId>seata-spring-boot-starter</artifactId>
</exclusion>
</exclusions>
</dependency>
<dependency>
<groupId>io.seata</groupId>
<artifactId>seata-spring-boot-starter</artifactId>
<version>1.3.0</version>
</dependency>
<dependency>
<groupId>com.alibaba.cloud</groupId>
<artifactId>spring-cloud-starter-alibaba-nacos-discovery</artifactId>
</dependency>
<dependency>
<groupId>com.alibaba.cloud</groupId>
<artifactId>spring-cloud-starter-alibaba-nacos-config</artifactId>
</dependency>
<dependency>
<groupId>com.alibaba</groupId>
<artifactId>fastjson</artifactId>
<version>1.2.76</version>
</dependency>
<dependency>
<groupId>com.baomidou</groupId>
<artifactId>mybatis-plus-boot-starter</artifactId>
<version>3.4.1</version>
</dependency>
</dependencies>
|
服务配置
order服务的配置文件application.yml,如下所示。这里关于Seata数据源的代理,我们选择自动代理的方式。此外配置文件中的相关IP、端口信息均为容器内部的IP、Port。因为对于SpringBoot服务我们也会通过Docker的方式进行构建、打包及部署
1
2
3
4
5
6
7
8
9
10
11
12
13
14
15
16
17
18
19
20
21
22
23
24
25
26
27
28
29
30
31
32
33
34
35
36
37
38
39
40
41
42
43
44
45
46
47
48
49
50
51
52
53
54
55
56
57
58
| server:
port: 89
spring:
application:
name: order
datasource:
type: com.alibaba.druid.pool.DruidDataSource
driver-class-name: com.mysql.jdbc.Driver
url: jdbc:mysql://120.120.120.42:3306/order?allowPublicKeyRetrieval=true&useSSL=false
username: root
password: 12345
cloud:
nacos:
discovery:
server-addr: 120.120.120.23:8848
alibaba:
seata:
tx-service-group: my_test_tx_group
mybatis-plus:
mapper-locations: classpath:mapper/*.xml
seata:
registry:
type: nacos
nacos:
application: seata-server
server-addr: 120.120.120.23:8848
username: nacos
password: nacos
group: SEATA_GROUP
config:
type: nacos
nacos:
server-addr: 120.120.120.23:8848
username: nacos
password: nacos
group: SEATA_GROUP
enable-auto-data-source-proxy: true
management:
endpoints:
web:
exposure:
include: "*"
base-path: /actuator
|
Controller层
在order服务中通过添加一个Controller类用于进行测试,核心代码实现如下。addRecord方法逻辑很简单。首先向自己的数据库插入一条记录,然后再调用另外一个服务pyament的接口。由于该方法是作为分布式事务的发起者,故需要在方法上添加 @GlobalTransactional 注解,以开启一个分布式事务
1
2
3
4
5
6
7
8
9
10
11
12
13
14
15
16
17
18
19
20
21
22
23
24
25
26
27
28
29
30
31
32
33
34
35
36
37
38
39
40
41
42
43
44
45
46
47
48
49
50
51
| @RestController
@RequestMapping("order2")
public class OrderController2 {
public static final String PAYMENT_URL = "http://payment";
@Autowired
private RestTemplate restTemplate;
@Autowired
private OrderRecordMapper orderRecordMapper;
@GlobalTransactional
@GetMapping("/addRecord")
public String addRecord(@RequestParam String name, @RequestParam Integer total) {
OrderRecord orderRecord = OrderRecord.builder()
.name(name)
.total(total)
.build();
orderRecordMapper.save(orderRecord);
String msg = restTemplate.getForObject(PAYMENT_URL +"/pay3/test1?name={1}", String.class, name);
return "OK";
}
}
...
@Configuration
public class RestTemplateConfig {
@Bean
@LoadBalanced
public RestTemplate restTemplate() {
return new RestTemplate();
}
}
...
@Data
@Builder
@AllArgsConstructor
@NoArgsConstructor
@TableName("orderRecord")
public class OrderRecord {
@TableId
private int id;
private String name;
private int total;
}
|
服务部署
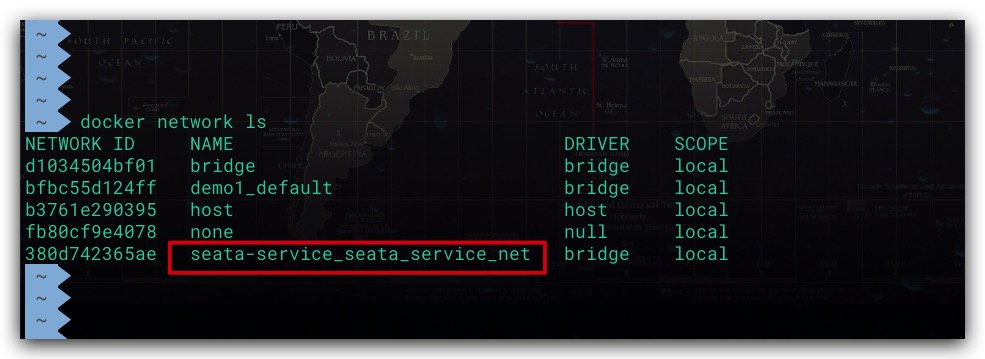
首先将SpringBoot服务打包为Docker镜像,然后通过Docker Compose进行服务部署。为保证各服务、容器间的网络互通互联,这里order服务的容器同样需要使用Seata Server所在的名为seata_service_net的自定义网络。由于docker-compose.yml中自定义网络在创建后,其最终的网络名称是包含项目名的。故首先用docker network ls查看该网络的全名。如下所示,即该网络全名为seata-service_seata_service_net
在分布式环境下,每个微服务都是使用自己的数据库。这一点在order服务的application.yml配置文件中也可以看到。故在docker-compose.yml中我们同样需要为order服务创建一个MySQL实例。如下所示
1
2
3
4
5
6
7
8
9
10
11
12
13
14
15
16
17
18
19
20
21
22
23
24
25
26
27
28
29
30
31
32
33
34
35
|
version: '3.8'
services:
Order-Service:
image: aaron1995/spring_boot_order:1.0
container_name: Order-Service
ports:
- "8089:89"
networks:
seata-service_seata_service_net:
ipv4_address: 120.120.120.41
depends_on:
- Order-MySQL
Order-MySQL:
image: mysql:5.7
container_name: Order-MySQL
ports:
- "9307:3306"
environment:
MYSQL_ROOT_PASSWORD: 12345
networks:
seata-service_seata_service_net:
ipv4_address: 120.120.120.42
networks:
seata-service_seata_service_net:
external: true
|
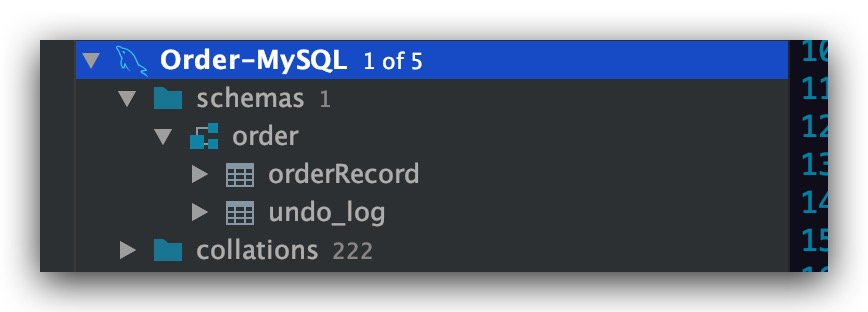
数据库初始化
通过数据库客户端连接Order服务的数据库,即Order-MySQL容器。首先order服务所连接的数据库order,然后在该数据库中执行相关业务的建表语句
1
2
3
4
5
6
7
8
9
| # 建库建表
create database `order`;
use `order`;
create table orderRecord (
id int not null auto_increment,
name varchar(255) null,
total int null,
primary key (id)
);
|
当然上述这些并无什么特别,只是业务方面需要。而为了保证Seata在事务出现异常时可以实现对业务数据进行回滚,我们还需要在业务的数据库中建立undo_log表。类似地,该SQL脚本也可通过Github进行获取,下载地址如下所示
1
2
|
https://github.com/seata/seata/blob/1.3.0/script/client/at/db/mysql.sql
|
效果如下所示
搭建payment服务
为了验证分布式事务,自然不能只有一个微服务。故这里类似地我们再搭建一个payment服务。当然基本搭建过程与order服务并无明显差异。首先在POM依赖方面,payment服务的POM依赖与order服务一致,同样也需要引入Seata、Nacos等相关依赖。其次在服务配置方面,payment服务的application.yml配置文件中关于Seata、Nacos相关的配置自然与order服务并无二致。但需调整修改其所连接的数据库信息,如下所示。即使用自身的数据库
1
2
3
4
5
6
7
8
9
10
11
12
| server:
port: 8011
spring:
application:
name: payment
datasource:
type: com.alibaba.druid.pool.DruidDataSource
driver-class-name: com.mysql.jdbc.Driver
url: jdbc:mysql://120.120.120.52:3306/payment?allowPublicKeyRetrieval=true&useSSL=false
username: root
password: 12345
|
在payment服务中添加相应的Controller方法
1
2
3
4
5
6
7
8
9
10
11
12
13
14
15
16
17
18
19
20
21
22
23
24
25
26
27
28
29
30
31
32
33
| @RestController
@RequestMapping("pay3")
public class PaymentController3 {
@Autowired
private PayRecordMapper payRecordMapper;
@GetMapping("/test1")
public String test1(@RequestParam String name) {
PayRecord payRecord = PayRecord.builder()
.id(1)
.serial( name +", "+ UUID.randomUUID().toString() )
.build();
payRecordMapper.updateById(payRecord);
if(name.equals("Tony")) {
throw new RuntimeException("发生业务异常");
}
return "OK";
}
}
...
@Data
@Builder
@AllArgsConstructor
@NoArgsConstructor
@TableName("payRecord")
public class PayRecord {
private int id;
private String serial;
}
|
类似地,将payment打包为Docker镜像后,通过docker compose进行部署,如下所示
1
2
3
4
5
6
7
8
9
10
11
12
13
14
15
16
17
18
19
20
21
22
23
24
25
26
27
28
29
30
31
32
33
34
35
|
version: '3.8'
services:
Payment-Service:
image: aaron1995/spring_boot_payment:1.0
container_name: Payment-Service
ports:
- "8015:8011"
networks:
seata-service_seata_service_net:
ipv4_address: 120.120.120.51
depends_on:
- Payment-MySQL
Payment-MySQL:
image: mysql:5.7
container_name: Payment-MySQL
ports:
- "9308:3306"
environment:
MYSQL_ROOT_PASSWORD: 12345
networks:
seata-service_seata_service_net:
ipv4_address: 120.120.120.52
networks:
seata-service_seata_service_net:
external: true
|
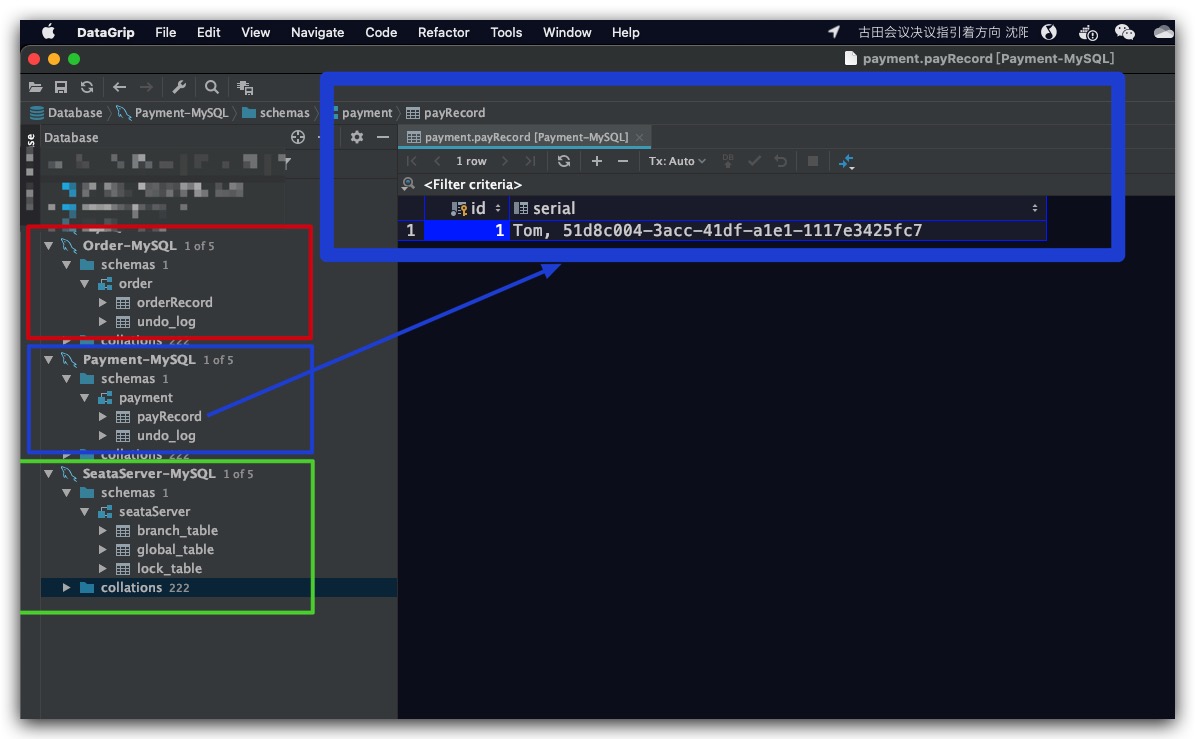
最后,在payment服务所使用的数据库Payment-MySQL容器上完成建库建表操作。不仅包含业务表,也包含上文提到的undo_log表。如下所示,由于PaymentController3的test1方法的业务逻辑是更新id为1记录,故这里也提前插入便于后续演示
测试验证
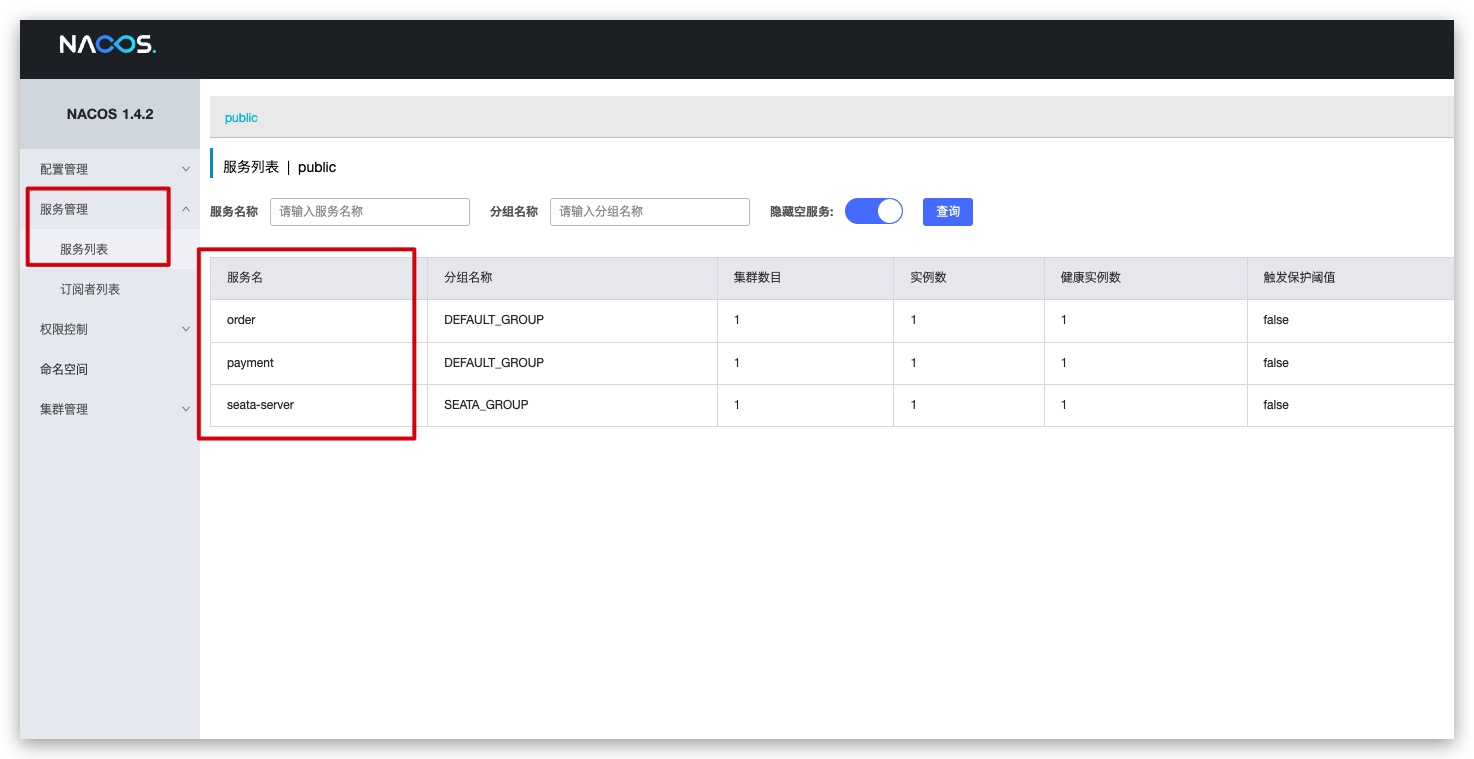
现在各服务部署完成后,从Nacos页面可以看到Seata Server、order、payment服务均已注册上线
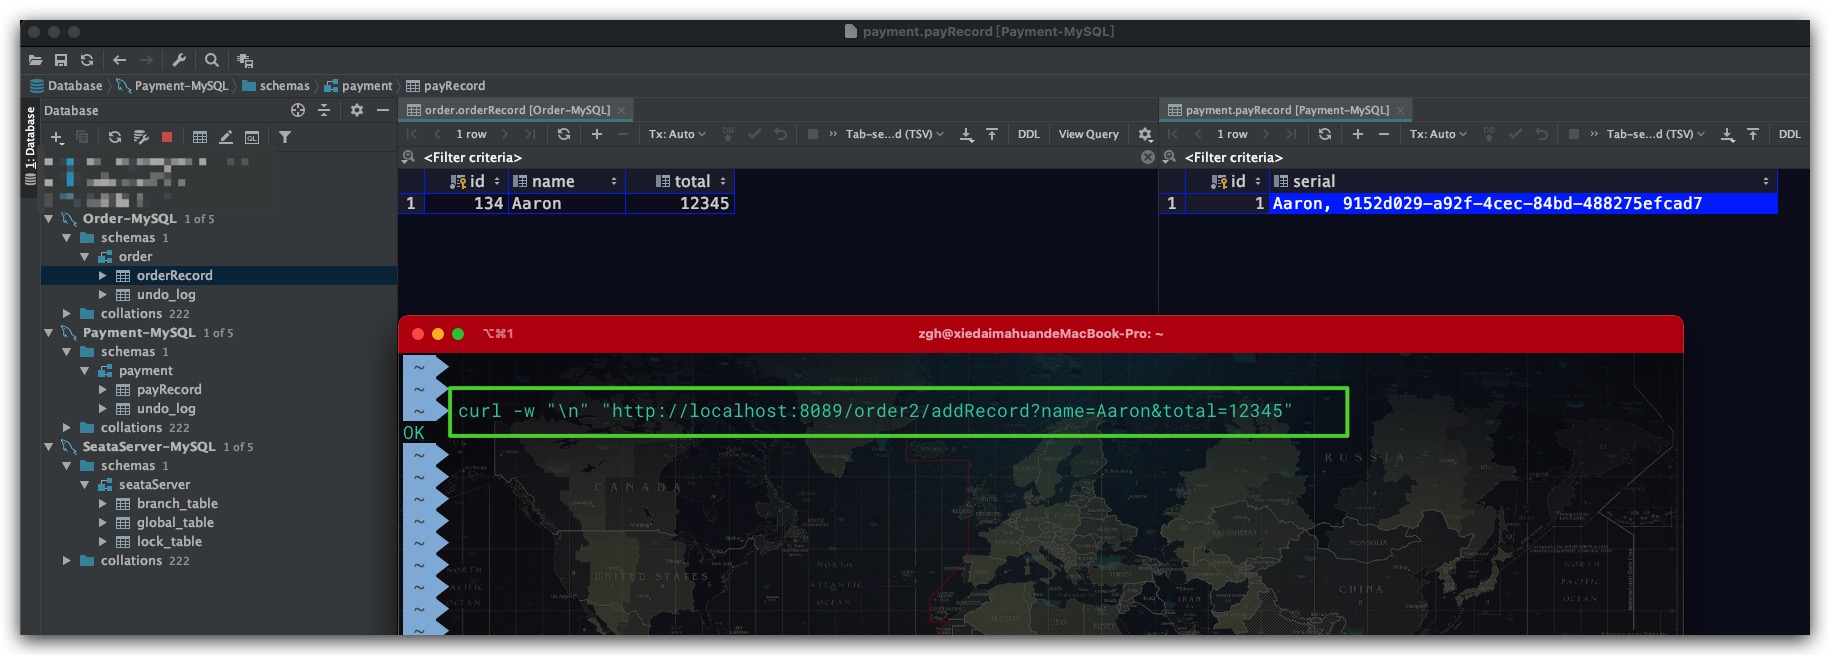
当向order服务的接口发送HTTP请求时,由于name不为Tony未抛出异常。order的表中新增了一条记录。而payment表id为1的数据也被正确地更新了
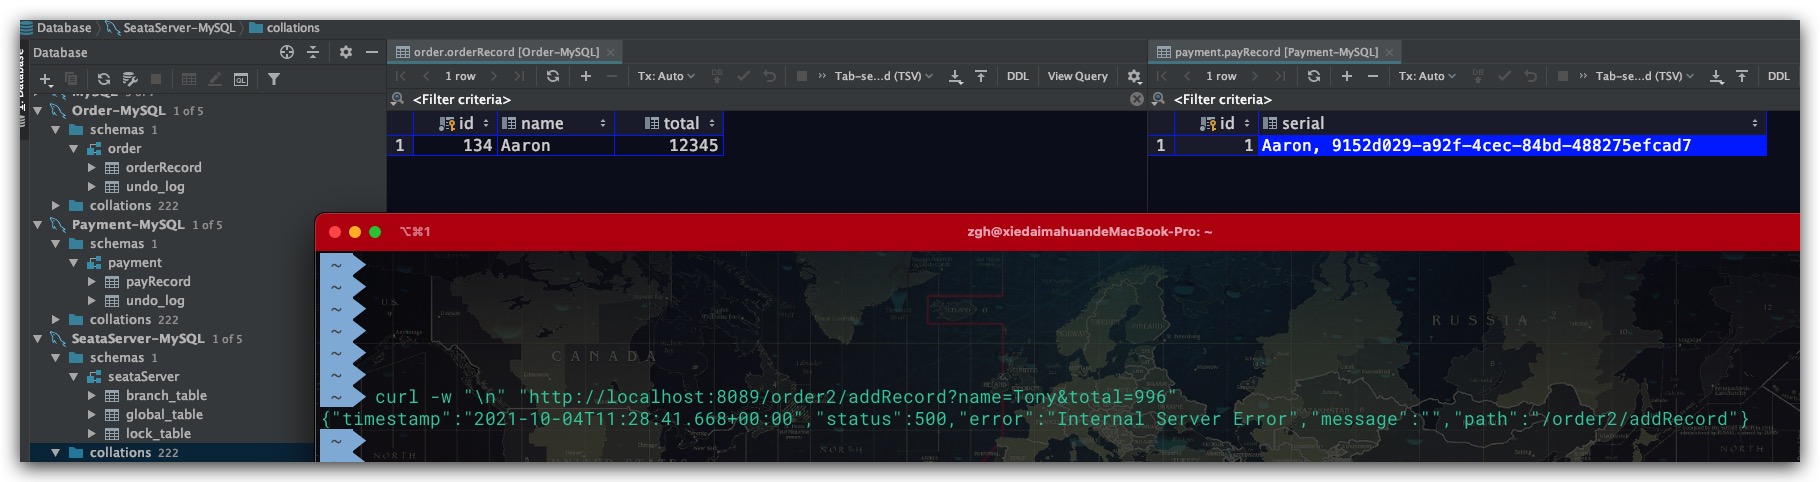
而当HTTP请求的name参数为Tony时,payment服务发生异常。不仅payment表未发生更新,而且order的表中也没有新增数据。即被正常回滚
Note
- 在本次实践过程中,发现通过Mybatis Plus Mapper内置的insert方法进行插入的数据在发生异常时无法进行回滚,故在order服务中添加记录是通过在相应的xml文件自定义SQL实现的。后者在发生异常时,可以对插入的数据进行回滚
