Spring Cloud Config 作为分布式系统的配置管理方案,为各微服务提供了统一的集中式的配置管理服务,并且可以实现配置的动态更新
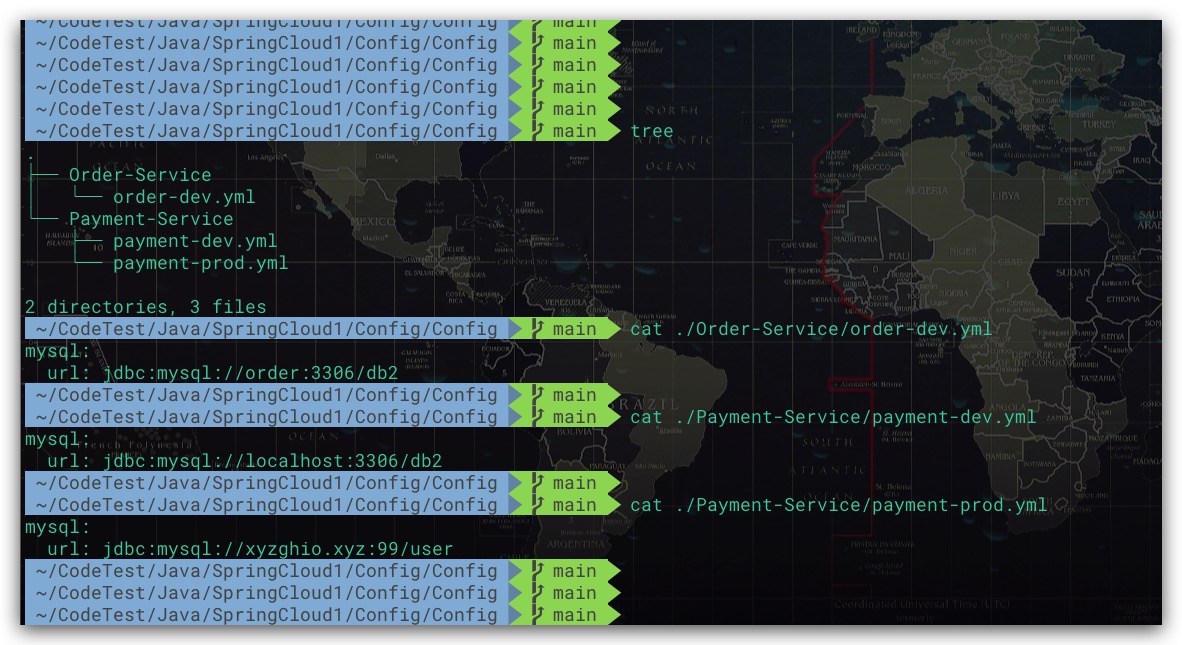
基本实践 Spring Cloud Config 服务端 Spring Cloud Config根据角色具体可分为服务端和客户端。对于服务端而言,其会连接配置文件的Git仓库来获取具体的配置文件数据。这里为了演示方便直接选用Github作为我们的Git仓库,这里我们将Git仓库拉取到本地,便于后续我们查看、修改等操作。配置文件的目录结构及内容如下所示,可以看到不同服务(order、payment)的配置文件是放置在不同子目录下的,这样便于区分、管理
这里通过SpringBoot来搭建配置中心的服务端,POM中引入spring-cloud-config-server即可。这里为了便于后续演示,同时也引入了Consul注册中心的依赖。将配置中心服务端也注册进去。但需要注意的是,这个操作并不是必须的
1 2 3 4 5 6 7 8 9 10 11 12 13 14 15 16 17 18 19 20 21 22 23 24 25 26 27 28 29 30 31 32 33 34 35 36 37 38 39 <dependencyManagement > <dependencies > <dependency > <groupId > org.springframework.boot</groupId > <artifactId > spring-boot-dependencies</artifactId > <version > 2.2.2.RELEASE</version > <type > pom</type > <scope > import</scope > </dependency > <dependency > <groupId > org.springframework.cloud</groupId > <artifactId > spring-cloud-dependencies</artifactId > <version > Hoxton.SR1</version > <type > pom</type > <scope > import</scope > </dependency > </dependencies > </dependencyManagement > <dependencies > <dependency > <groupId > org.springframework.cloud</groupId > <artifactId > spring-cloud-config-server</artifactId > </dependency > <dependency > <groupId > org.springframework.cloud</groupId > <artifactId > spring-cloud-starter-consul-discovery</artifactId > </dependency > </dependencies >
其配置文件如下所示,可以看到关于config的配置项非常简单。只需配置Git远程仓库地址信息即可。同时如果配置文件是位于子目录时,可通过searchPaths配置多个配置文件所在的子目录
1
2
3
4
5
6
7
8
9
10
11
12
13
14
15
16
17
18
19
20
21
22
23
24
25
26
server: port: 3344 spring: application: name: config cloud: consul: host: 127.0 .0 .1 port: 8500 discovery: service-name: ${spring.application.name} config: server: git: uri: [email protected] :Aaron/Config.git searchPaths: - Payment-Service/ - Order-Service/ label: main
最后只需在启动类上添加 @EnableConfigServer 注解即可实现启用。当然这里我们想把配置中心也注册进Consul,故还添加了@EnableDiscoveryClient注解
1
2
3
4
5
6
7
8
9
@EnableDiscoveryClient @SpringBootApplication @EnableConfigServer public class ConfigApplication { public static void main (String[] args) { SpringApplication.run(ConfigApplication.class, args); } }
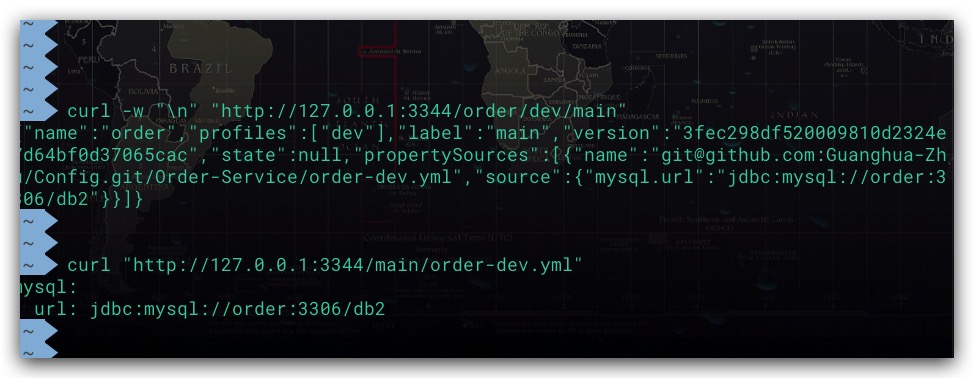
启动该服务后,我们可以先通过HTTP请求读取Git仓库中的配置文件来验证我们的配置中心是否正常。其支持的访问路径如下所示,其中application为应用名,profile为环境名,label为Git分支名。显然第2、3种与第4、5种方式本质上是一样,只是为了支持不同类型(yml、properties)的配置文件
1
2
3
4
5
/{application}/{profile}[/{label}] /{application}-{profile}.yml /{label}/{application}-{profile}.yml /{application}-{profile}.properties /{label}/{application}-{profile}.properties
效果如下所示,符合预期。说明Spring Cloud Config Server是正常的,可以从Git仓库获取到我们的配置文件
Spring Cloud Config 客户端 而所谓的Spring Cloud Config客户端即是需要使用相关配置的各微服务。这里我们利用SpringBoot建立一个payment服务,作为Spring Cloud Config客户端。首先在POM中引入spring-cloud-starter-config依赖
1 2 3 4 5 6 7 8 9 10 11 12 13 14 15 16 17 18 19 20 21 22 23 24 25 26 27 28 29 30 31 32 33 34 35 36 37 38 39 <dependencyManagement > <dependencies > <dependency > <groupId > org.springframework.boot</groupId > <artifactId > spring-boot-dependencies</artifactId > <version > 2.2.2.RELEASE</version > <type > pom</type > <scope > import</scope > </dependency > <dependency > <groupId > org.springframework.cloud</groupId > <artifactId > spring-cloud-dependencies</artifactId > <version > Hoxton.SR1</version > <type > pom</type > <scope > import</scope > </dependency > </dependencies > </dependencyManagement > <dependencies > <dependency > <groupId > org.springframework.cloud</groupId > <artifactId > spring-cloud-starter-config</artifactId > </dependency > <dependency > <groupId > org.springframework.cloud</groupId > <artifactId > spring-cloud-starter-consul-discovery</artifactId > </dependency > </dependencies >
这里引入一种新的配置文件——bootstrap.yml。其与application.yml配置文件的区别在于,前者实际上是系统级的配置,而后者则是服务应用级的配置。配置内容如下所示,可以看到其进行了Spring Cloud Config相关配置,定义了配置中心的地址信息及具体需要获取的配置文件信息。这里的配置,是Git仓库中main分支payment-prod.yml配置文件
1
2
3
4
5
6
7
8
9
10
11
12
13
14
15
16
17
18
19
20
21
spring: cloud: config: label: main name: payment profile: prod uri: http://127.0.0.1:3344 management: endpoints: web: exposure: include: refresh base-path: /actuator
而在application.yml配置文件中,则定义服务相关的配置,内容如下所示
1
2
3
4
5
6
7
8
9
10
11
12
13
14
15
16
17
server: port: 8006 spring: application: name: payment spring: cloud: consul: host: 127.0 .0 .1 port: 8500 discovery: service-name: ${spring.application.name}
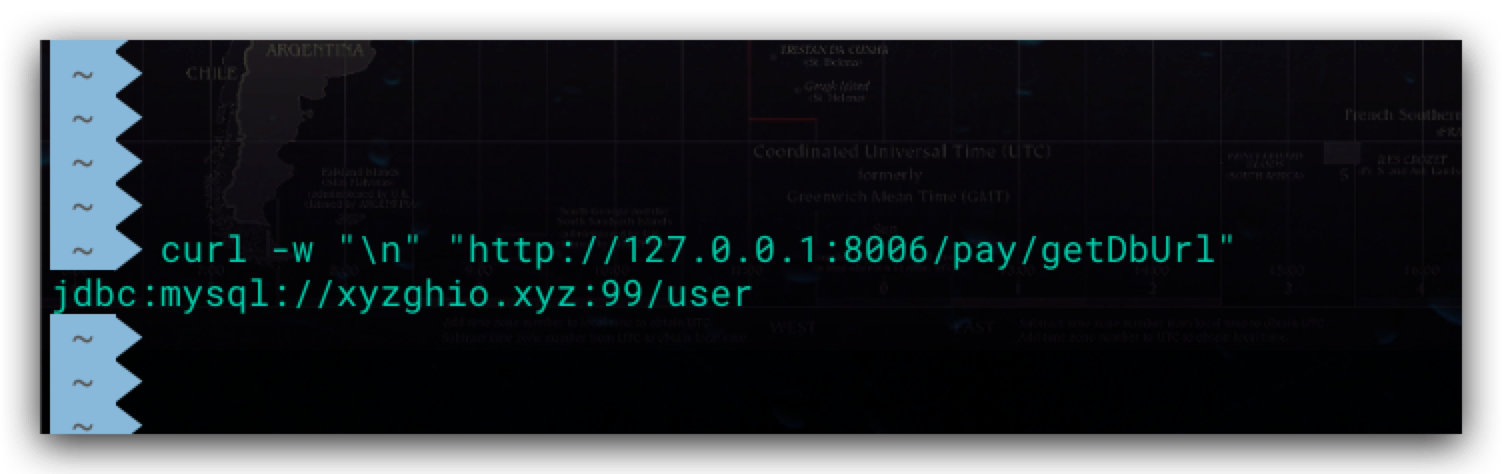
为了便于演示,这里提供了一个Controller类用于验证是否可以正常获取相关配置
1
2
3
4
5
6
7
8
9
10
11
12
13
14
@RestController @RefreshScope @RequestMapping("pay") public class ConfigController { @Value("${mysql.url}") private String dbUrl; @GetMapping("/getDbUrl") public String getDbUrl () { return dbUrl; } }
最后为该服务添加一个启动类即可
1
2
3
4
5
6
7
@SpringBootApplication @EnableDiscoveryClient public class PaymentApplication { public static void main (String[] args) { SpringApplication.run(PaymentApplication.class, args); } }
至此,我们的示例Demo已基本开发完成。现在验证下,payment服务是否可以通过配置中心获取相关配置。测试结构如下,符合预期
配置的动态更新 前面提到,配置中心的一大作用就是便于对各服务实现配置的动态更新。为了验证该功能,需要有两个前提:
客户端需要依赖spring-boot-starter-actuator,并且Actuator配置中需要开启 refresh端点
对于需要动态刷新的配置项,需要在其所注入的类上添加@RefreshScope注解
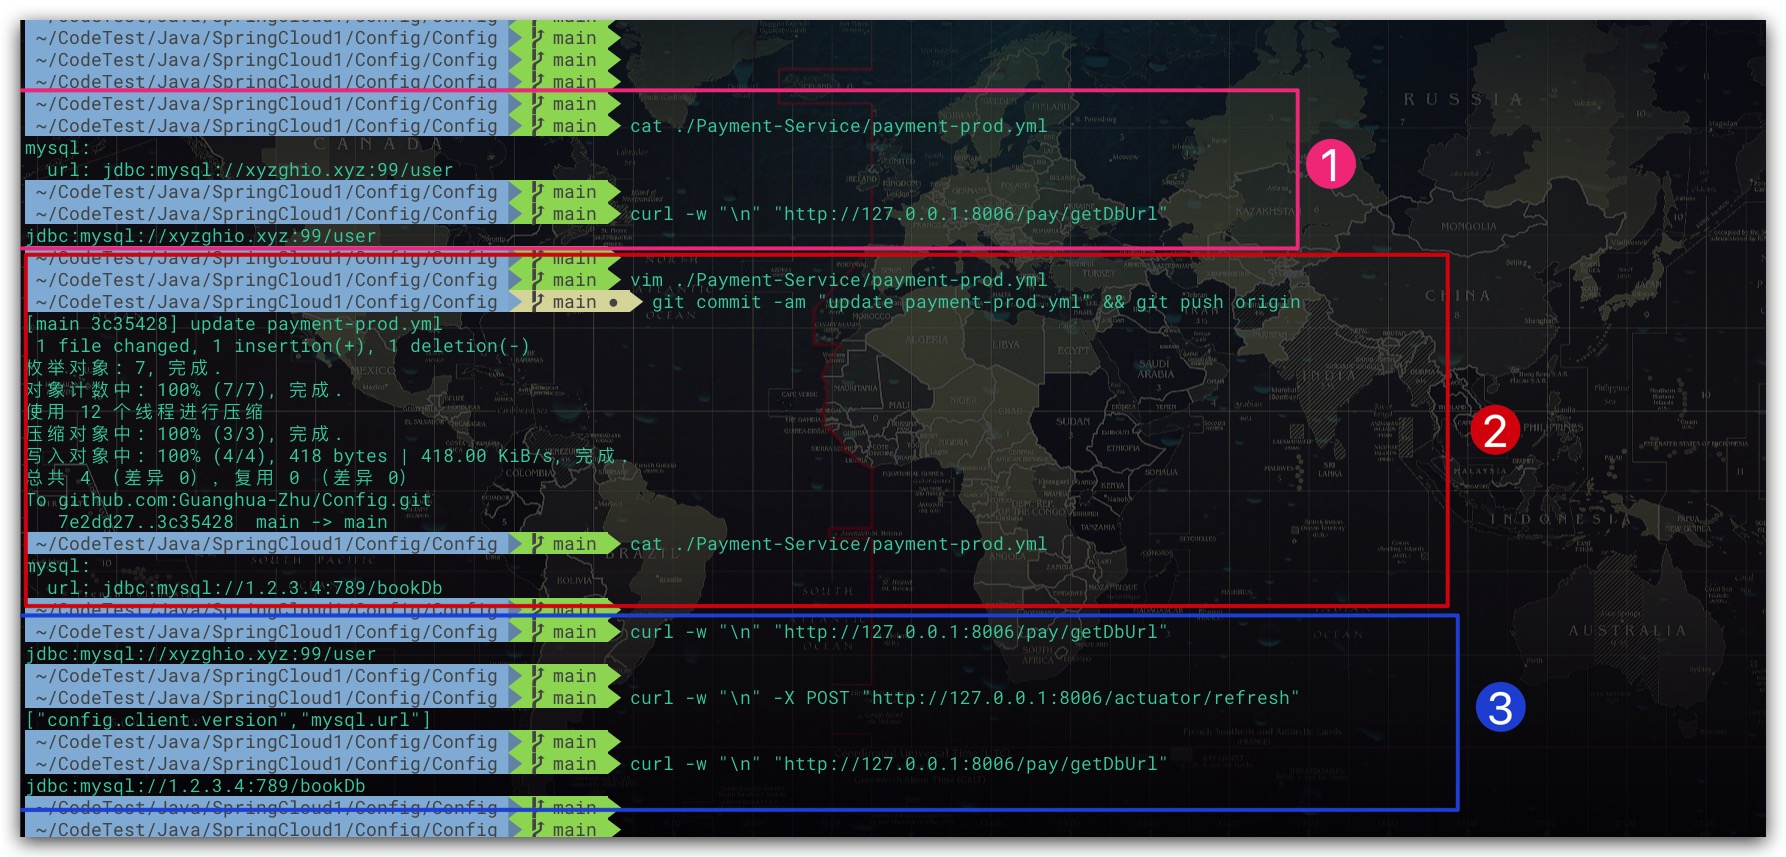
下图展示了如何进行配置的动态更新
第一步,payment服务与Git仓库的配置是一致的
第二步,我们修改了Git仓库的相关配置内容
第三步,我们首先尝试再次访问payment服务,结果发现其使用的配置并未更新;而只有当我们向该服务的refresh端点 发送了一次POST请求 后,其才会去更新并使用最新的配置数据
集成Consul注册中心 前面提到我们将Spring Cloud Config Server配置中心也注册进了Consul。那是不是在Spring Cloud Config Client侧我们也可以基于配置中心的服务名来进行访问,而不是通过IP的方式进行连接呢?答案是肯定的。如下即是配置示例
1
2
3
4
5
6
7
8
9
10
11
12
spring: cloud: config: discovery: enabled: true service-id: config
集成Spring Cloud Bus消息总线 虽然上文已经通过Spring Cloud Config实现了配置的动态更新,但显然操作过程较为麻烦。具体地,我们需要向各服务实例依次发送Post请求来让其获取、应用新配置。为此这里将消息总线Spring Cloud Bus集成到Spring Cloud Config的服务端、客户端当中去,以简化动态更新配置。Spring Cloud Bus中支持两种MQ组件——Kafka、RabbitMQ。本文选用前者,这里通过Docker快速搭建Kafka服务,其中ZooKeeper服务的地址、端口信息分别为192.168.2.102、2181,本机IP信息为192.168.2.102
1 2 3 4 5 6 7 8 9 docker run \ -e KAFKA_BROKER_ID=1 \ -e KAFKA_LISTENERS=PLAINTEXT://0.0.0.0:9092 \ -e KAFKA_ZOOKEEPER_CONNECT=192.168.2.102:2181/kafka \ -e KAFKA_ADVERTISED_LISTENERS=PLAINTEXT://192.168.2.102:9092 \ -d -p 9092:9092 \ --name Kafka-Service \ wurstmeister/kafka
Spring Cloud Config 服务端 首先对配置中心的服务端进行改进。POM中添加Spring Cloud Bus依赖的Kafka版本
1 2 3 4 5 6 7 8 9 10 11 12 13 14 15 16 17 18 19 20 21 22 23 24 25 26 27 28 29 30 31 32 33 <dependencyManagement > <dependencies > <dependency > <groupId > org.springframework.boot</groupId > <artifactId > spring-boot-dependencies</artifactId > <version > 2.2.2.RELEASE</version > <type > pom</type > <scope > import</scope > </dependency > <dependency > <groupId > org.springframework.cloud</groupId > <artifactId > spring-cloud-dependencies</artifactId > <version > Hoxton.SR1</version > <type > pom</type > <scope > import</scope > </dependency > </dependencies > </dependencyManagement > <dependencies > <dependency > <groupId > org.springframework.cloud</groupId > <artifactId > spring-cloud-starter-bus-kafka</artifactId > </dependency > </dependencies >
然后在配置文件中通过spring.kafka.bootstrap-servers指定Kafka服务的地址信息。并且Actuator配置中需要开启 bus-refresh 端点,当然这里需要依赖spring-boot-starter-actuator
1
2
3
4
5
6
7
8
9
10
11
12
13
14
... spring: kafka: bootstrap-servers: 127.0 .0 .1 :9092 management: endpoints: web: exposure: include: 'bus-refresh' base-path: /actuator ...
Spring Cloud Config 客户端 其与Spring Cloud Config服务端一样,同样需要向POM中添加Spring Cloud Bus依赖的Kafka版本,这里不再赘述。而在配置文件bootstrap.yml中同样需要添加Kafka服务的连接信息,同时需要继续保证Actuator配置中开启 refresh 端点。如下所示
1
2
3
4
5
6
7
8
9
10
11
12
13
... spring: kafka: bootstrap-servers: 127.0 .0 .1 :9092 management: endpoints: web: exposure: include: "refresh" base-path: /actuator
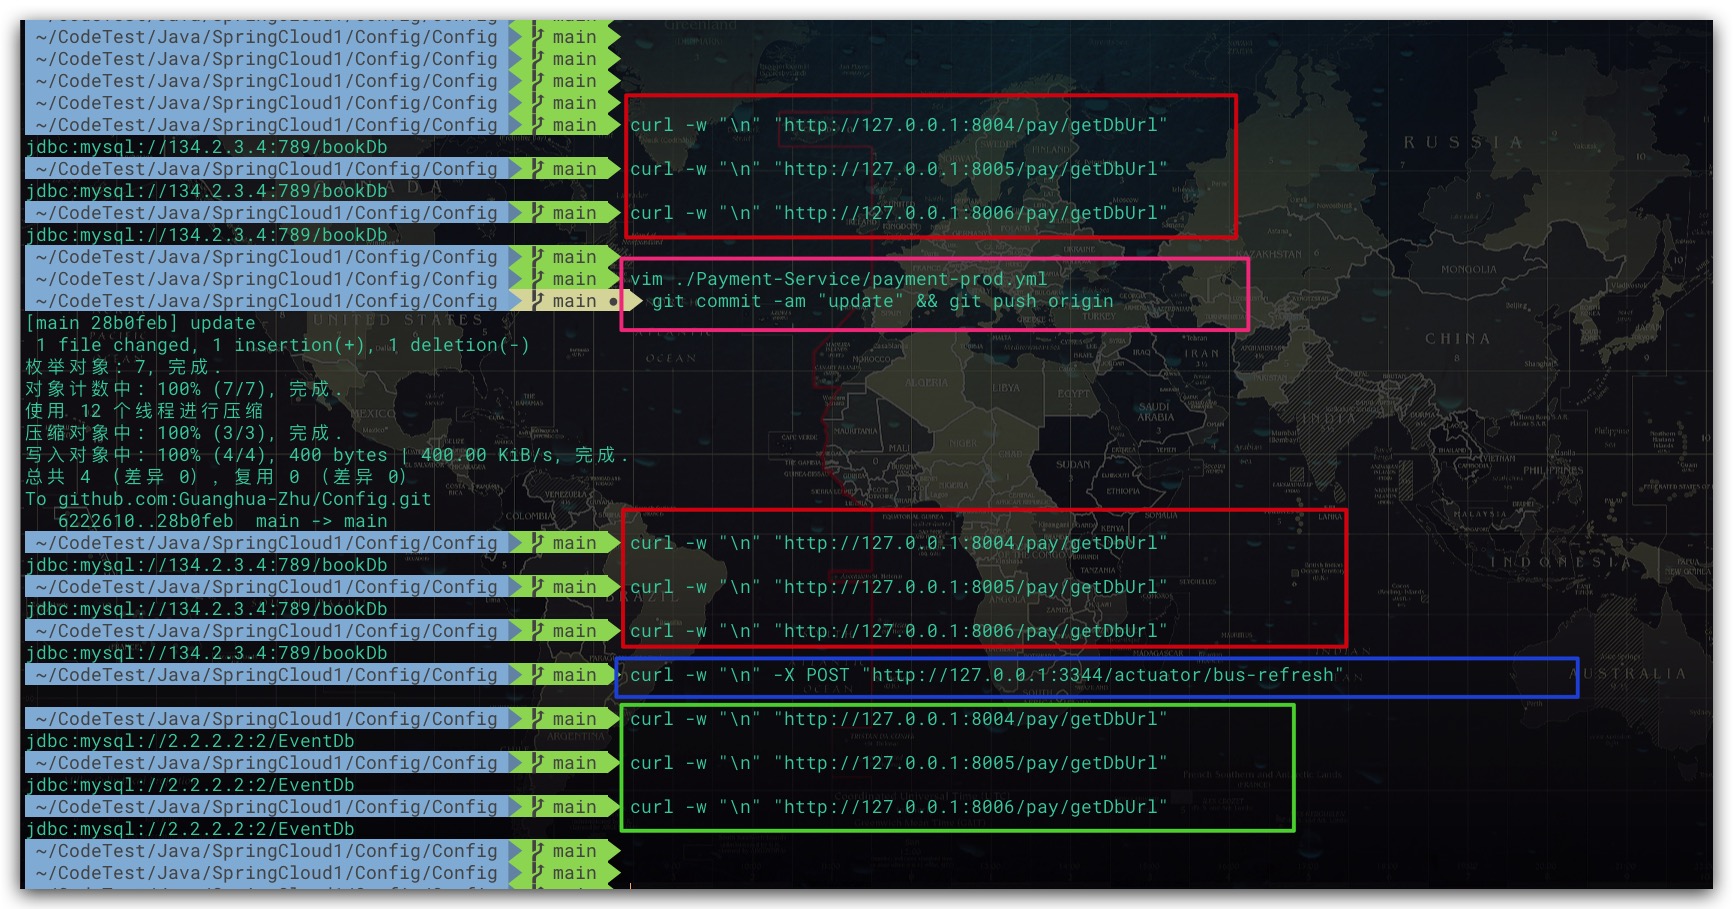
测试 首先启动配置中心(即Spring Cloud Config 服务端),然后启动Spring Cloud Config客户端的三个实例,分别使用8004、8005、8006端口。当配置被修改并提交到Git仓库后,我们只需向Spring Cloud Config服务端的bus-refresh端点 发送一次POST请求 。这样所有连接到该消息总线的服务实例都将会收到刷新配置的通知消息,进而重新获取配置。测试过程如下所示
可以看到通过集成Spring Cloud Bus大大方便了配置的动态刷新,只需发送一次Post请求即可更新全部实例的相关配置。实际上,还可以实现针对某个具体的服务实例进行通知,实现对指定服务实例的配置更新,命令如下所示
1 2 curl -X POST "http://127.0.0.1:3344/actuator/bus-refresh/<服务名>:<端口>"
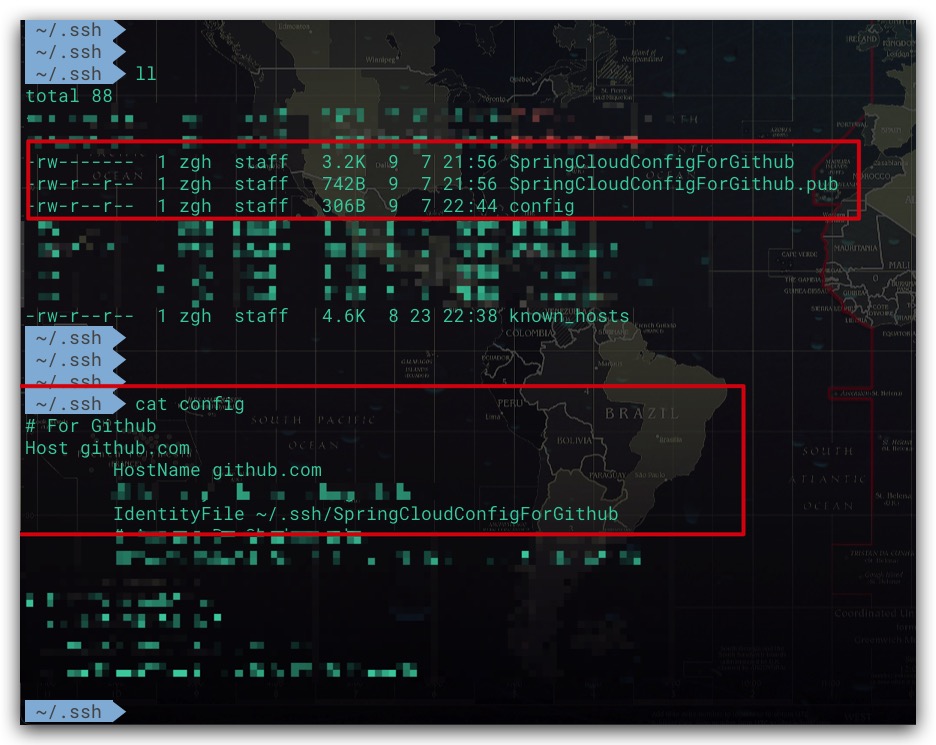
Note 文中配置中心只配置呢Git仓库地址,没有用户名、密码。是因为这里使用了SSH的方式进行验证,但在该方式下需要注意的是,Spring Cloud Config需要使用PEM格式 的密钥,不支持OPENSSH 格式。其密钥生成命令如下所示
1 ssh-keygen -m PEM -t rsa -b 4096 -C <邮箱>
然后在.ssh路径的config文件中,通过IdentityFile指定访问Git仓库时所使用的密钥即可,配置示例如下所示
参考文献
Spring微服务实战 John Carnell著