本文介绍如何在SpringBoot下自定义Starter
自定义SDK SpringBoot框架提供了各种starter方便日常开发使用,底层即是通过Spring SPI机制来实现自动装配的。这里我们来定义一个SDK展示具体过程
POM文件 sdk工程的POM文件如下所示
1
2
3
4
5
6
7
8
9
10
11
12
13
14
15
16
17
18
19
20
21
22
23
24
25
26
27
28
29
30
<?xml version="1.0" encoding="UTF-8" ?> <project xmlns ="http://maven.apache.org/POM/4.0.0" xmlns:xsi ="http://www.w3.org/2001/XMLSchema-instance" xsi:schemaLocation ="http://maven.apache.org/POM/4.0.0 http://maven.apache.org/xsd/maven-4.0.0.xsd" > <modelVersion > 4.0.0</modelVersion > <groupId > com.aaron</groupId > <artifactId > sdk1</artifactId > <version > 9.6.6</version > <properties > <maven.compiler.source > 11</maven.compiler.source > <maven.compiler.target > 11</maven.compiler.target > <project.build.sourceEncoding > UTF-8</project.build.sourceEncoding > </properties > <dependencies > <dependency > <groupId > org.springframework.boot</groupId > <artifactId > spring-boot-starter</artifactId > <version > 2.7.6</version > </dependency > <dependency > <groupId > org.projectlombok</groupId > <artifactId > lombok</artifactId > <version > 1.18.8</version > </dependency > </dependencies > </project >
属性类 然后我们定义一个属性类,实现将配置文件中相关配置项的值绑定到该属性类实例的字段当中。避免通过@Value注解来一个一个注入。示例代码如下所示
1
2
3
4
5
6
7
8
9
10
11
12
13
14
15
16
17
18
19
20
21
22
23
24
25
26
27
28
29
30
31
package com.aaron.sdk1.config;import lombok.Data;import org.springframework.boot.context.properties.ConfigurationProperties;import org.springframework.boot.context.properties.NestedConfigurationProperty;@Data @ConfigurationProperties(prefix = AaronSdkConfigProperties.PREFIX) public class AaronSdkConfigProperties { public static final String PREFIX = "aaron.sdk.config" ; private String separator = "---" ; @NestedConfigurationProperty private PeopleInfo peopleInfo; @Data public static class PeopleInfo { private String firstName; private String lastName="Zhu" ; private Integer age; } }
Service 作为一个SDK,我们自然需要来提供几个Service来实现些功能。这里提供了HelloService、ByeService
1
2
3
4
5
6
7
8
9
10
11
12
13
14
15
16
17
18
19
20
21
22
23
24
package com.aaron.sdk1.service;import com.aaron.sdk1.config.AaronSdkConfigProperties;import org.springframework.beans.factory.annotation.Autowired;public class HelloService { @Autowired private AaronSdkConfigProperties aaronSdkConfigProperties; public void hello () { StringBuilder sb = new StringBuilder (); sb.append("<" ) .append(aaronSdkConfigProperties.getPeopleInfo().getFirstName()) .append("." ) .append(aaronSdkConfigProperties.getPeopleInfo().getLastName()) .append(">: Hello. " ) .append("My Age" ) .append(" " +aaronSdkConfigProperties.getSeparator() + " " ) .append(aaronSdkConfigProperties.getPeopleInfo().getAge()); System.out.println(sb.toString()); } }
1
2
3
4
5
6
7
8
9
10
11
12
13
14
15
16
17
18
19
20
21
22
23
24
package com.aaron.sdk1.service;import com.aaron.sdk1.config.AaronSdkConfigProperties;import org.springframework.beans.factory.annotation.Autowired;public class ByeService { @Autowired private AaronSdkConfigProperties aaronSdkConfigProperties; public void bye () { StringBuilder sb = new StringBuilder (); sb.append("<" ) .append(aaronSdkConfigProperties.getPeopleInfo().getFirstName()) .append("." ) .append(aaronSdkConfigProperties.getPeopleInfo().getLastName()) .append(">: Bye. " ) .append("My Age" ) .append(" " +aaronSdkConfigProperties.getSeparator() + " " ) .append(aaronSdkConfigProperties.getPeopleInfo().getAge()); System.out.println(sb.toString()); } }
自动配置类 然后对于上述Serivce,我们提供相应的Java配置类使其进行实例化。同时为了实现对属性类AaronSdkConfigProperties的实例化、并向属性类实例的字段注入配置项的值。还需要在Java配置类上添加@EnableConfigurationProperties注解
1
2
3
4
5
6
7
8
9
10
11
12
13
14
15
16
17
18
19
20
21
22
23
24
25
package com.aaron.sdk1.config;import com.aaron.sdk1.service.HelloService;import org.springframework.beans.factory.annotation.Autowired;import org.springframework.boot.context.properties.EnableConfigurationProperties;import org.springframework.context.annotation.Bean;import org.springframework.context.annotation.Configuration;@EnableConfigurationProperties(AaronSdkConfigProperties.class) @Configuration public class HelloServiceAutoConfig { @Autowired private AaronSdkConfigProperties aaronSdkConfigProperties; public HelloServiceAutoConfig () { System.out.println("HelloServiceAutoConfig: 被实例化" ); } @Bean public HelloService helloService () { System.out.println("HelloService: 被实例化" ); return new HelloService (); } }
1
2
3
4
5
6
7
8
9
10
11
12
13
14
15
16
17
18
19
20
21
22
23
24
25
package com.aaron.sdk1.config;import com.aaron.sdk1.service.ByeService;import org.springframework.beans.factory.annotation.Autowired;import org.springframework.boot.context.properties.EnableConfigurationProperties;import org.springframework.context.annotation.Bean;import org.springframework.context.annotation.Configuration;@EnableConfigurationProperties(AaronSdkConfigProperties.class) @Configuration public class ByeServiceAutoConfig { @Autowired private AaronSdkConfigProperties aaronSdkConfigProperties; public ByeServiceAutoConfig () { System.out.println("ByeServiceAutoConfig: 被实例化" ); } @Bean public ByeService byeService () { System.out.println("ByeService: 被实例化" ); return new ByeService (); } }
spring.factories文件 前面提到,自动装配本质是通过Spring SPI机制实现的。故我们还需在 /src/main/resources/META-INF 路径下创建spring.factories文件。当期望实现自动装配时,需要在spring.factories文件中添加相应的键值对。其中,key是特定的,为org.springframework.boot.autoconfigure.EnableAutoConfiguration;value即为该SDK下期望自动装配的所有Java配置类,当存在多个配置类时,使用逗号进行分隔。当一行较长时,还可以使用 续行符反斜杠\ 来进行换行。文件内容如下所示
1
2
3
org.springframework.boot.autoconfigure.EnableAutoConfiguration = \ com.aaron.sdk1.config.HelloServiceAutoConfig, \ com.aaron.sdk1.config.ByeServiceAutoConfig
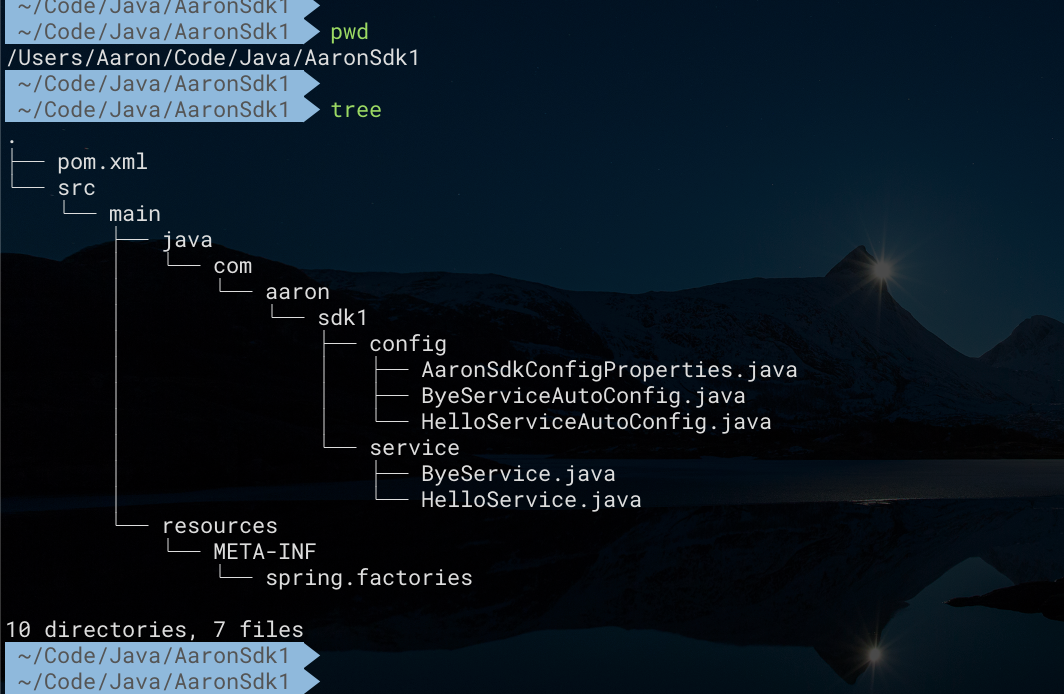
工程结构 至此,该SDK就基本完成了,工程结构如下所示
使用SDK 现在我们将sdk通过maven打包install到本地后,本地的其他项目就可以使用该sdk了。首先在其他项目中的pom中引入sdk的依赖
1 2 3 4 5 <dependency > <groupId > com.aaron</groupId > <artifactId > sdk1</artifactId > <version > 9.6.6</version > </dependency >
然后,编写一个测试类来进行验证。我们期望在其他项目中注入sdk相关的service后能够正常使用
1
2
3
4
5
6
7
8
9
10
11
12
13
14
15
16
17
18
19
20
21
22
23
24
package com.aaronzhu.SpringBoot1.service;import com.aaron.sdk1.service.ByeService;import com.aaron.sdk1.service.HelloService;import org.junit.jupiter.api.Test;import org.springframework.beans.factory.annotation.Autowired;import org.springframework.boot.test.context.SpringBootTest;@SpringBootTest public class SdkTest { @Autowired private HelloService helloService; @Autowired private ByeService byeService; @Test public void test1 () { System.out.println("Start Test" ); helloService.hello(); byeService.bye(); System.out.println("End Test" ); } }
最后,在其他项目的配置文件application.properties中添加sdk相关的配置项
1 2 3 4 aaron.sdk.config.separator =+++ aaron.sdk.config.peopleInfo.firstName =Aaron aaron.sdk.config.peopleInfo.age =18
首先通过启动日志,可以看到sdk中的相关配置类、service类均被成功实例化
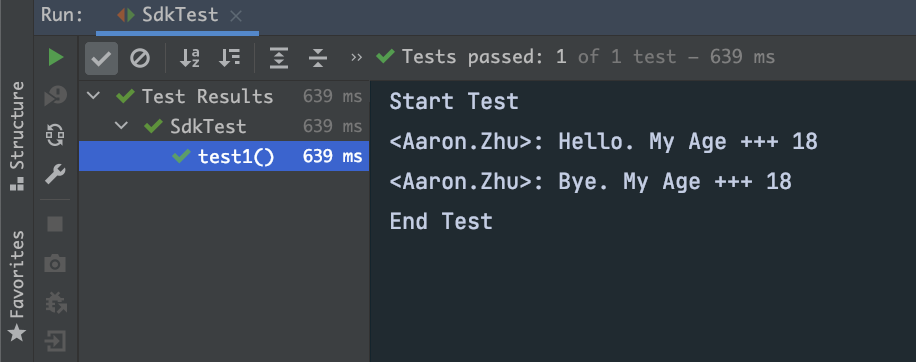
同时,sdk中的service不仅注入成功,也可以正常被使用
SDK主动生效 上文,我们采用了Spring SPI机制通过spring.factories文件来实现对sdk中相关配置类的实例化。即所谓的被动生效。因为如果我们不再使用该sdk后,不想让该sdk中相关配置类被实例化。只能手动移除对该sdk的pom依赖。故这里补充介绍如何利用@Import注解实现主动生效
这里我们首先在上文的sdk工程中定义一个组合注解@EnableSdk。可以看到该注解上方通过@Import注解来指定需要实例化的若干个配置类
1
2
3
4
5
6
7
8
9
10
11
12
13
14
15
16
package com.aaron.sdk1.annotation;import com.aaron.sdk1.config.ByeServiceAutoConfig;import com.aaron.sdk1.config.HelloServiceAutoConfig;import org.springframework.context.annotation.Import;import java.lang.annotation.ElementType;import java.lang.annotation.Retention;import java.lang.annotation.RetentionPolicy;import java.lang.annotation.Target;@Target(ElementType.TYPE) @Retention(RetentionPolicy.RUNTIME) @Import({HelloServiceAutoConfig.class, ByeServiceAutoConfig.class}) public @interface EnableSdk {}
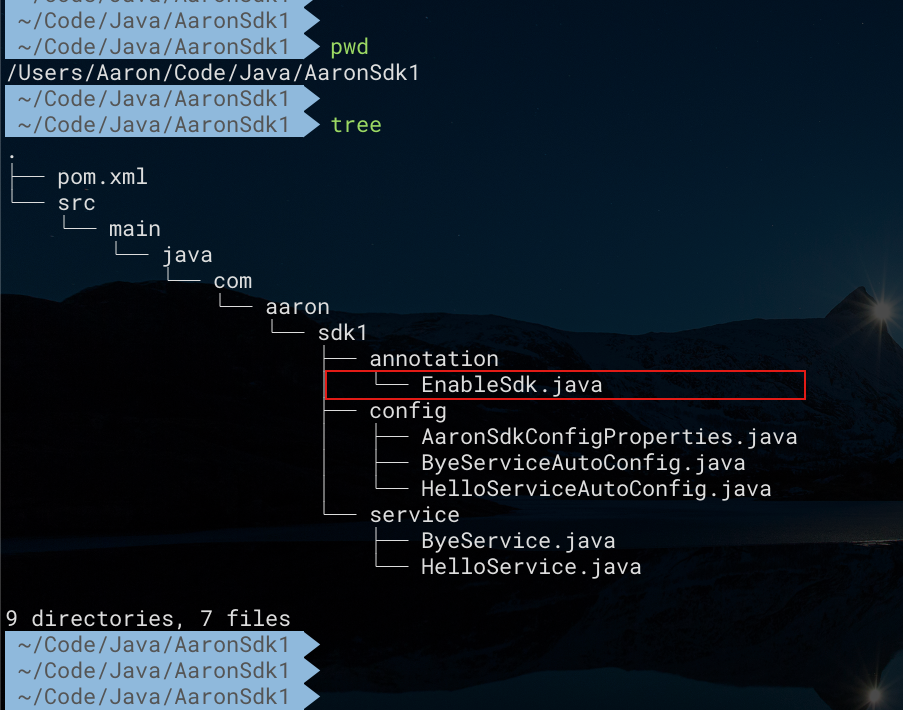
同时,这里我们将sdk工程中的spring.factories文件删除。此时sdk的工程结构如下所示
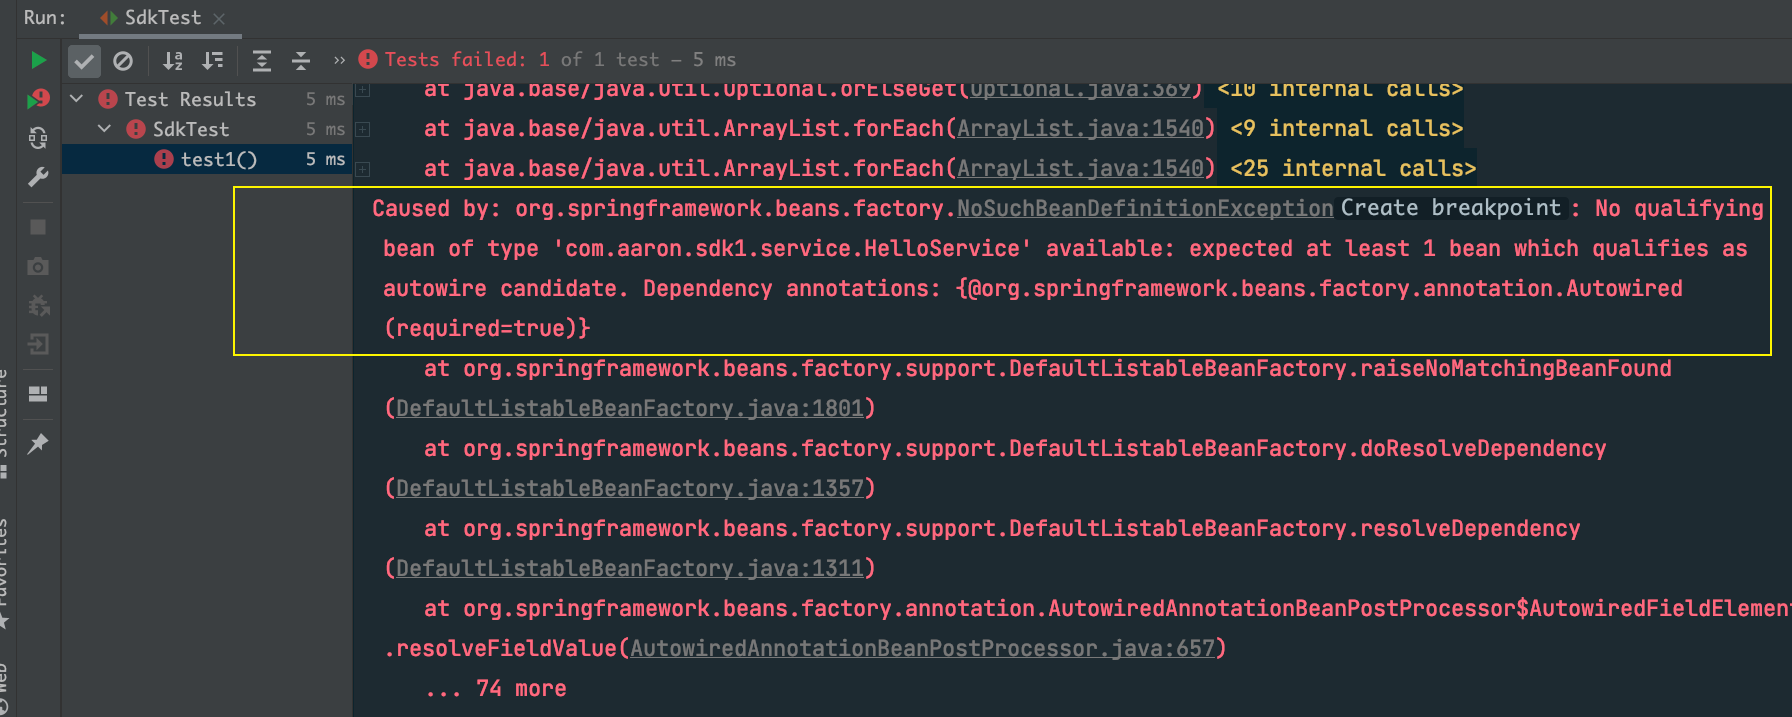
现在我们先将本地maven仓库的sdk包删除干净。然后对sdk重新打包并install到本地。重新运行其他项目中的测试类SdkTest来进行验证下。通过日志不难看出,即使我们在其他项目中引入了sdk依赖。也并不会对sdk中的Java配置类进行实例化,更无法注入该sdk中相关service来使用
只有当我们在其他项目的启动类上添加@EnableSdk注解后,此时才会对sdk中的Java配置类进行实例化。即所谓的主动生效
1
2
3
4
5
6
7
8
9
10
11
12
13
14
package com.aaronzhu;import com.aaron.sdk1.annotation.EnableSdk;import org.springframework.boot.SpringApplication;import org.springframework.boot.autoconfigure.SpringBootApplication;@EnableSdk @SpringBootApplication public class SpringBoot1Application { public static void main (String[] args) { SpringApplication.run(SpringBoot1Application.class, args); } }
现在,sdk中的相关配置类、service类均被成功实例化。此时,sdk中的service不仅注入成功,也可以正常被使用
Note
Spring Boot从2.7版本开始,推荐 在 resources/META-INF/spring/路径下使用 org.springframework.boot.autoconfigure.AutoConfiguration.imports
Spring Boot从3.0版本开始,仅支持 使用 org.springframework.boot.autoconfigure.AutoConfiguration.imports 文件来指定需要进行自动装配的Java配置类。而不再支持 通过spring.factories文件来指定需要自动装配的Java配置类
具体地,在 org.springframework.boot.autoconfigure.AutoConfiguration.imports 文件中指定需要进行自动装配的Java配置类的全限定类名。存在多个Java配置类时按行分隔即可。配置示例如下所示
