Ehcache,一个纯Java的进程内存缓存框架。本地缓存相比较于分布式缓存(例如Redis等)而言,由于避免网络IO通讯的开销故效率非常高。这里就如何在SpringBoot下进行集成、应用来进行介绍

依赖
在POM文件中添加如下依赖
1
2
3
4
5
6
7
8
9
10
|
<dependency>
<groupId>org.springframework.boot</groupId>
<artifactId>spring-boot-starter-cache</artifactId>
</dependency>
<dependency>
<groupId>net.sf.ehcache</groupId>
<artifactId>ehcache</artifactId>
<version>2.10.6</version>
</dependency>
|
配置
这里我们使用XML配置文件的方式来进行配置。在src/main/resources目录下创建名为ehcache.xml的Ehcache配置文件,示例如下
1
2
3
4
5
6
7
8
9
10
11
12
13
14
15
16
17
18
19
20
21
22
23
24
25
26
| <?xml version="1.0" encoding="UTF-8"?>
<ehcache xmlns:xsi="http://www.w3.org/2001/XMLSchema-instance"
xsi:noNamespaceSchemaLocation="http://ehcache.org/ehcache.xsd"
maxBytesLocalHeap="30K">
<diskStore path="user.dir/Ehcache"/>
<defaultCache eternal="false"
timeToIdleSeconds="123" timeToLiveSeconds="311"
maxBytesLocalHeap="13K" overflowToDisk="false" diskPersistent="false"
memoryStoreEvictionPolicy="LRU">
</defaultCache>
<cache name="stuInfo" eternal="false"
timeToIdleSeconds="0" timeToLiveSeconds="300"
maxBytesLocalHeap="12K" overflowToDisk="false" diskPersistent="false"
memoryStoreEvictionPolicy="LRU">
</cache>
</ehcache>
|
这里就常见的配置项,说明如下
diskStore path
当 内存缓存中的数量超过maxElementsInMemory 且 overflowToDisk为true时 时,会将缓存数据存储到磁盘缓存中。当然被缓存的对象需要实现Serializable序列化接口)。该配置指定磁盘缓存文件的路径。其可选值通常有:
- user.home:用户主目录
- user.dir:用户当前的工作目录
- java.io.tmpdir:默认临时路径
- 自定义绝对路径
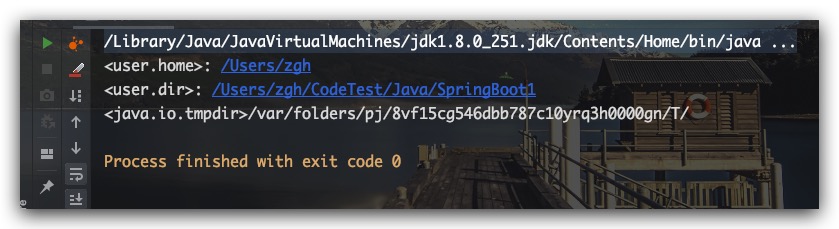
对于上述几个变量的具体路径可通过下述方式来了解、确定
1
2
3
4
5
| public static void main(String[] args) {
System.out.println("<user.home>: " + System.getProperty("user.home"));
System.out.println("<user.dir>: " + System.getProperty("user.dir"));
System.out.println("<java.io.tmpdir>" + System.getProperty("java.io.tmpdir"));
}
|
测试结果如下
defaultCache
默认的缓存配置,其是可选地。该配置将应用于 通过CacheManager.add(String cacheName)以编程方式创建的缓存。如果使用了CacheManager.add(String cacheName)而无该配置将会引起CacheException
name
缓存名称,用于唯一标识缓存
eternal
缓存中的数据是否永久有效。当其为true时,将会忽略timeToIdleSeconds、timeToLiveSeconds配置
timeToIdleSeconds
缓存数据在失效前允许的闲置时间(Unit: second)。若缓存数据超过该时间间隔后未被访问,则该缓存数据即会被从Cache中清除。默认值为0,意为无穷大。显然该配置仅仅在eternal为false时生效
timeToLiveSeconds
缓存数据的生存时间(Unit: second)。默认值为0,意为无穷大。显然该配置仅仅在eternal为false时生效
maxBytesLocalHeap
用于指定CacheManager下所有Cache 或 某个Cache 在内存中缓存数据的容量上限。显然各Cache所使用总内存(12KB+13KB)不可超过CacheManager所指定的总内存容量(30KB)
maxEntriesLocalHeap
其还支持通过对Cache中缓存数据的数量进行限制,即在Cache标签内的maxEntriesLocalHeap属性(例如,maxEntriesLocalHeap=”100”),其中0意为无上限。值得注意的是,上述两种限制方式:内存容量(maxBytesLocalHeap)、缓存数量(maxEntriesLocalHeap),只可使用其中一种。即不可同时使用、指定上述两种属性的值
overflowToDisk
内存缓存中缓存数据超过上限(maxElementsInMemory)时,是否使用硬盘保存。值为true时,使用硬盘来保存缓存数据;值为false时,会根据memoryStoreEvictionPolicy配置的淘汰策略来淘汰内存缓存中的数据
diskPersistent
磁盘持久化。当其为true时,在重启虚拟机后会将硬盘缓存加载到内存缓存中
memoryStoreEvictionPolicy
缓存淘汰策略。当内存缓存数据的数量达到上限maxElementsInMemory 且 overflowToDisk为false时,Ehcache即会利用该配置执行相应的淘汰策略。其可选值有:
- FIFO:先进先出策略
- LFU:最近最不常用策略
- LRU:最近最少使用策略
基本操作
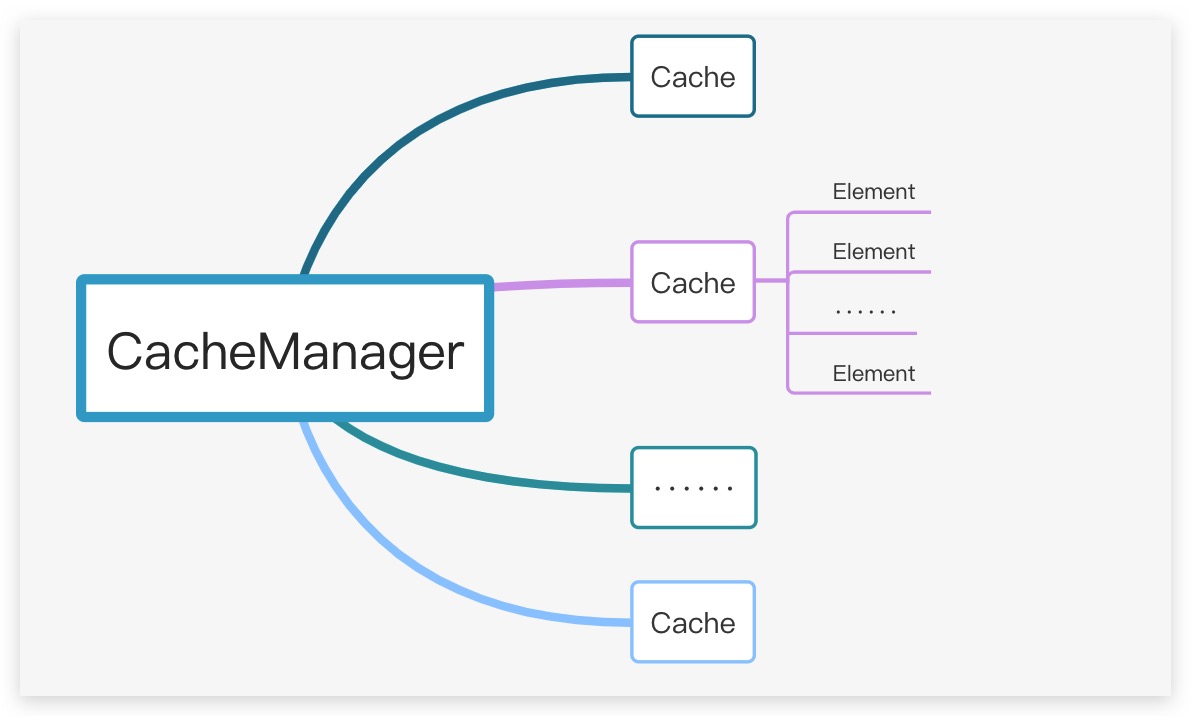
在Ehcache中通常有以下几个概念
- CacheManager:缓存管理器,是Ehcache框架的核心类和入口。可通过Ehcache配置文件来获取该类的实例
- Cache:每个CacheManager可以管理若干个Cache
- Element:每个Cache可以管理若干个Element,真正用于存放缓存数据
基本使用方法如下所示
1
2
3
4
5
6
7
8
9
10
11
12
13
14
15
16
17
18
19
20
21
22
23
24
25
26
27
28
29
30
31
32
33
34
35
36
37
38
39
40
41
42
43
44
45
| public class TestEhcache {
public static void main(String[] args) {
CacheManager manager = CacheManager.newInstance("src/main/resources/ehcache.xml");
Cache stuInfoCache = manager.getCache("stuInfo");
StuInfo stuInfo1 = new StuInfo(1, "Aaron", 25);
Element element1 = new Element(stuInfo1.getId(), stuInfo1 );
stuInfoCache.put(element1);
Element element2 = stuInfoCache.get( (Object)stuInfo1.getId() );
StuInfo stuInfo2 = (StuInfo) element2.getObjectValue();
System.out.println("stuInfo2 : " + stuInfo2);
}
}
@Data
@AllArgsConstructor
@NoArgsConstructor
class StuInfo {
private Integer id;
private String name;
private Integer age;
}
|
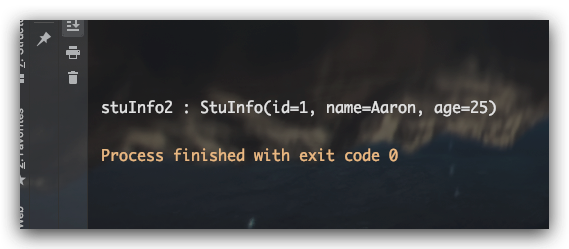
测试结果如下,符合预期
通过Sping Cache注解操作缓存
Spring中关于缓存的操作,提供了下列注解
- @Cacheable:如果有缓存则不执行方法、直接获取缓存数据; 否则执行方法并设置缓存数据以备下一次访问。适用于读数据的方法
- @CachePut:执行方法,并设置缓存。适用于新增、修改数据的方法
- @CacheEvict:执行方法,并删除缓存。适用于删除数据的方法
使用示例如下所示
1
2
3
4
5
6
7
8
9
10
11
12
13
14
15
16
17
18
19
20
21
22
23
24
25
26
27
28
29
30
31
32
33
34
35
36
37
38
39
40
41
42
43
| public class StuInfoService {
private static final String cacheName = "stuInfo";
@Cacheable(value = cacheName, key = "#id")
public StuInfo getStuInfoById(Integer id) {
System.out.println("begin <getStuInfoById>");
...
System.out.println("end <getStuInfoById>");
return stuInfo;
}
@CachePut(value = cacheName, key = "#id")
public StuInfo updateStuInfoById(StuInfo stuInfo) {
System.out.println("begin <updateStuInfoById>");
...
System.out.println("end <updateStuInfoById>");
return stuInfo;
}
@CacheEvict(value = cacheName, key = "#id")
public void deleteStuInfoById(Integer id) {
System.out.println("begin <deleteStuInfoById>");
...
System.out.println("end <deleteStuInfoById>");
}
@CacheEvict(value = cacheName, allEntries = true)
public void deleteAll() {
System.out.println("begin <deleteAll>");
...
System.out.println("end <deleteAll>");
}
}
|
