Seata是Spring Cloud Alibaba中一款开源的分布式事务解决方案,本文具体就Seata的TCC 模式进行介绍、实践
环境配置 基础环境 首先通过Docker Compose搭建基础环境——Nacos、MySQL服务,具体如下
1 2 3 4 5 6 7 8 9 10 11 12 13 14 15 16 17 18 19 20 21 22 23 24 25 26 27 28 29 30 31 32 33 34 35 36 37 38 39 40 41 42 43 44 45 46 47 48 version: '3.8' services: Nacos-Service-1: image: nacos/nacos-server:1.4.2 container_name: Nacos-Service-1 ports: - "9848:8848" environment: MODE: standalone networks: seata_tcc_net: ipv4_address: 130.130.130.32 PayService-DB: image: mysql:5.7 container_name: PayService-DB ports: - "9306:3306" environment: MYSQL_ROOT_PASSWORD: 12345 networks: seata_tcc_net: ipv4_address: 130.130.130.36 StorageService-DB: image: mysql:5.7 container_name: StorageService-DB ports: - "9307:3306" environment: MYSQL_ROOT_PASSWORD: 12345 networks: seata_tcc_net: ipv4_address: 130.130.130.37 networks: seata_tcc_net: ipam: config: - subnet: 130.130.130.0/24
配置Seata Server 通过Github下载Seata Server,命令如下
1 wget https://github.com/seata/seata/releases/download/v1.3.0/seata-server-1.3.0.zip
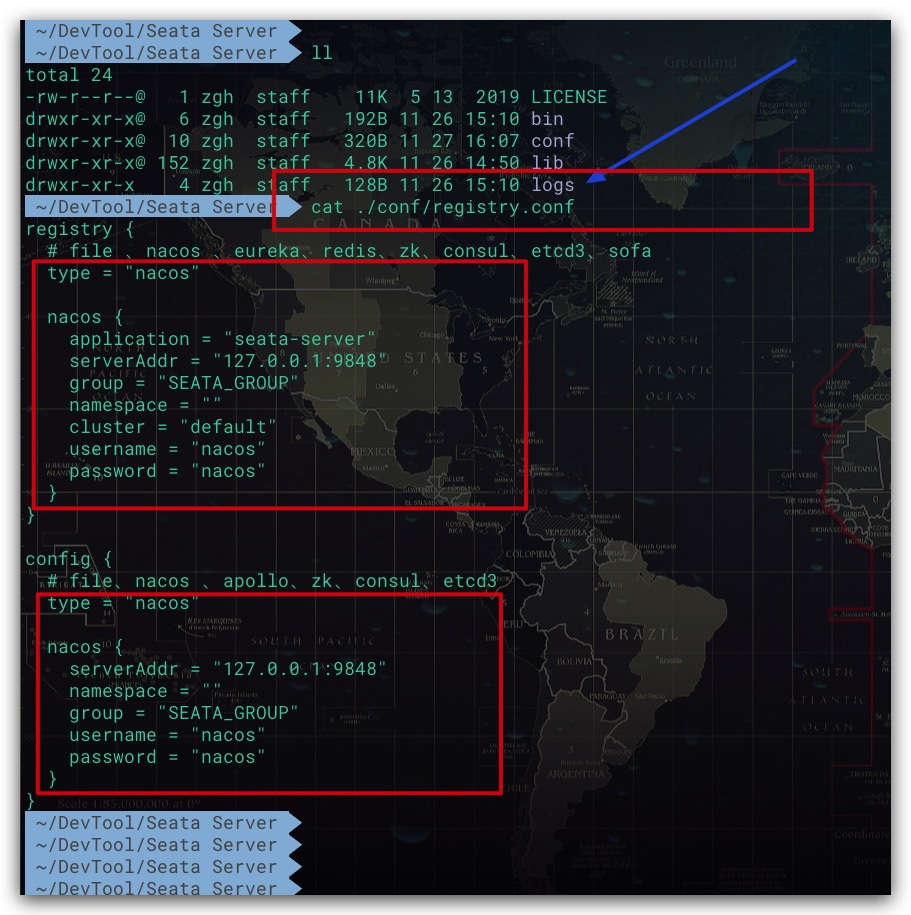
修改Seata Server下conf目录的registry.conf文件,将注册中心、配置中心均设置Nacos。需要注意的是如果没有logs目录,则需要手动创建该目录
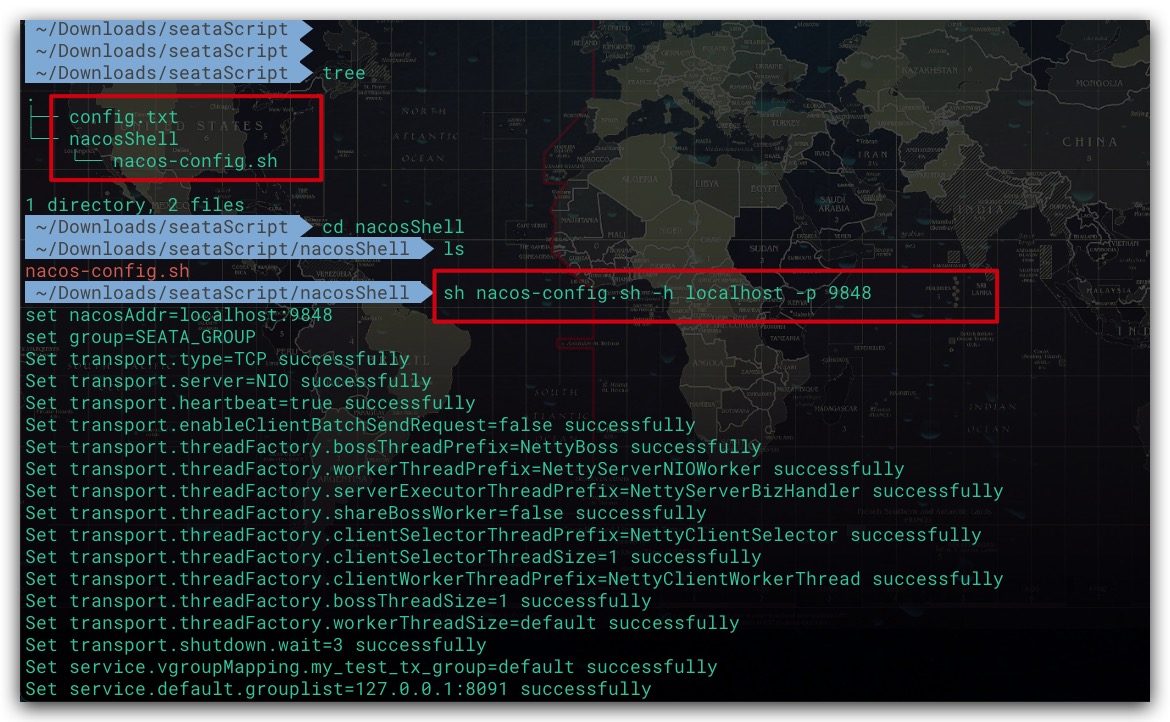
对于Seata Server而言,其配置信息支持两种形式:本地文件、配置中心。对于后者而言,我们需要将Seata的相关配置项导入到配置中心。同样,我们需要通过Github来下载配置文件config.txt及相应的导入脚本nacos-config.sh
1 2 3 4 5 https://github.com/seata/seata/blob/1.3.0/script/config-center/config.txt https://github.com/seata/seata/blob/1.3.0/script/config-center/nacos/nacos-config.sh
在通过Shell脚本导入配置至Nacos过程中,配置文件config.txt应与Shell脚本的上一级目录保持平行。然后在Shell脚本所在目录中执行如下命令即可
1 2 sh nacos-config.sh -h localhost -p 9848
该Shell脚本支持的选项如下所示
-h : Nacos服务的IP地址,默认为localhost-p : Nacos服务的Port端口,默认为8848-g : Nacos分组名,默认为SEATA_GROUP-t : Nacos命名空间ID。默认为””,即使用public命名空间-u : Nacos服务的用户名-w : Nacos服务的密码
效果如下所示
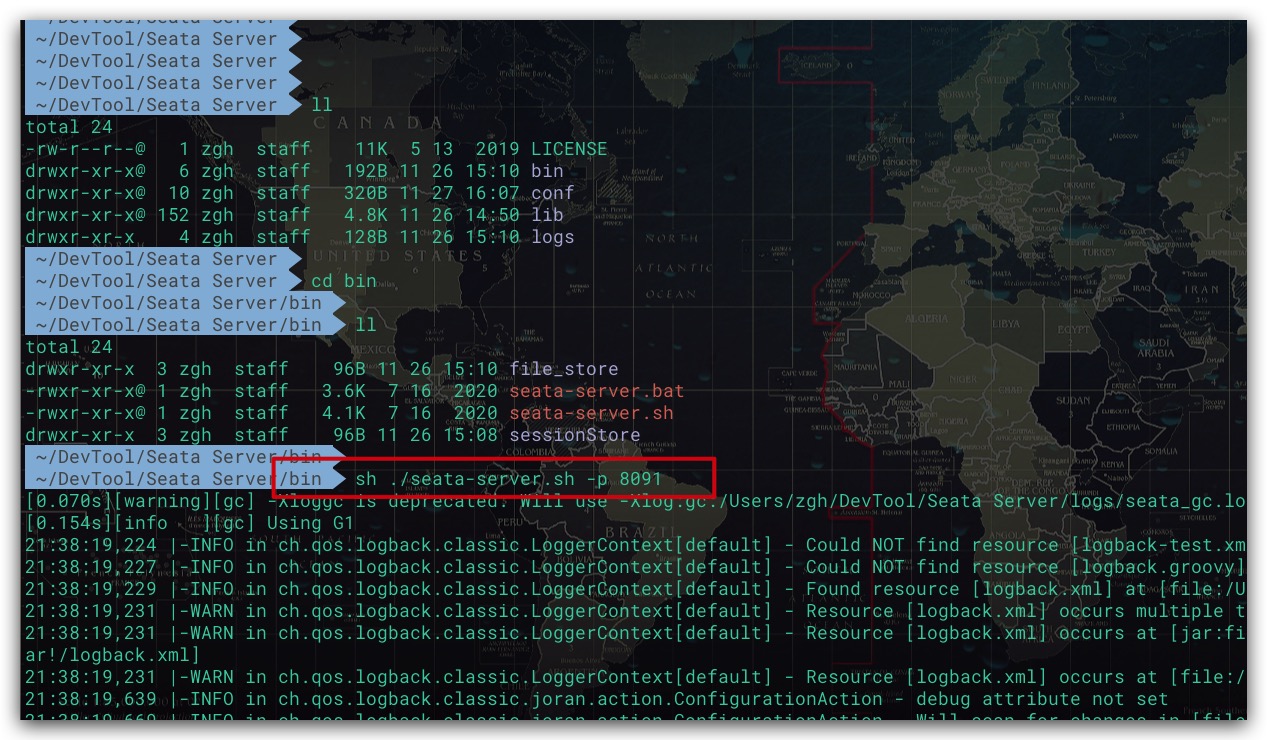
至此Seata Server相关环境及配置就完成了,只需通过Seata Server下bin目录的seata-server.sh脚本启动服务即可。其中-p选项指定服务使用的端口,默认为8091
搭建库存服务 POM依赖 通过SpringBoot搭建库存服务StorageService。这里给出关键性的依赖及版本,如下所示
1 2 3 4 5 6 7 8 9 10 11 12 13 14 15 16 17 18 19 20 21 22 23 24 25 26 27 28 29 30 31 32 33 34 35 36 37 38 39 40 41 42 43 44 45 46 47 48 49 50 51 52 53 54 55 56 57 58 59 60 61 62 63 64 65 66 67 68 69 70 71 72 73 74 <dependencyManagement > <dependencies > <dependency > <groupId > org.springframework.boot</groupId > <artifactId > spring-boot-dependencies</artifactId > <version > 2.3.2.RELEASE</version > <type > pom</type > <scope > import</scope > </dependency > <dependency > <groupId > org.springframework.cloud</groupId > <artifactId > spring-cloud-dependencies</artifactId > <version > Hoxton.SR8</version > <type > pom</type > <scope > import</scope > </dependency > <dependency > <groupId > com.alibaba.cloud</groupId > <artifactId > spring-cloud-alibaba-dependencies</artifactId > <version > 2.2.3.RELEASE</version > <type > pom</type > <scope > import</scope > </dependency > </dependencies > </dependencyManagement > <dependencies > <dependency > <groupId > com.alibaba.cloud</groupId > <artifactId > spring-cloud-starter-alibaba-seata</artifactId > <exclusions > <exclusion > <groupId > io.seata</groupId > <artifactId > seata-spring-boot-starter</artifactId > </exclusion > </exclusions > </dependency > <dependency > <groupId > io.seata</groupId > <artifactId > seata-spring-boot-starter</artifactId > <version > 1.3.0</version > </dependency > <dependency > <groupId > com.alibaba.cloud</groupId > <artifactId > spring-cloud-starter-alibaba-nacos-discovery</artifactId > </dependency > <dependency > <groupId > com.alibaba</groupId > <artifactId > fastjson</artifactId > <version > 1.2.76</version > </dependency > <dependency > <groupId > com.baomidou</groupId > <artifactId > mybatis-plus-boot-starter</artifactId > <version > 3.4.1</version > </dependency > </dependencies >
服务配置 该服务的配置文件如下所示
1
2
3
4
5
6
7
8
9
10
11
12
13
14
15
16
17
18
19
20
21
22
23
24
25
26
27
28
29
30
31
32
33
34
35
36
37
38
39
40
41
42
43
44
45
46
47
48
49
50
51
52
53
54
55
56
57
58
59
60
server: port: 8080 spring: application: name: StorageService datasource: type: com.alibaba.druid.pool.DruidDataSource driver-class-name: com.mysql.jdbc.Driver url: jdbc:mysql://localhost:9307/StorageDb?allowPublicKeyRetrieval=true&useSSL=false username: root password: 12345 cloud: nacos: discovery: server-addr: 127.0 .0 .1 :9848 alibaba: seata: tx-service-group: my_test_tx_group mybatis-plus: mapper-locations: classpath:mapper/*.xml seata: registry: type: nacos nacos: application: seata-server server-addr: 127.0 .0 .1 :9848 username: nacos password: nacos group: SEATA_GROUP config: type: nacos nacos: server-addr: 127.0 .0 .1 :9848 username: nacos password: nacos group: SEATA_GROUP enable-auto-data-source-proxy: true management: endpoints: web: exposure: include: "*" base-path: /actuator
服务实现 这里直接添加一个Controller类用以实现库存扣减,核心代码实现如下
1
2
3
4
5
6
7
8
9
10
11
12
13
14
15
16
17
18
19
20
21
22
23
24
25
26
27
28
29
30
31
32
33
34
35
@RestController @RequestMapping("goods") @Slf4j public class GoodsController { @Autowired private GoodsStorageService goodsStorageService; @RequestMapping("/sell") public String sell (@RequestBody GoodsDto goodsDto) { String msg = "success" ; goodsStorageService.sell(null , goodsDto); return msg; } } ... @Data @Builder @AllArgsConstructor @NoArgsConstructor public class GoodsDto { private String goodsName; private int num; }
作为TCC的分布式事务方案来说,对于一个售卖商品扣减库存的过程。需要根据Try-Confirm-Cancel的设计要求,将库存的扣减分为两阶段完成。首先在GoodsStorageService接口中定义sell、confirmSell、cancelSell方法,然后在接口上添加@LocalTCC注解,最后在Try方法上添加@TwoPhaseBusinessAction注解。具体地,@TwoPhaseBusinessAction注解的name属性只需保证唯一性即可、commitMethod/rollbackMethod属性用来设置两阶段调用的方法名。TCC中各方法的BusinessActionContext参数是TCC两阶段之间用来传递参数的context上下文,故在Controller中调用Try方法时BusinessActionContext参数只需传null值即可。并将通过@BusinessActionContextParameter注解将相关参数以指定名称存入context上下文。与此同时还在接口中提供了一个默认方法getParamByContext,以便于二阶段时从context上下文获取参数。为了保证TCC二阶段的Confirm、Cancel接口的幂等性,这里在实现类中通过向resultHolder存入xid全局事务ID进行幂等控制
1
2
3
4
5
6
7
8
9
10
11
12
13
14
15
16
17
18
19
20
21
22
23
24
25
26
27
28
29
30
31
32
33
34
35
36
37
38
39
40
41
42
43
44
45
46
47
48
49
50
51
52
53
54
55
56
57
58
59
60
61
62
63
64
65
66
67
68
69
70
71
72
73
74
75
76
77
78
79
80
81
82
83
84
85
86
87
88
89
90
91
92
93
94
95
96
97
98
99
100
101
102
@LocalTCC public interface GoodsStorageService { String paramName = "params" ; default GoodsDto getParamByContext (BusinessActionContext context) { JSONObject jsonObject = (JSONObject) context.getActionContext(paramName); GoodsDto goodsDto = jsonObject.toJavaObject(GoodsDto.class); return goodsDto; } @TwoPhaseBusinessAction(name = "sell", commitMethod = "confirmSell", rollbackMethod = "cancelSell") int sell (BusinessActionContext context, @BusinessActionContextParameter(paramName = paramName) GoodsDto goodsDto) ; void confirmSell (BusinessActionContext context) ; void cancelSell (BusinessActionContext context) ; } ... @Service @Slf4j public class GoodsStorageServiceImpl implements GoodsStorageService { private static Set<String> resultHolder = new ConcurrentHashSet <>(); @Autowired private GoodsStorageMapper goodsStorageMapper; @Override public int sell (BusinessActionContext context, GoodsDto goodsDto) { String xid = context.getXid(); int result = goodsStorageMapper.sell(goodsDto); log.info("[Goods Storage Service]: result: {}" , result); if ( result != 1 ) { throw new RuntimeException ("商品库存不足" ); } resultHolder.add( xid ); return result; } @Override public void confirmSell (BusinessActionContext context) { String xid = context.getXid(); if ( !resultHolder.contains(xid) ) { return ; } GoodsDto goodsDto = getParamByContext(context); goodsStorageMapper.confirmSell(goodsDto); resultHolder.remove(xid); log.info("[Goods Storage Service]: confirm sell" ); } @Override public void cancelSell (BusinessActionContext context) { String xid = context.getXid(); if ( !resultHolder.contains(xid) ) { return ; } GoodsDto goodsDto = getParamByContext(context); goodsStorageMapper.cancelSell(goodsDto); resultHolder.remove(xid); log.info("[Goods Storage Service]: cancel sell" ); } }
DB层面 商品库存表对应的实体类GoodsStorage如下所示
1 2 3 4 5 6 7 8 9 10 11 12 13 14 15 16 17 18 19 20 21 22 23 24 25 26 27 28 29 30 31 32 @Data @Builder @AllArgsConstructor @NoArgsConstructor @TableName("goods_storage") public class GoodsStorage { @TableId private int id; private String goodsName; private int stock; private int soldNum; private int freezeNum; }
而售卖商品扣减库存的各阶段方法所使用的SQL如下所示,至此就可以明白freezeNum冻结库存数这一中间状态的含义。这也是TCC方案两阶段的具体体现
1 2 3 4 5 6 7 8 9 10 11 12 13 14 15 16 17 18 <update id ="sell" parameterType ="com.aaron.StorageService.dto.GoodsDto" > update goods_storage set stock = stock - #{num}, freeze_num = freeze_num + #{num} where goods_name = #{goodsName} and (stock - #{num}) >= 0 </update > <update id ="confirmSell" parameterType ="com.aaron.StorageService.dto.GoodsDto" > update goods_storage set sold_num = sold_num + #{num}, freeze_num = freeze_num - #{num} where goods_name = #{goodsName} </update > <update id ="cancelSell" parameterType ="com.aaron.StorageService.dto.GoodsDto" > update goods_storage set stock = stock + #{num}, freeze_num = freeze_num - #{num} where goods_name = #{goodsName} </update >
搭建支付服务 为了验证分布式事务,自然不能只有一个微服务。故这里类似地我们再搭建一个PayService支付服务。当然基本搭建过程与StorageService服务并无明显差异。首先在POM依赖方面,PayService服务的POM依赖与StorageService服务一致,同样也需要引入Seata、Nacos等相关依赖。其次在服务配置方面,PayService服务的application.yml配置文件中关于Seata、Nacos相关的配置自然与StorageService服务并无二致。但需调整修改其所连接的数据库信息,部分配置如下所示
1
2
3
4
5
6
7
8
9
10
11
12
server: port: 90 spring: application: name: PayService datasource: type: com.alibaba.druid.pool.DruidDataSource driver-class-name: com.mysql.jdbc.Driver url: jdbc:mysql://localhost:9306/PayDb?allowPublicKeyRetrieval=true&useSSL=false username: root password: 12345
这里添加一个Controller用于进行余额、库存的扣减。作为分布式事务的发起者,这里需要添加一个@GlobalTransactional注解
1
2
3
4
5
6
7
8
9
10
11
12
13
14
15
16
17
18
19
20
21
22
23
24
25
26
27
28
29
30
31
32
33
34
35
36
37
38
39
40
41
42
43
44
45
46
47
48
49
50
51
52
53
54
@RestController @RequestMapping("pay") @Slf4j public class PayController { @Autowired private RestTemplate restTemplate; @Autowired private PayService payService; @GlobalTransactional @RequestMapping("/buy") public String buy () { PayDto payDto = new PayDto ("Aaron" ,2000 ); payService.pay(null , payDto); String url = "http://StorageService/goods/sell" ; GoodsDto goodsDto = new GoodsDto ("iPhone" , 5 ); String response = restTemplate.postForObject(url, goodsDto, String.class); return "complete" ; } } ... @Configuration public class RestTemplateConfig { @Bean @LoadBalanced public RestTemplate restTemplate () { return new RestTemplate (); } } ... @Data @Builder @AllArgsConstructor @NoArgsConstructor public class PayDto { private String name; private int money; }
类似地,Service层同样按照TCC的设计原则进行设计
1
2
3
4
5
6
7
8
9
10
11
12
13
14
15
16
17
18
19
20
21
22
23
24
25
26
27
28
29
30
31
32
33
34
35
36
37
38
39
40
41
42
43
44
45
46
47
48
49
50
51
52
53
54
55
56
57
58
59
60
61
62
63
64
65
66
67
68
69
70
71
72
73
74
75
76
77
78
79
80
81
82
83
84
85
86
87
88
89
90
91
92
93
94
95
96
97
98
99
100
101
102
@LocalTCC public interface PayService { String paramName = "params" ; default PayDto getParamByContext (BusinessActionContext context) { JSONObject jsonObject = (JSONObject) context.getActionContext(paramName); PayDto payDto = jsonObject.toJavaObject(PayDto.class); return payDto; } @TwoPhaseBusinessAction(name = "pay", commitMethod = "confirmPay", rollbackMethod = "cancelPay") int pay (BusinessActionContext context, @BusinessActionContextParameter(paramName = paramName) PayDto payDto ) ; void confirmPay (BusinessActionContext context) ; void cancelPay (BusinessActionContext context) ; } ... @Service @Slf4j public class PayServiceImpl implements PayService { private static Set<String> resultHolder = new ConcurrentHashSet <>(); @Autowired private PayMapper payMapper; @Override public int pay (BusinessActionContext context, PayDto payDto) { String xid = context.getXid(); int result = payMapper.pay(payDto); log.info("[Pay Service]: result: {}" , result); if ( result != 1 ) { throw new RuntimeException ("账户余额不足" ); } resultHolder.add( xid ); return result; } @Override public void confirmPay (BusinessActionContext context) { String xid = context.getXid(); if ( !resultHolder.contains(xid) ) { return ; } PayDto payDto = getParamByContext(context); payMapper.confirmPay( payDto ); resultHolder.remove(xid); log.info("[Pay Service]: confirm pay" ); } @Override public void cancelPay (BusinessActionContext context) { String xid = context.getXid(); if ( !resultHolder.contains(xid) ) { return ; } PayDto payDto = getParamByContext(context); payMapper.cancelPay( payDto ); resultHolder.remove(xid); log.info("[Pay Service]: cancel pay" ); } }
余额表对应的实体类Pay如下所示
1
2
3
4
5
6
7
8
9
10
11
12
13
14
15
16
17
18
19
20
21
22
23
24
@Data @Builder @AllArgsConstructor @NoArgsConstructor @TableName("member_balance") public class Pay { @TableId private int id; private String name; private int balance; private int freeze; }
而支付的各阶段方法所使用的SQL如下所示,其同样通过中间状态freeze冻结金额这一中间状态实现TCC的两阶段
1 2 3 4 5 6 7 8 9 10 11 12 13 14 15 16 17 18 <update id ="pay" parameterType ="com.aaron.PayService.dto.PayDto" > update member_balance set balance = balance - #{money}, freeze = freeze + #{money} where name = #{name} and (balance - #{money}) >= 0 </update > <update id ="confirmPay" parameterType ="com.aaron.PayService.dto.PayDto" > update member_balance set freeze = freeze - #{money} where name = #{name} </update > <update id ="cancelPay" parameterType ="com.aaron.PayService.dto.PayDto" > update member_balance set balance = balance + #{money}, freeze = freeze - #{money} where name = #{name} </update >
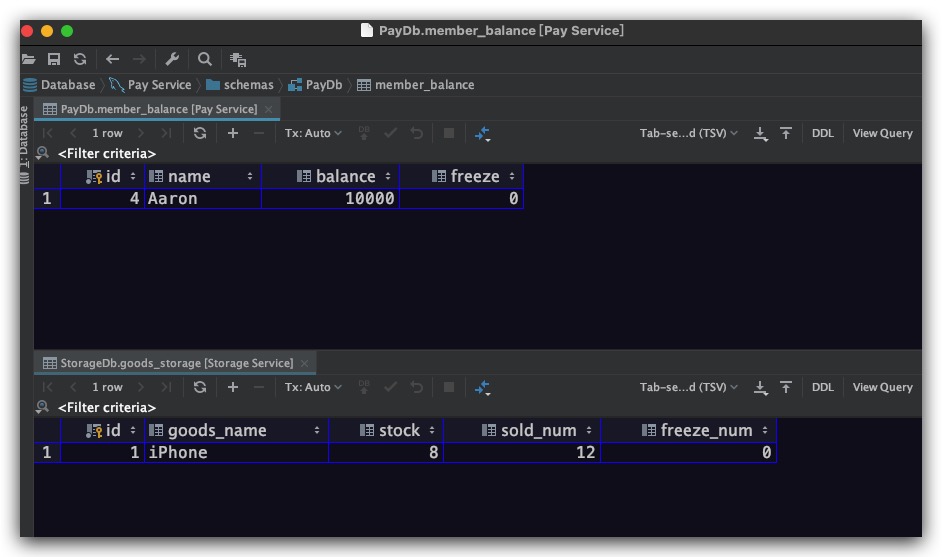
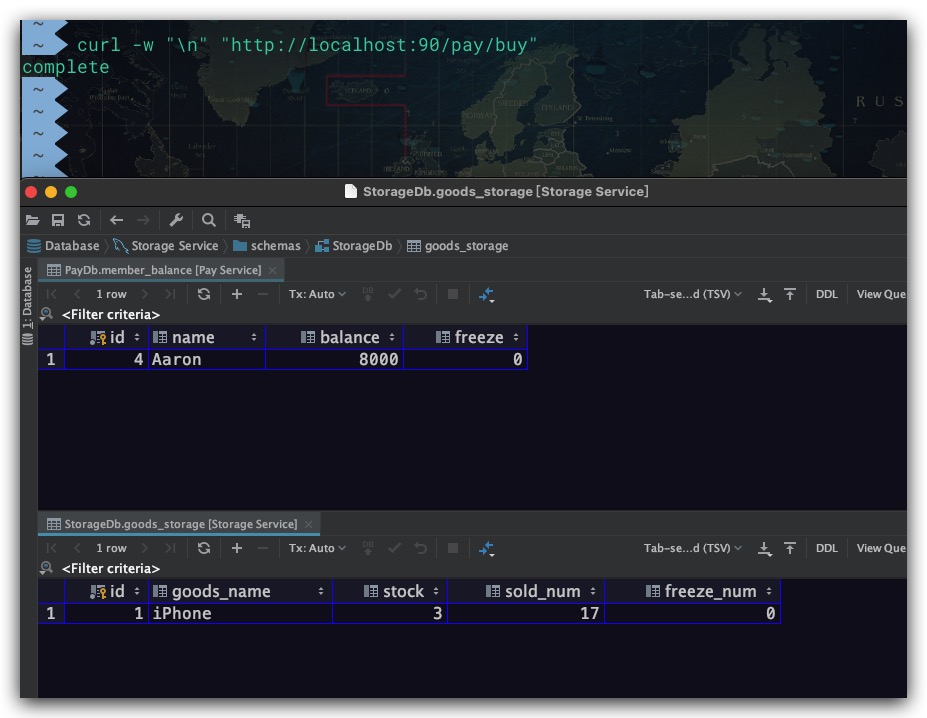
测试 在测试之前,需要对PayService支付服务、StorageService库存服务各自的数据库完成表的建立及数据初始化工作,如下图所示
分别在90、8080端口启动PayService支付服务、StorageService库存服务,当我们第一次调用PayService支付服务的buy接口时,可以看到余额、库存均被正常扣减
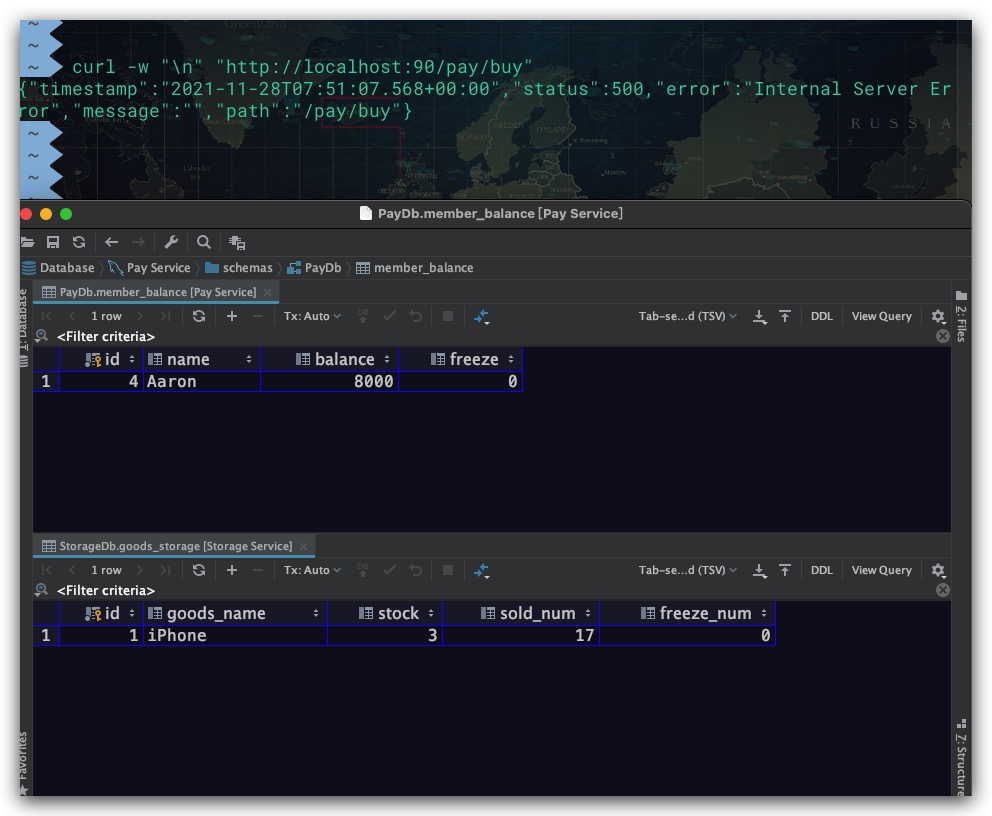
而当第二次调用该接口时,由于商品库存不足。则会导致整个分布式事务进行回滚。可以看到余额、库存的数据由于被正常回滚,故未发生意外扣除