SpringCloud Stream针对消息中间件服务致力于提供统一的编程模型

SpringCloud Stream 模型
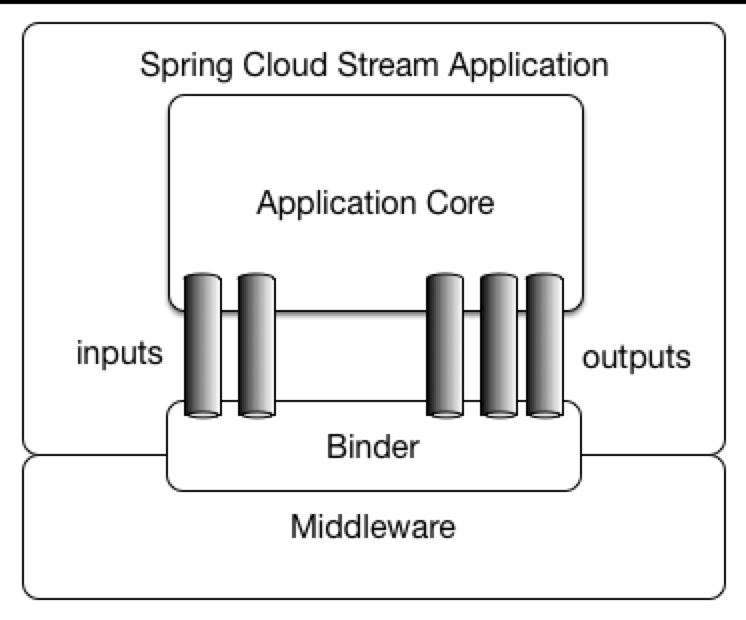
针对市面上多种消息中间件并存的局面,Spring Cloud Stream作为一个构建消息驱动的微服务框架。其目标在于对开发者提供统一的消息中间件操作接口,屏蔽底层中间件的实现细节。可以看到Stream本身并不具有消息中间件的能力,其底层依然需要依赖具体的中间件来实现消息服务。现阶段Stream支持RabbitMQ、Kafka两种消息中间件。在Stream的模型中,其针对各消息中间件均提供了相应的Binder,其实现了对具体中间件的封装、屏蔽功能。同时开发者在应用程序中只需通过相应的通道(输出通道output、输入通道input)与Binder进行交互,即可实现消息的生产、消费。其模型架构如下所示
消息生产者
这里我们以Kafka为例介绍如何通过SpringCloud Stream使用消息服务。首先建立一个消息的生产者order服务,向POM中引入spring-cloud-starter-stream-kafka依赖
1
2
3
4
5
6
7
8
9
10
11
12
13
14
15
16
17
18
19
20
21
22
23
24
25
26
27
28
29
30
31
32
33
| <dependencyManagement>
<dependencies>
<dependency>
<groupId>org.springframework.boot</groupId>
<artifactId>spring-boot-dependencies</artifactId>
<version>2.2.2.RELEASE</version>
<type>pom</type>
<scope>import</scope>
</dependency>
<dependency>
<groupId>org.springframework.cloud</groupId>
<artifactId>spring-cloud-dependencies</artifactId>
<version>Hoxton.SR1</version>
<type>pom</type>
<scope>import</scope>
</dependency>
</dependencies>
</dependencyManagement>
<dependencies>
<dependency>
<groupId>org.springframework.cloud</groupId>
<artifactId>spring-cloud-starter-stream-kafka</artifactId>
</dependency>
</dependencies>
|
配置文件如下所示。可以看到,我们在其中定义所使用的Binder类型及相关底层中间件的连接信息。然后定义相关通道,在Kafka中通道的目的地为Topic(RabbitMQ下则为Exchange)
1
2
3
4
5
6
7
8
9
10
11
12
13
14
15
16
17
18
19
20
21
22
23
24
25
26
27
28
29
30
31
32
33
34
| server:
port: 83
spring:
application:
name: order
cloud:
stream:
binders:
myKafka:
type: kafka
environment:
spring:
kafka:
bootstrap-servers: 127.0.0.1:9092
bindings:
alarmOutput:
destination: topic.alarm
content-type: application/json
binder: myKafka
billOutput:
destination: topic.bill
content-type: application/json
binder: myKafka
|
通过接口定义生产者的通道。具体地,通过@Output注解来标识Stream模型中的输出通道。其中通道名即为配置文件中所定义的通道名。在Stream的模型中,生产者发布的消息通过输出通道离开应用程序
1
2
3
4
5
6
7
8
9
10
11
12
13
14
15
16
17
18
19
20
21
22
23
24
25
| import org.springframework.cloud.stream.annotation.Output;
import org.springframework.messaging.MessageChannel;
public interface MySource {
String alarmOutput = "alarmOutput";
String billOutput = "billOutput";
@Output(alarmOutput)
MessageChannel alarmOutput();
@Output(billOutput)
MessageChannel billOutput();
}
|
现在来实现生产者的消息发送方法。首先向@EnableBinding注解传入刚刚的接口类MySource来使能绑定过程,然后注入MySource实例以调用相关的发送方法,实现如下。由于@EnableBinding注解本身继承了@Configuration注解,故无需开发者自行添加
1
2
3
4
5
6
7
8
9
10
11
12
13
14
15
16
17
18
19
20
21
22
23
24
25
| import org.springframework.cloud.stream.annotation.EnableBinding;
import org.springframework.messaging.MessageChannel;
import org.springframework.messaging.support.MessageBuilder;
@EnableBinding(MySource.class)
public class SendService {
@Autowired
private MySource mySource;
public void sendAlarm(AlarmMsg alarmMsg) {
String json = JSON.toJSONString(alarmMsg);
MessageChannel messageChannel = mySource.alarmOutput();
messageChannel.send(MessageBuilder.withPayload(json).build() );
}
public void sendBill(Bill bill) {
String json = JSON.toJSONString(bill);
MessageChannel messageChannel = mySource.billOutput();
messageChannel.send(MessageBuilder.withPayload(json).build() );
}
}
|
现在,我们添加一个Controller来便于我们发送消息进行测试
1
2
3
4
5
6
7
8
9
10
11
12
13
14
15
16
17
18
19
20
21
22
23
24
25
26
27
| @RestController
@RequestMapping("order")
public class MqController {
@Autowired
private SendService sendService;
@GetMapping("/sendAlarm")
public void sendAlarm(@RequestParam String msg) {
AlarmMsg alarmMsg = AlarmMsg.builder()
.msg(msg)
.level(3)
.type("ERROR")
.build();
sendService.sendAlarm(alarmMsg);
}
@GetMapping("/sendBill")
public void sendBill(@RequestParam Double money ) {
Bill bill = Bill.builder()
.money(money)
.remark("消费")
.build();
sendService.sendBill(bill);
}
}
|
消息消费者
现在来实现消息的消费者payment服务,同样需要向POM引入spring-cloud-starter-stream-kafka依赖,此处不再赘述。消费者相关配置如下所示,可以看到生产者、消费者虽然使用不同的通道,但其是通过相同的目的地(即主题)实现对接
1
2
3
4
5
6
7
8
9
10
11
12
13
14
15
16
17
18
19
20
21
22
23
24
25
26
27
28
29
30
31
32
33
34
| server:
port: 8008
spring:
application:
name: payment
cloud:
stream:
binders:
myKafka:
type: kafka
environment:
spring:
kafka:
bootstrap-servers: 127.0.0.1:9092
bindings:
alarmInput:
destination: topic.alarm
content-type: application/json
binder: myKafka
billInput:
destination: topic.bill
content-type: application/json
binder: myKafka
|
通过接口定义消费者的通道。具体地,通过@Input注解来标识Stream模型中的输入通道。其中通道名即为配置文件中所定义的通道名。在Stream的模型中,消费者通过输入通道接收、消费进入应用程序的消息
1
2
3
4
5
6
7
8
9
10
11
12
13
14
15
16
17
18
19
20
21
22
23
24
25
| import org.springframework.cloud.stream.annotation.Input;
import org.springframework.messaging.SubscribableChannel;
public interface MySink {
String alarmInput = "alarmInput";
String billInput = "billInput";
@Input(alarmInput)
SubscribableChannel alarmInput();
@Input(billInput)
SubscribableChannel billInput();
}
|
现在来实现消息的监听。首先向@EnableBinding注解传入刚刚的接口类MySink来使能绑定过程,然后向@StreamListener注解传入相关输入通道的名称,实现消息的监听消费。实现如下所示
1
2
3
4
5
6
7
8
9
10
11
12
13
14
15
16
17
18
19
20
21
22
23
24
| import org.springframework.cloud.stream.annotation.EnableBinding;
import org.springframework.cloud.stream.annotation.StreamListener;
@EnableBinding(MySink.class)
public class ReceiveService {
@Value("${server.port}")
private Integer serverPort;
@StreamListener(MySink.alarmInput)
public void receiveAlarm(String msg) {
AlarmMsg alarmMsg = JSON.parseObject(msg, AlarmMsg.class);
String info = "[ Payment:"+serverPort+" ]: " + alarmMsg;
System.out.println(info);
}
@StreamListener(MySink.billInput)
public void receiveBill(String msg) {
Bill bill = JSON.parseObject(msg, Bill.class);
String info = "[ Payment:"+serverPort+" ]: " + bill;
System.out.println(info);
}
}
|
验证
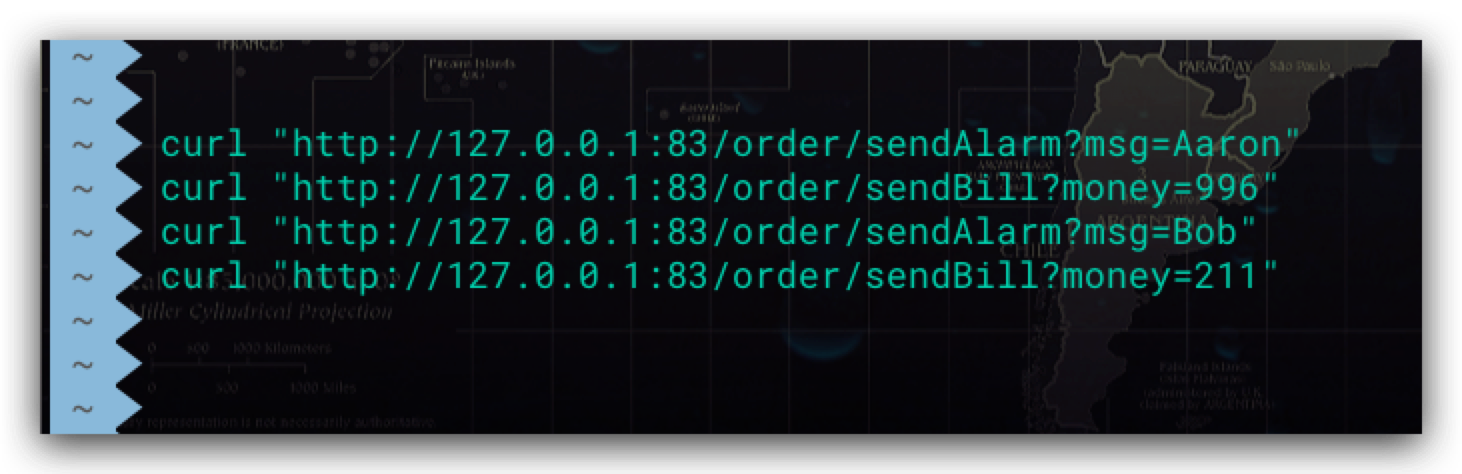
启动消息生产者order、消费者payment服务,并向order服务发送HTTP请求以触发消息的发送。如下所示
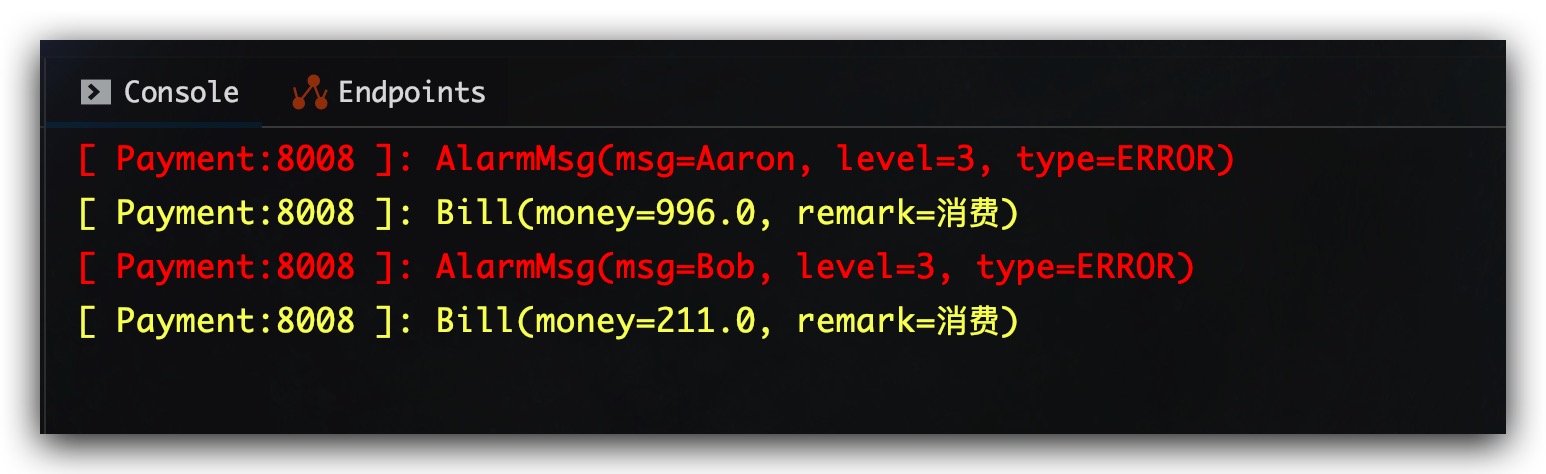
消费者payment服务收到的消息,如下所示,符合预期
Note
对于同一消费者服务的多个实例,未避免消息的重复消费,需将各实例的消费者群组的名称设置为相同的。具体地,可在配置文件通过 spring.cloud.stream.bindings..group 配置项设置消费者群组的名称
参考文献
- Spring微服务实战 John Carnell著
