Hystrix是Netflix开源的一款分布式容错框架,其为微服务提供了一整套服务保护、容错机制。从而避免由于个别服务故障而引起的级联故障,即所谓的服务雪崩效应

服务降级
所谓服务降级是指所调用服务发生意外时,调用自己本地方法(即fallback降级方法)返回缺省值。而导致服务降级的原因包括但不限于服务超时、异常、宕机、熔断、服务资源不足(例如线程、信号量等)等。实践过程中,首先在payment服务的POM文件引入Hystrix依赖,如下所示
1
2
3
4
5
6
7
8
9
10
11
12
13
14
15
16
17
18
19
20
21
22
23
24
25
26
27
28
29
30
31
32
33
| <dependencyManagement>
<dependencies>
<dependency>
<groupId>org.springframework.boot</groupId>
<artifactId>spring-boot-dependencies</artifactId>
<version>2.2.2.RELEASE</version>
<type>pom</type>
<scope>import</scope>
</dependency>
<dependency>
<groupId>org.springframework.cloud</groupId>
<artifactId>spring-cloud-dependencies</artifactId>
<version>Hoxton.SR1</version>
<type>pom</type>
<scope>import</scope>
</dependency>
</dependencies>
</dependencyManagement>
<dependencies>
<dependency>
<groupId>org.springframework.cloud</groupId>
<artifactId>spring-cloud-starter-netflix-hystrix</artifactId>
</dependency>
</dependencies>
|
可通过@HystrixCommand注解,配置该方法所对应的降级方法。具体通过fallbackMethod属性配置一个入参、出参类型一致的降级方法。进一步地,还可以通过commandProperties属性设置相关降级配置。但如果需要对每个@HystrixCommand注解都添加重复的配置,显然十分麻烦。故可以在类上添加@DefaultProperties注解设置该类默认的降级属性配置,其会对该类中添加了@HystrixCommand注解的方法,提供默认的降级配置。特别地对于该类默认的降级方法,一方面通过defaultFallback属性设置;另一方面该降级方法是无入参的,但出参类型需要与被降级的方法保持一致
1
2
3
4
5
6
7
8
9
10
11
12
13
14
15
16
17
18
19
20
21
22
23
24
25
26
27
28
29
30
31
32
33
34
35
36
37
38
39
40
41
42
43
44
45
46
47
48
49
50
51
52
53
54
55
56
57
58
59
60
61
62
63
| @RestController
@RequestMapping("pay2")
@DefaultProperties(defaultFallback = "defaultFallback")
public class PaymentController2 {
@GetMapping("/test1")
@HystrixCommand(fallbackMethod = "timeoutFallback", commandProperties = {
@HystrixProperty(name = "execution.isolation.thread.timeoutInMilliseconds", value = "5000")
})
public String test1(@RequestParam Integer time) {
try {
Thread.sleep( time );
} catch (Exception e) {
}
String msg = "[Payment Service - test1], time:" + time;
return msg;
}
@GetMapping("/test2")
@HystrixCommand
public String test2(@RequestParam Integer time) {
try {
Thread.sleep( time );
} catch (Exception e) {
}
String msg = "[Payment Service - test2], time:" + time;
return msg;
}
@GetMapping("/test3")
@HystrixCommand
public String test3(@RequestParam Integer num) {
int result = 10/num;
String msg = "[Payment Service - test3], num:" + num;
return msg;
}
public String timeoutFallback(Integer time) {
return "payment服务发生超时, param: time: " + time;
}
public String defaultFallback() {
return "payment服务暂不可用";
}
}
|
最后,在启动类上添加@EnableHystrix注解以启用Hystrix
1
2
3
4
5
6
7
8
| @SpringBootApplication
@EnableDiscoveryClient
@EnableHystrix
public class PaymentApplication {
public static void main(String[] args) {
SpringApplication.run(PaymentApplication.class, args);
}
}
|
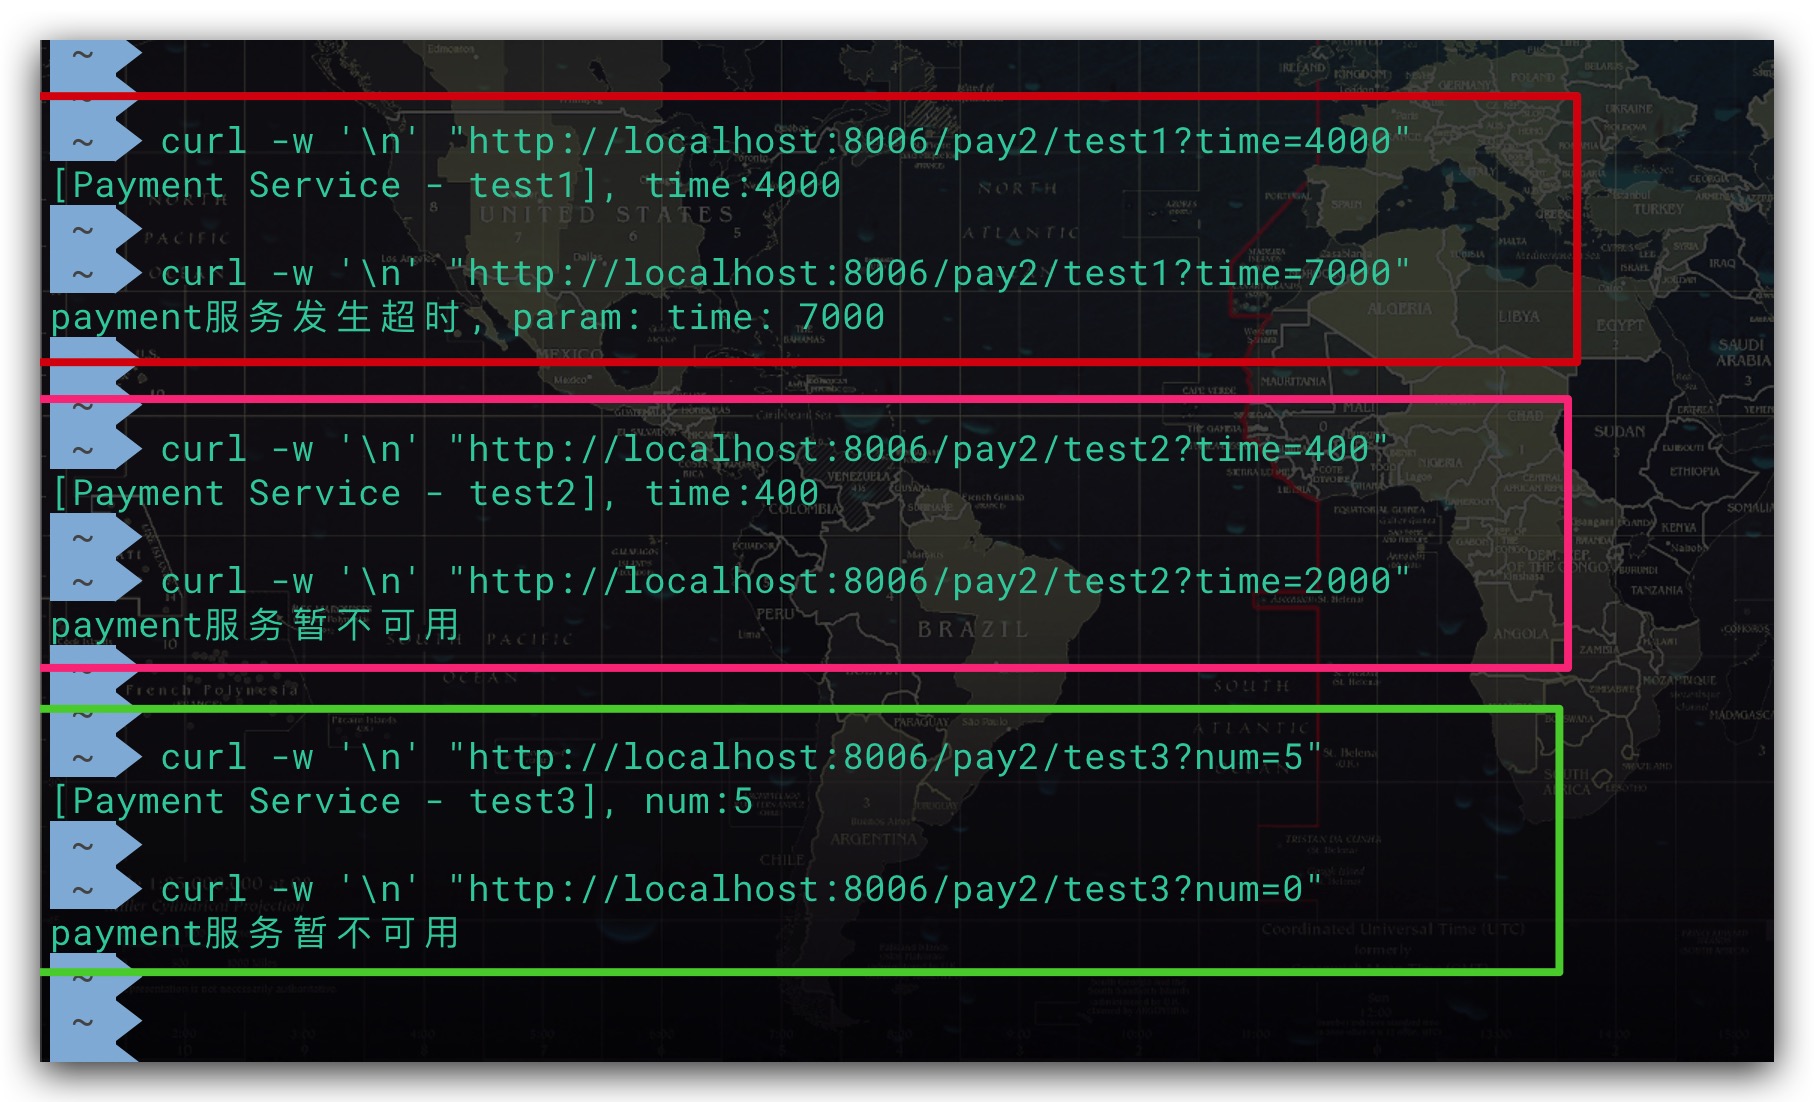
测试效果如下,符合预期
服务熔断
Hystrix的服务熔断采用断路器模式的思想进行设计。在该模式中存在如下三种状态
- Closed:关闭状态。接受请求,服务的主逻辑可以被访问调用
- Open:打开状态。拒绝请求,服务的主逻辑无法执行。该服务如果有相应的降级方法则执行降级方法,否则直接抛出错误响应
- Half-Open:半开状态。处于该状态时,其会允许一部分请求流量通过,尝试执行主逻辑。如果发现调用成功则说明当前服务可以被恢复,进而变为Closed状态;否则调用失败,继续变为Open状态
从上可以看到,正是由于Half-Open状态的存在,为服务的自我恢复提供了一种思路。关于上述三种状态的转换逻辑,如下所示。在服务初始阶段,断路器肯定处于Closed状态。在断路器统计的滑动时间窗口内,满足一定的打开条件时,断路器才会进入Open状态。当断路器进入Open状态达到一定时间后会进入Half-Open状态,让一部分请求通过以验证服务是否可以被恢复,并根据验证结果决定进入Closed或Open状态
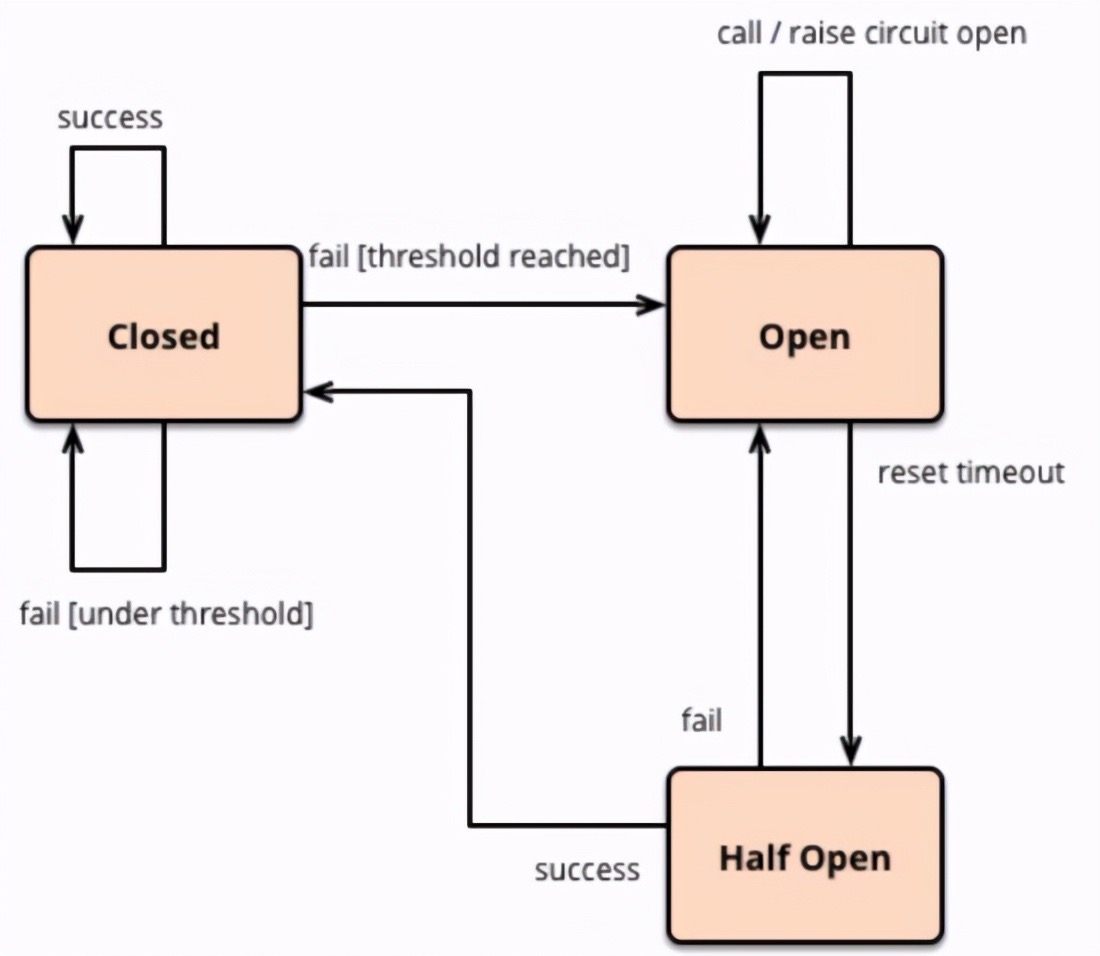
这里需要补充说明的是,断路器统计的滑动时间窗口可通过 metrics.rollingStats.timeInMilliseconds 进行配置。而断路器的打开条件则是指在该时间窗口内,其接受的请求数、请求的失败率均达到阈值。需要注意的是,这两个阈值必须同时满足。可分别通过 circuitBreaker.requestVolumeThreshold、circuitBreaker.errorThresholdPercentage 进行配置。最后,对于断路器在进入Open状态后需要多长时间才会进入Half-Open状态,则可通过 circuitBreaker.sleepWindowInMilliseconds 进行配置
为了方便验证测试,我们在PaymentController2类继续添加一个新的方法test4
1
2
3
4
5
6
7
8
9
10
11
12
13
14
15
16
17
18
19
20
21
22
23
24
25
26
27
28
29
30
31
32
33
34
35
36
37
38
39
| @RestController
@RequestMapping("pay2")
@DefaultProperties(defaultFallback = "defaultFallback")
public class PaymentController2 {
...
@GetMapping("/test4")
@HystrixCommand( commandProperties = {
// 打开断路器
@HystrixProperty(name = "circuitBreaker.enabled", value = "true"),
// 断路器统计的滑动时间窗口, Unit: ms
@HystrixProperty(name = "metrics.rollingStats.timeInMilliseconds", value = "10000"),
// 断路器的请求数阈值
@HystrixProperty(name = "circuitBreaker.requestVolumeThreshold", value = "5"),
// 断路器的请求失败率阈值, Unit: %
@HystrixProperty(name = "circuitBreaker.errorThresholdPercentage", value = "70"),
// 断路器进入Open打开状态多长时间后, 允许再次尝试处理部分请求(即Half-Open半开状态), Unit: ms
@HystrixProperty(name = "circuitBreaker.sleepWindowInMilliseconds", value = "10000")
})
public String test4(@RequestParam Integer num) {
if(num < 50) {
throw new RuntimeException("非法参数异常");
}
String msg = "[Payment Service - test4], num:" + num;
return msg;
}
public String defaultFallback() {
return "payment服务暂不可用";
}
}
|
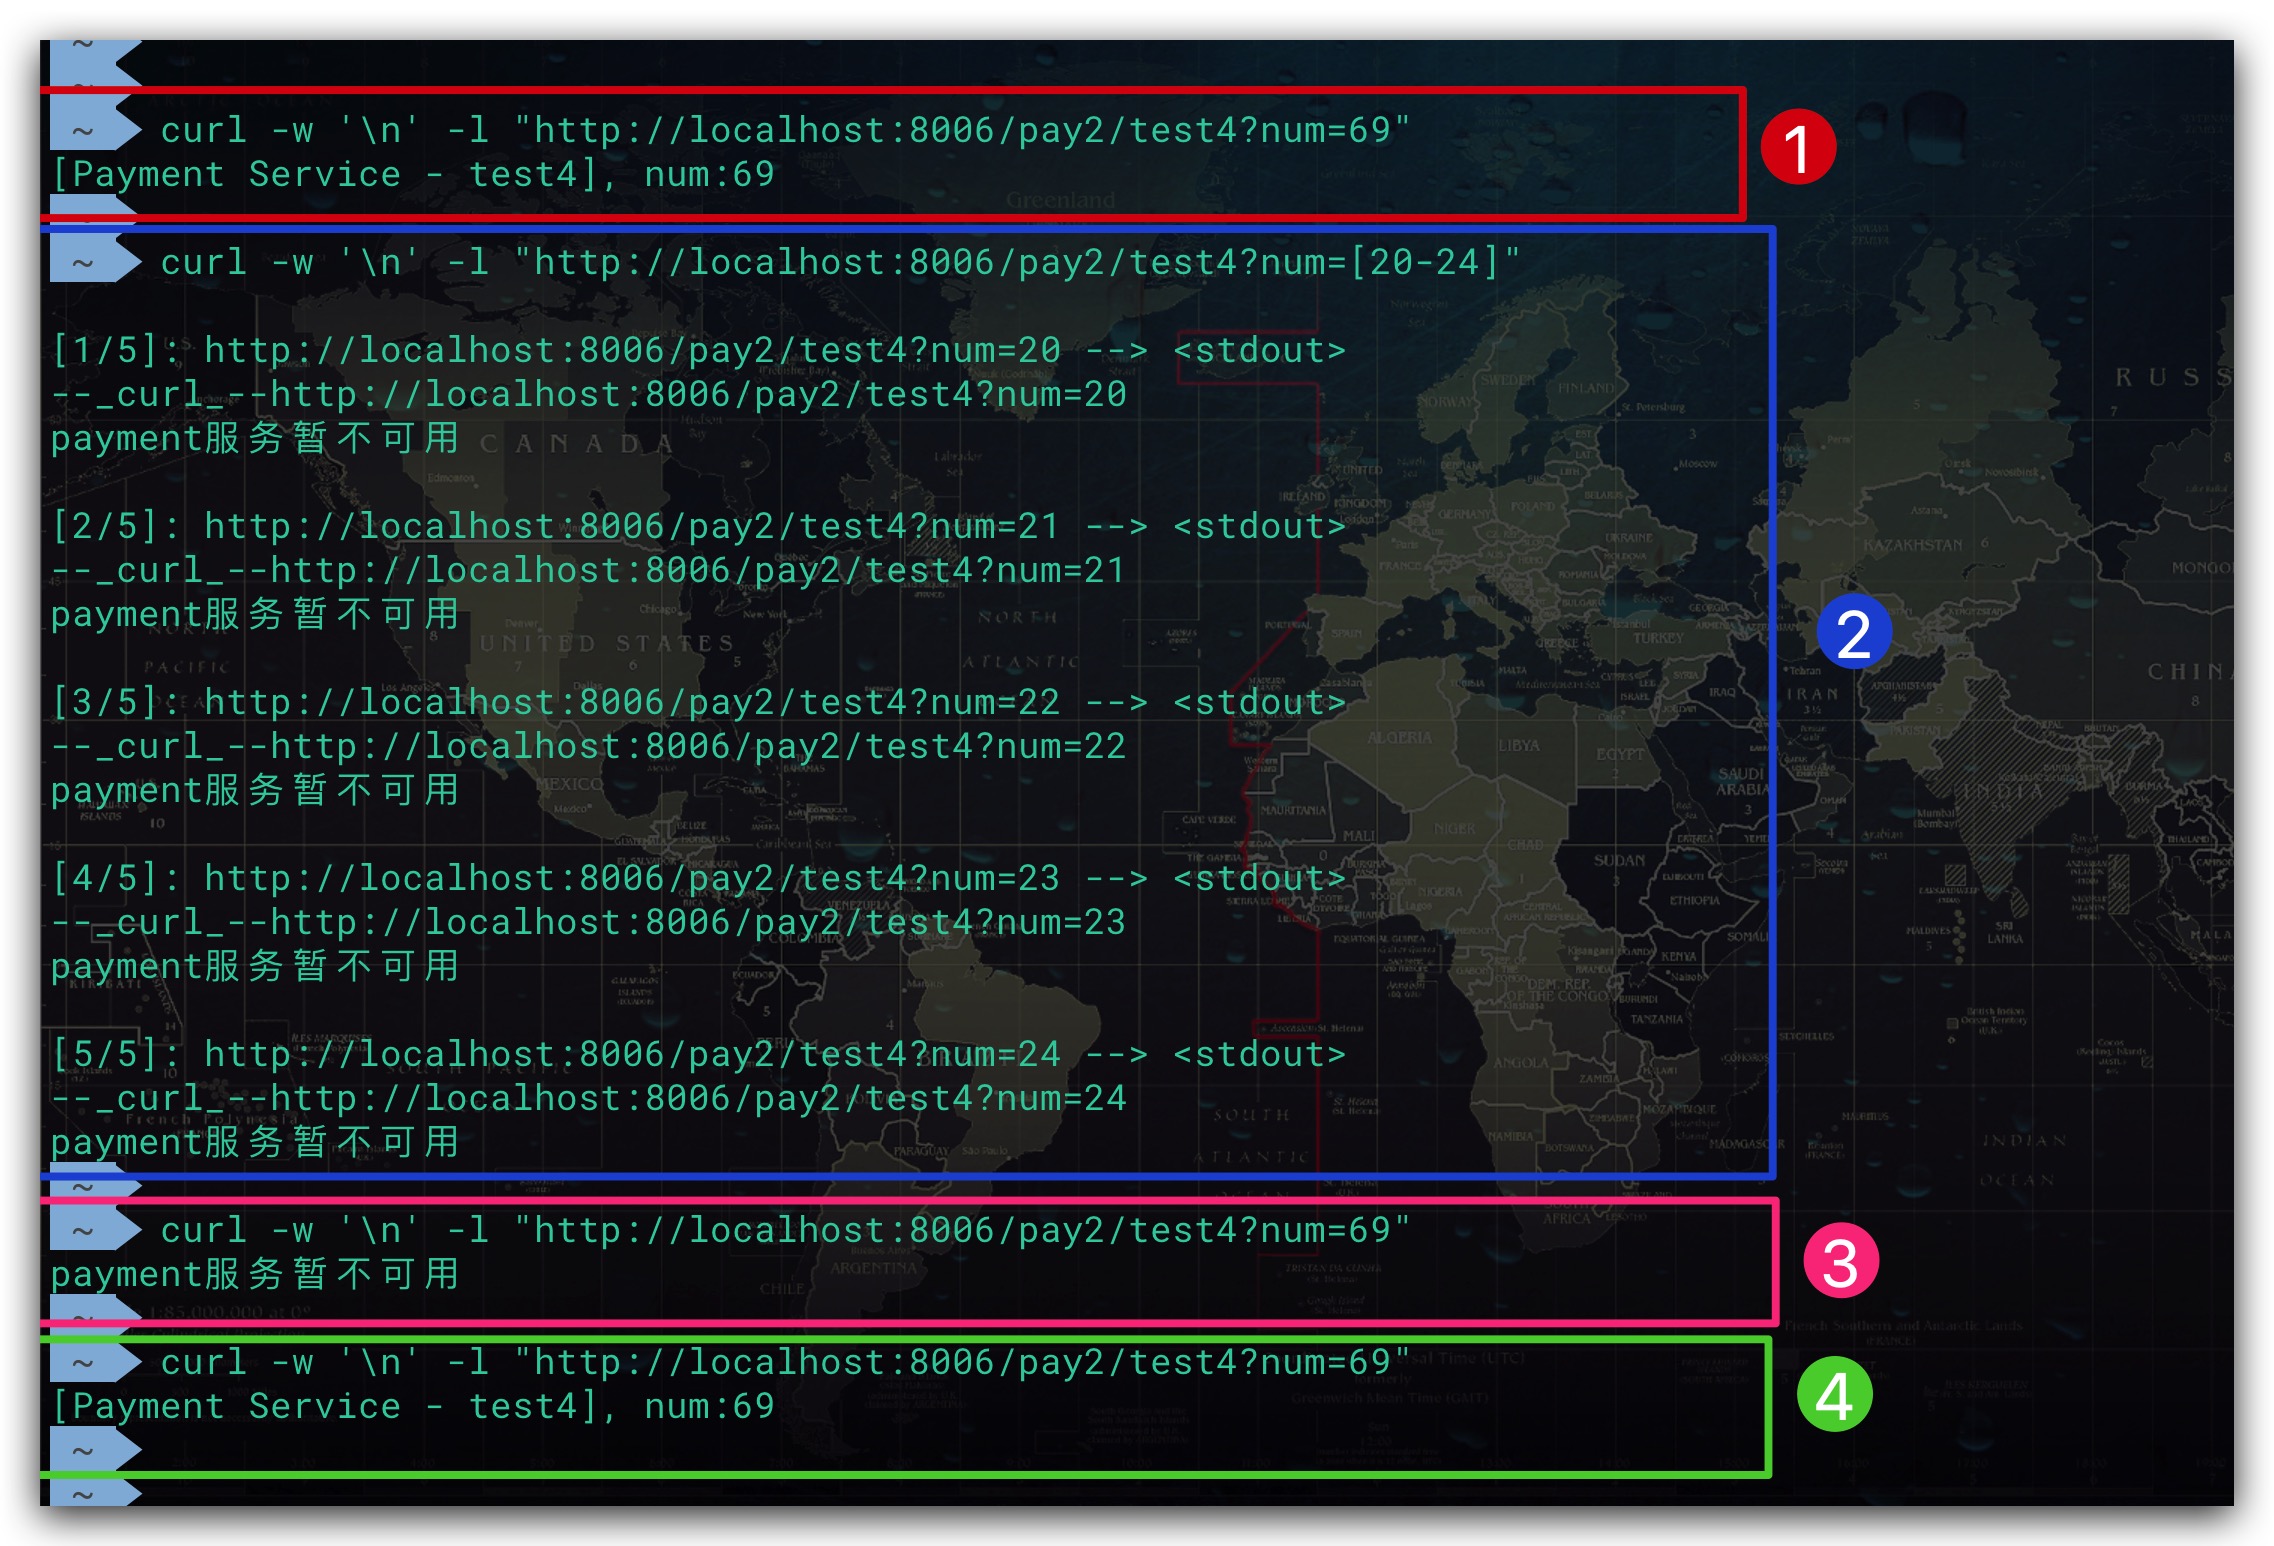
测试结果如下所示。第①次访问时,可以看到访问正常,执行了主流程;第②次访问时,发送了5个请求且访问结果均失败被降级;然后马上开始第③次访问,从测试结果可以看出由于该服务已经被熔断了,直接走降级方法;等过了一段时间后,服务恢复第④次访问成功
服务限流
Hystrix提供了两种隔离策略:线程池隔离、信号量隔离。这里我们以前者为例介绍如何进行限流,信号量隔离同理。在线程池隔离的场景下,可通过控制线程池相关参数实现流量控制。这样当线程池资源不足时,对于新的请求就进行降级。为了方便验证测试,我们在PaymentController2类继续添加一个新的方法test5
1
2
3
4
5
6
7
8
9
10
11
12
13
14
15
16
17
18
19
20
21
22
23
24
25
26
27
28
29
30
31
32
33
34
35
36
37
38
39
40
41
42
43
44
45
46
47
| @RestController
@RequestMapping("pay2")
@DefaultProperties(defaultFallback = "defaultFallback")
public class PaymentController2 {
...
@GetMapping("/test5")
@HystrixCommand(
commandProperties = {
// 方法超时配置, Unit: ms
@HystrixProperty(name = "execution.isolation.thread.timeoutInMilliseconds", value = "15000"),
// 资源隔离模式: 线程池隔离
@HystrixProperty(name = "execution.isolation.strategy", value = "THREAD")
},
threadPoolProperties = {
// 核心线程数
@HystrixProperty(name = "coreSize", value = "2"),
// 等待队列容量, -1表示不启用
@HystrixProperty(name = "maxQueueSize", value = "-1")
}
)
public String test5(@RequestParam Integer num) {
if(num < 50) {
throw new RuntimeException("非法参数异常");
}
try {
Thread.sleep( 10000 );
} catch (Exception e) {
}
String msg = "[Payment Service - test5], num:" + num;
return msg;
}
public String defaultFallback() {
return "payment服务暂不可用";
}
}
|
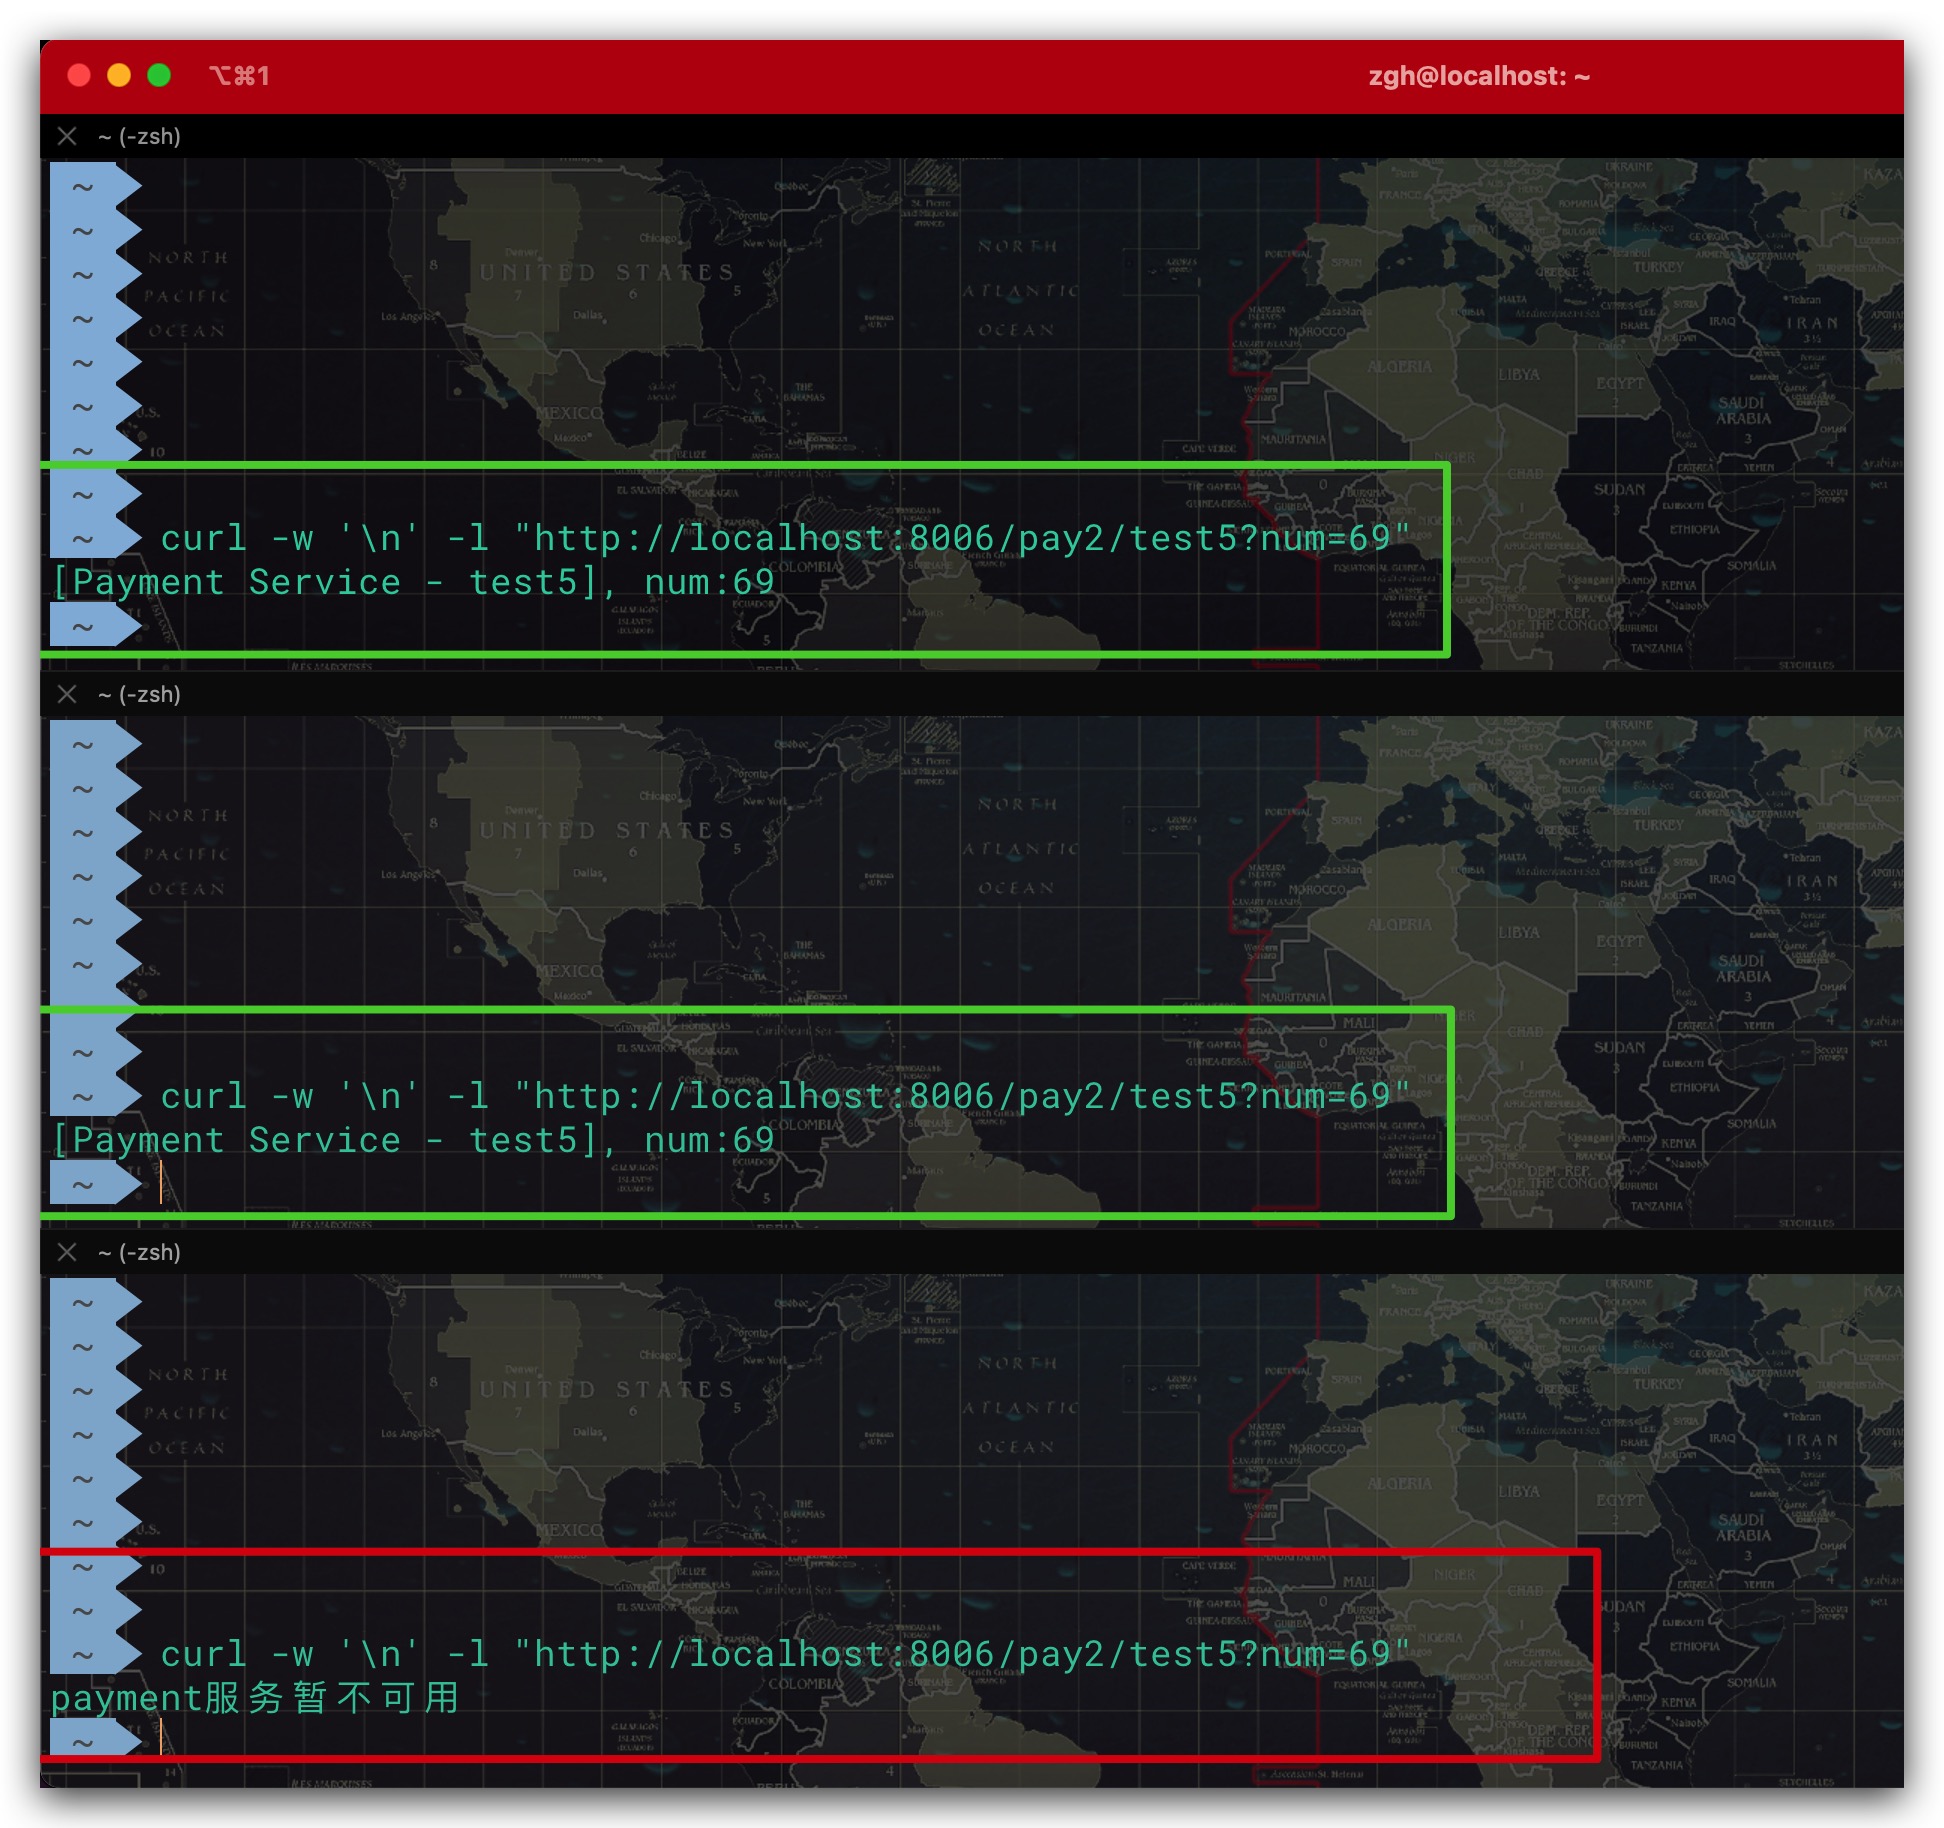
对于该服务接口其最大并发量为2。这样同时发送3个请求时,可以看到前2个请求正常处理。但第3个请求由于(线程池)资源不足被限流了,故进行降级处理。测试结果符合预期
服务监控
Hystrix还提供了Dashboard以便通过可视化的方式实现服务监控。这里我们建立一个HystrixDashboard服务对目标服务进行监控。首先在POM中我们引入 spring-cloud-starter-netflix-hystrix-dashboard 依赖,如下所示
1
2
3
4
5
6
7
8
9
10
11
12
13
14
15
16
17
18
19
20
21
22
23
24
25
26
27
28
29
30
31
32
33
34
35
36
37
38
39
| <dependencyManagement>
<dependencies>
<dependency>
<groupId>org.springframework.boot</groupId>
<artifactId>spring-boot-dependencies</artifactId>
<version>2.2.2.RELEASE</version>
<type>pom</type>
<scope>import</scope>
</dependency>
<dependency>
<groupId>org.springframework.cloud</groupId>
<artifactId>spring-cloud-dependencies</artifactId>
<version>Hoxton.SR1</version>
<type>pom</type>
<scope>import</scope>
</dependency>
</dependencies>
</dependencyManagement>
<dependencies>
<dependency>
<groupId>org.springframework.cloud</groupId>
<artifactId>spring-cloud-starter-netflix-hystrix-dashboard</artifactId>
</dependency>
<dependency>
<groupId>org.springframework.boot</groupId>
<artifactId>spring-boot-starter-web</artifactId>
</dependency>
</dependencies>
|
然后为该服务添加一个启动类即可,并通过添加@EnableHystrixDashboard注解实现Hystrix Dashboard的启用
1
2
3
4
5
6
7
8
| @SpringBootApplication
@EnableHystrixDashboard
public class HystrixDashboardApplication {
public static void main(String[] args) {
SpringApplication.run(HystrixDashboardApplication.class, args);
}
}
|
对于HystrixDashboard服务而言,其配置文件如下所示
1
2
3
4
5
6
| spring:
application:
name: HystrixDashboard
server:
port: 9111
|
这里我们以监控payment服务为例展开说明,在此之前我们需要对被监控服务payment进行一些必要的配置。首先需要在POM文件中添加 spring-boot-starter-actuator 依赖
1
2
3
4
5
6
7
8
9
10
| <dependencies>
<dependency>
<groupId>org.springframework.boot</groupId>
<artifactId>spring-boot-starter-actuator</artifactId>
<version>2.2.2.RELEASE</version>
</dependency>
</dependencies>
|
与此同时,需要配置Actuator以开启 hystrix.stream 端点,相关配置如下所示
1
2
3
4
5
6
7
|
management:
endpoints:
web:
exposure:
include: hystrix.stream
base-path: /actuator
|
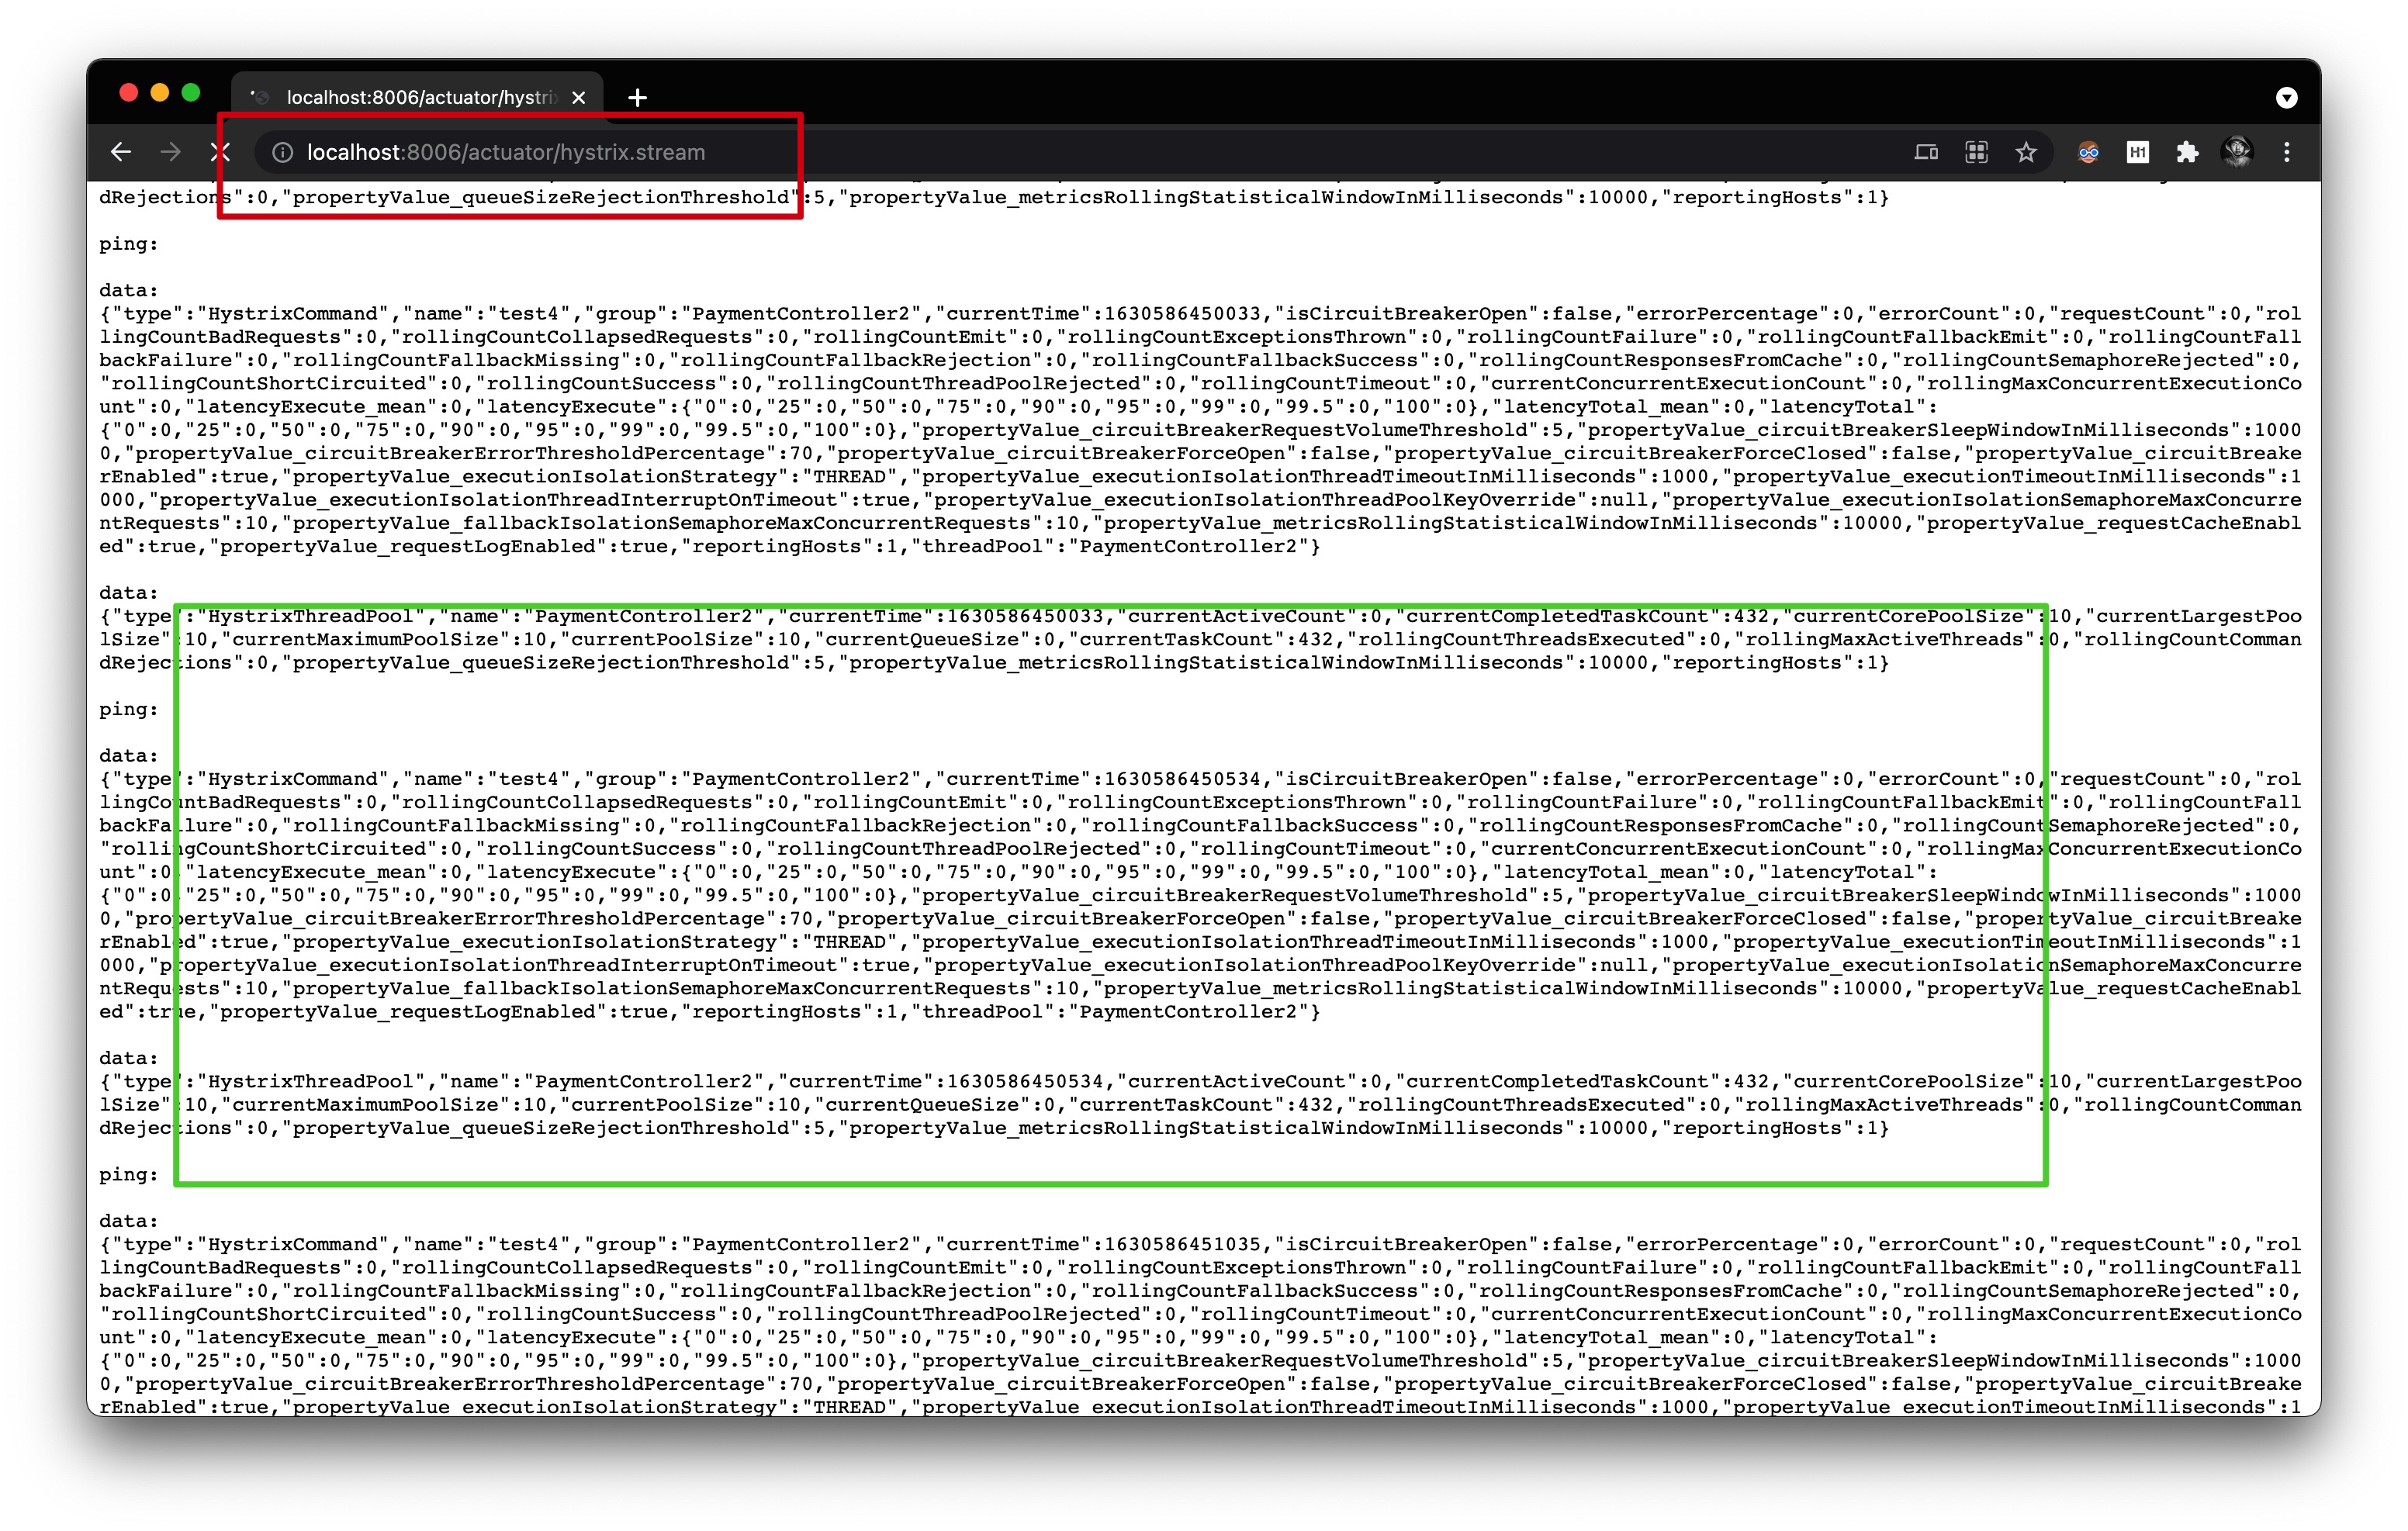
启动payment、HystrixDashboard服务,分别使用8006、9111端口。首先访问payment服务的 hystrix.stream 端点验证是否有相关监控数据,打开 http://localhost:8006/actuator/hystrix.stream 页面。效果如下,符合预期
然后访问HystrixDashboard服务,打开 http://localhost:9111/hystrix 页面。并在页面上填写被监控服务的 hystrix.stream 端点地址、延迟时间、被监控服务名称
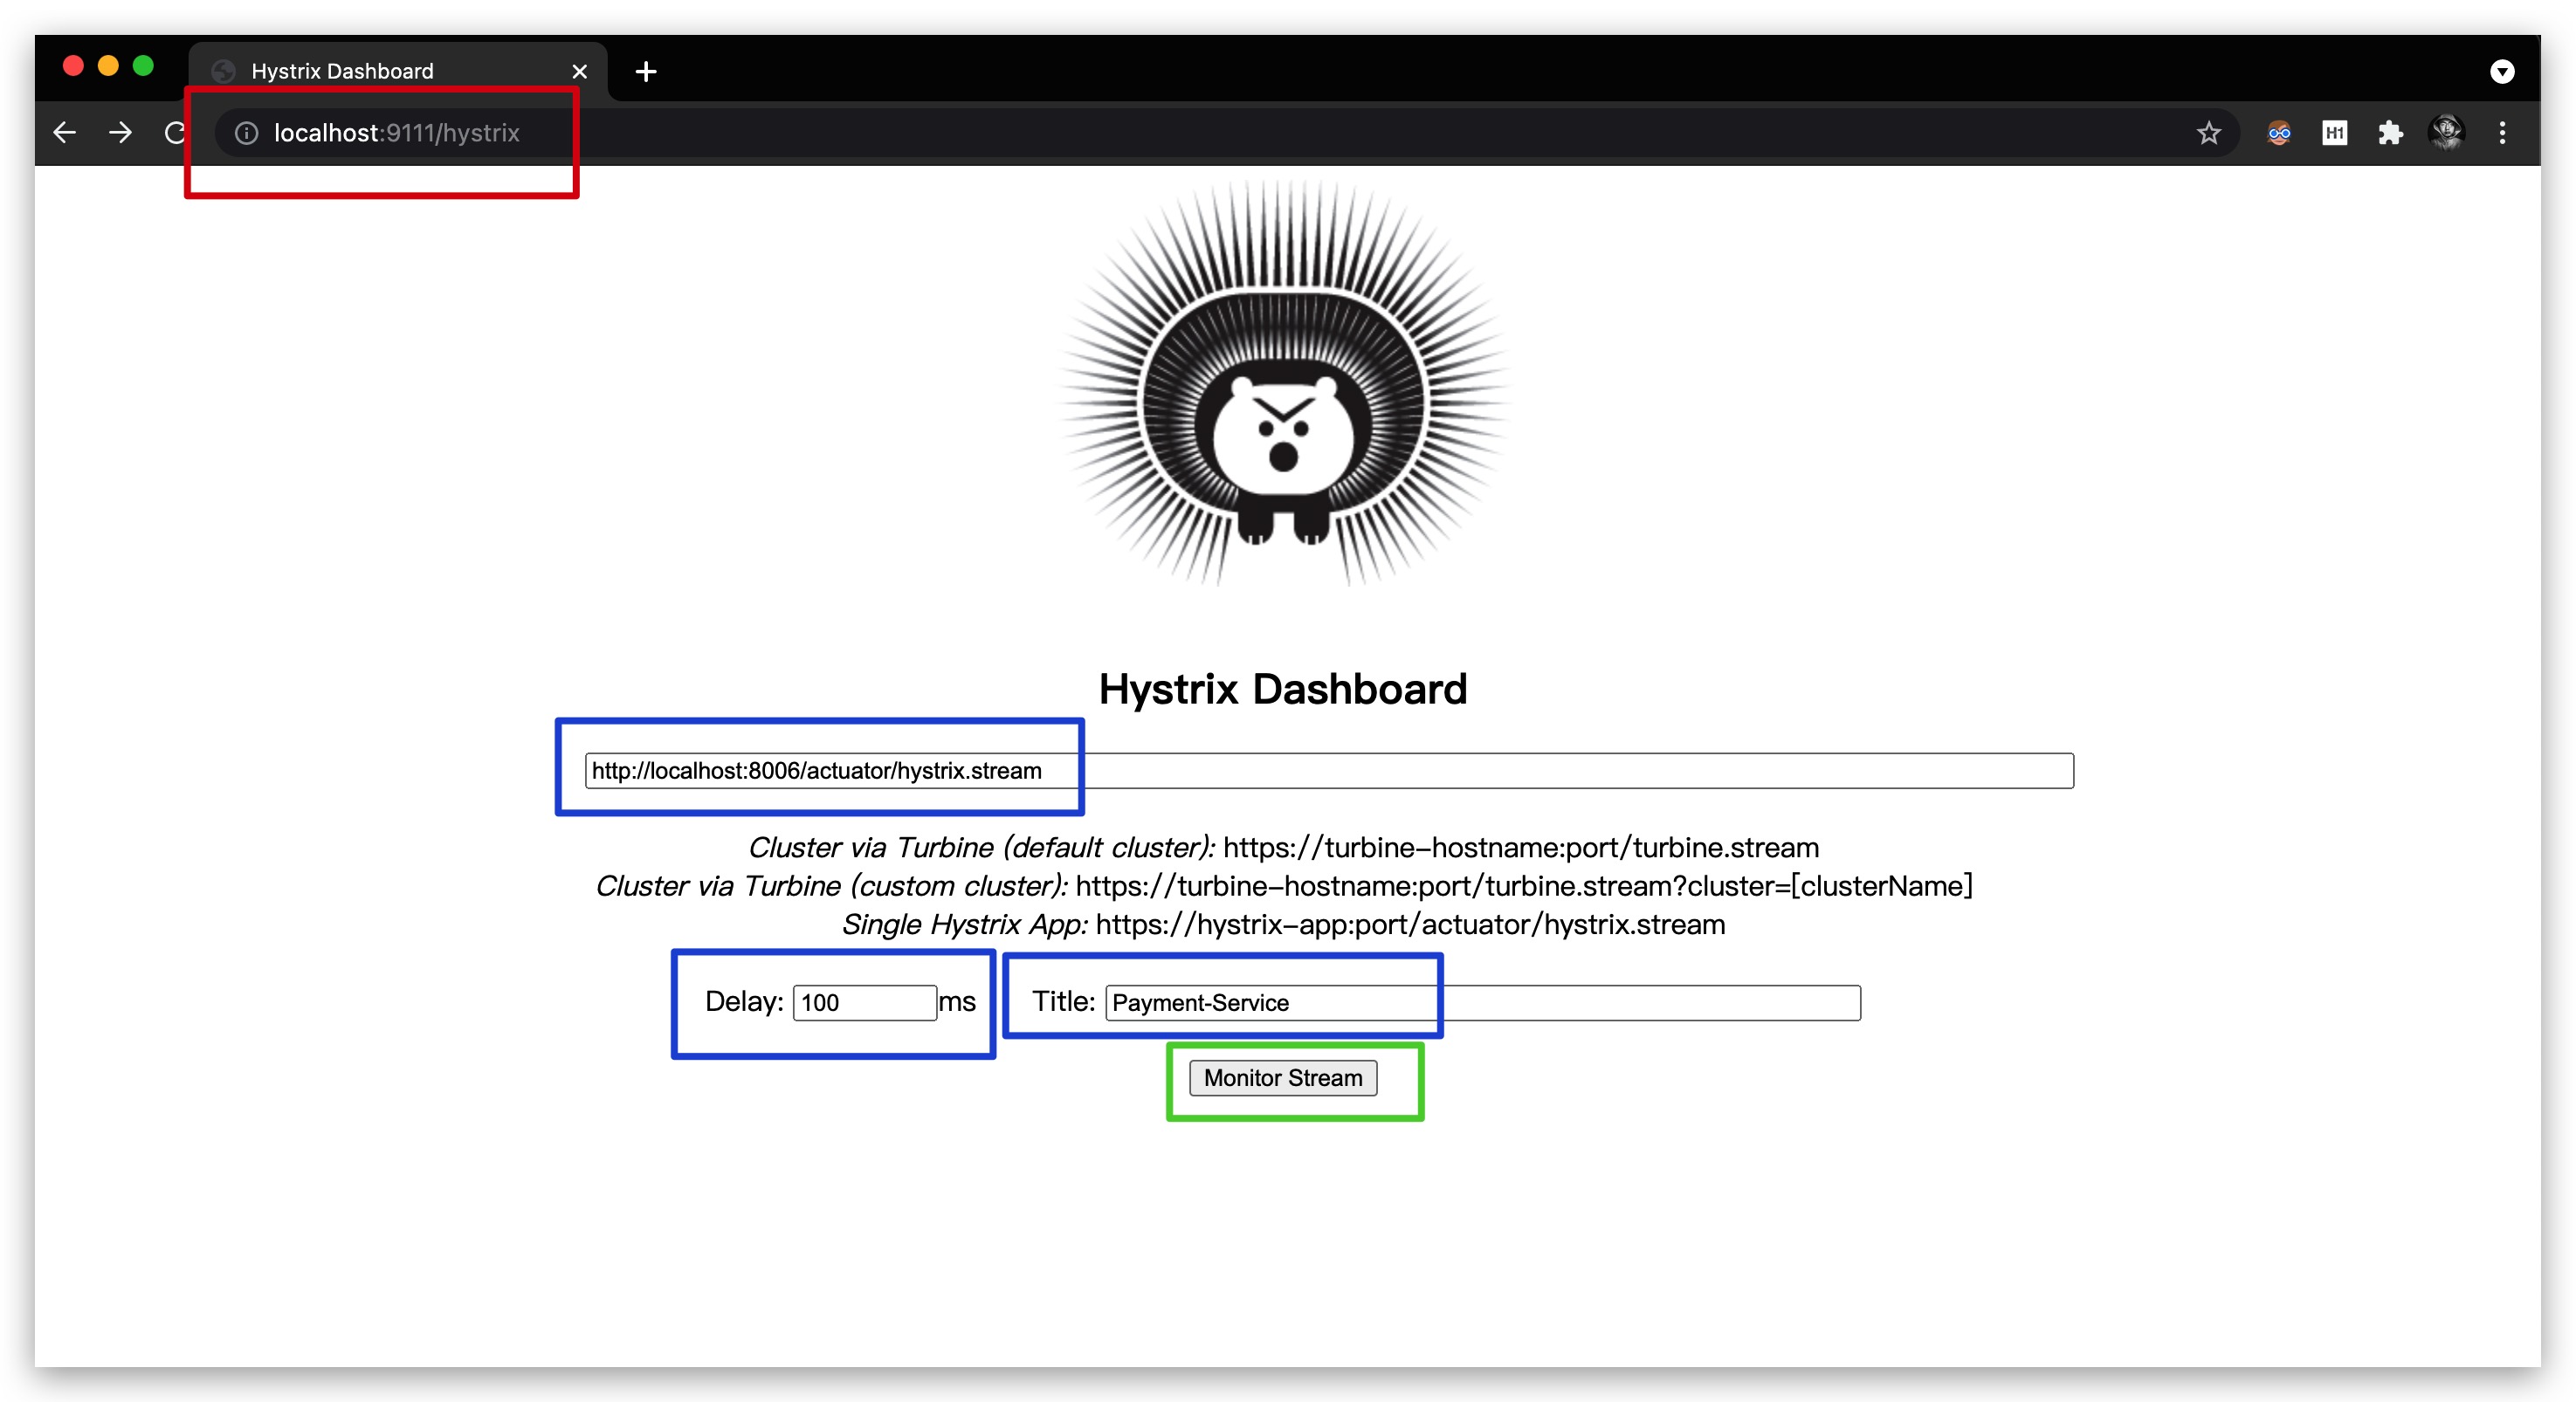
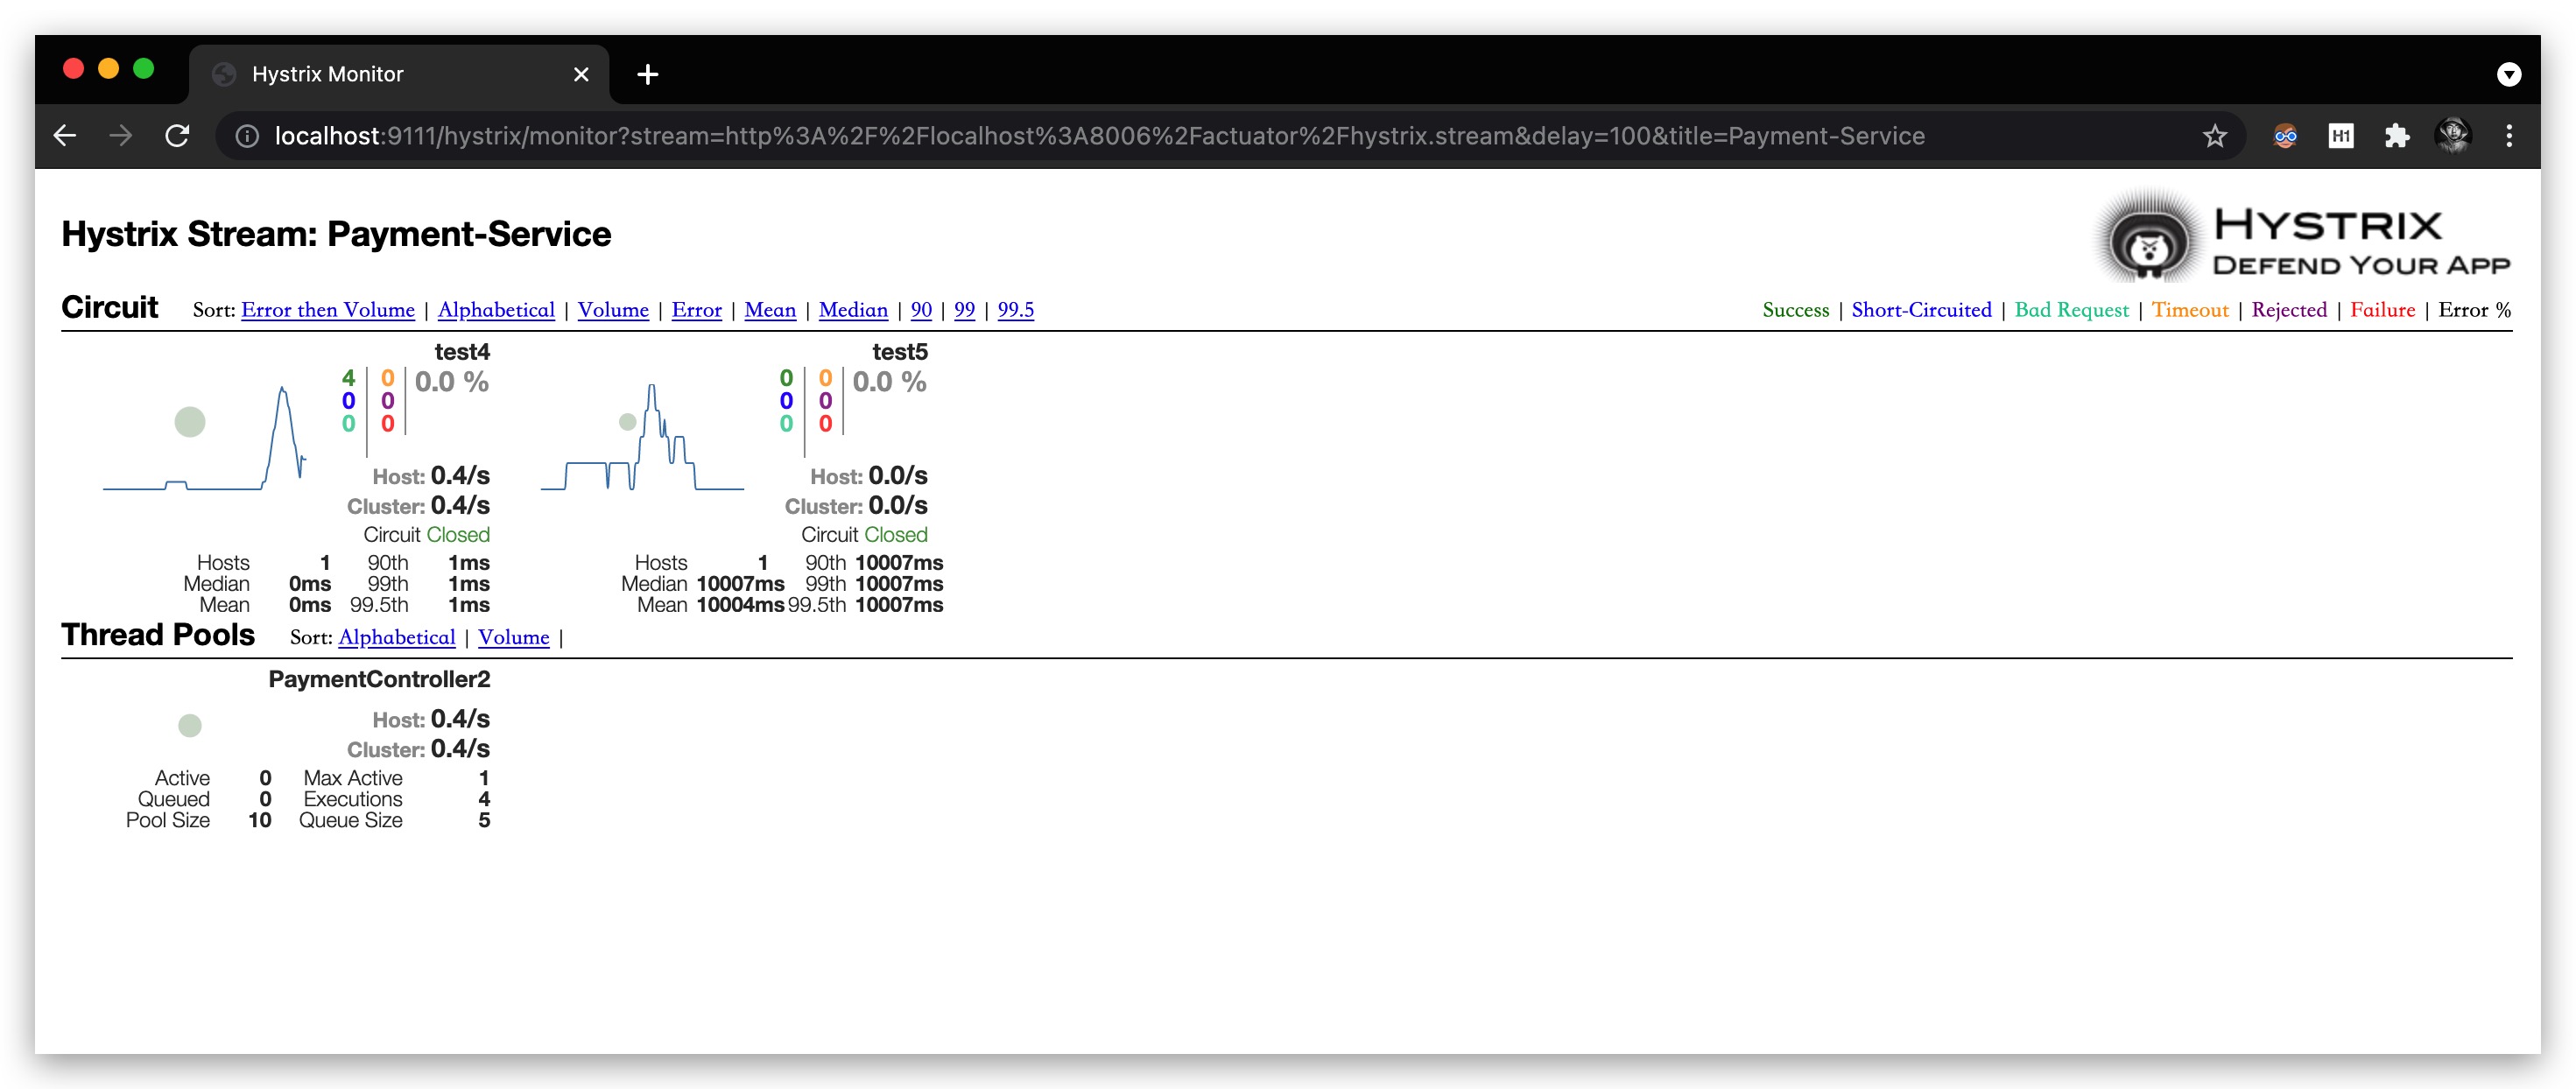
最后,点击Monitor Stream开启监控,效果如下所示
参考文献
- Spring微服务实战 John Carnell著
