0%

Spring之定时任务实践

Java下的定时任务实现有Timer,Spring,QuartZ等,这里我们介绍Spring中定时任务的应用,其通过 @Scheduled 注解即可轻松实现

abstract

概述

Spring 的定时任务可以支持各种形式的定时调度任务。其通过加在定时方法上的 @Scheduled 注解来配置任务执行周期,还需要在SpringBoot1Application启动类上添加 @EnableScheduling 注解来使能定时任务(如下所示),否则定时任务将无法执行

1
2
3
4
5
6
7
8
@SpringBootApplication
@EnableScheduling // 使能定时任务
public class SpringBoot1Application {
public static void main(String[] args) {
SpringApplication app = new SpringApplication(SpringBoot1Application.class);
app.run(args);
}
}

@Scheduled(fixedRate = msNum )

fixedRate 指定定时任务开始调用的时间间隔(单位为ms),示例如下所示:定时任务每5s调用一次

1
2
3
4
5
6
7
8
9
10
11
12
13
14
15
16
@Component
public class ScheduledTaskDemo {

@Scheduled(fixedRate = 5000)
public void scheduledTask1() {
System.out.println("Scheduled Task 1 Start: " + new Date());
try{
Thread.sleep(3000);
} catch (Exception e) {
System.out.println();
}
System.out.println("Scheduled Task 1 End: " + new Date());
System.out.println();
}

}

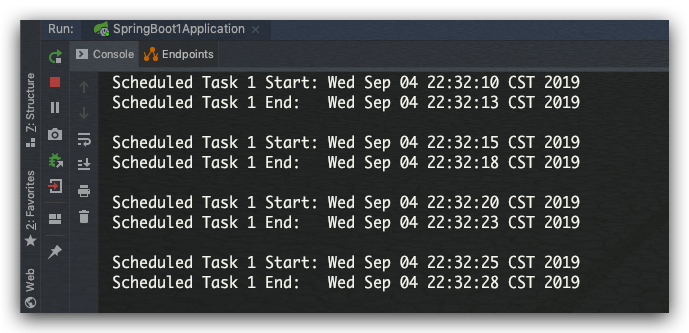
从下图的调用结果可以看出,定时任务如我们所配置的那样,每5秒调用一次:

figure 1.png

@Scheduled(fixedDelay = msNum)

fixedDelay 指定定时任务从本次调用结束到下一次开始调用的时间间隔(单位为ms),示例如下所示:

1
2
3
4
5
6
7
8
9
10
11
12
13
14
15
@Component
public class ScheduledTaskDemo {
@Scheduled(fixedDelay = 5000)
public void scheduledTask2() {
System.out.println("Scheduled Task 1 Start: " + new Date());
try {
Thread.sleep(3000);
} catch (Exception e) {
System.out.println();
}
System.out.println("Scheduled Task 2 End: " + new Date());
System.out.println();
}
}

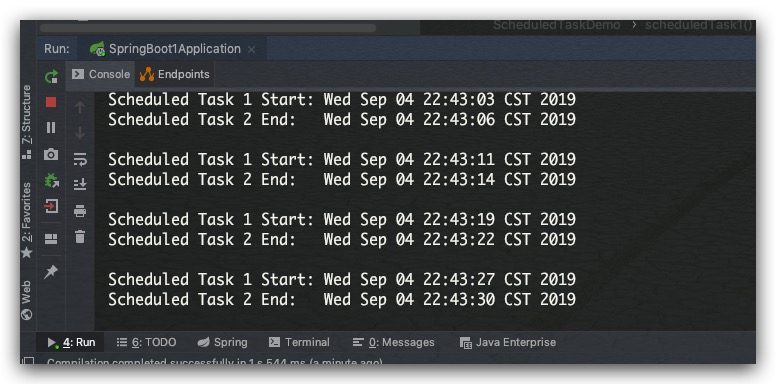
定时任务在结束5秒后即开始下一次调用:

figure 2.jpeg

cron表达式

Spring的@Scheduled注解同时也支持cron表达式,实现更复杂的定时配置。其由6个字段组成,使用空格进行分隔

  1. : 取值范围: 0~59
  2. : 取值范围: 0~59
  3. : 取值范围: 0~23
  4. : 取值范围: 1~31
  5. : 取值范围: 1~12,JAN~DEC(大小写不敏感)
  6. 星期: 取值范围: 0~7(0为周日,1为周一,…,7为周日),SUN~SAT(大小写不敏感)

取值表示方法

  • , : 表示该字段多个有效值。即,当’秒’字段为10,30,50,表示秒为10、30、50时生效
  • init/step : init为该字段的有效初值,step为步长。即,当’秒’字段为10/20时,表示秒为10、30(10+20)、50(30+20)时生效,其等同于10,30,50
  • - : 表示该字段均有效的取值范围。即,当’月’字段为1-3,表示月为1、2、3时生效
  • * : 表示该字段的所有值均有效。即,当’月’字段为 * ,表示每个月均生效
  • ? : 表示该字段无效,只能应用在日和星期字段。由于星期字段同时使用会发生冲突,故只能使用一个生效,另一个则使用 ?

cron表达式示例:

13/30 0,3 * * * ? : 每小时的0分13秒、0分43秒、3分13秒、3分43秒
34 2 3-5 * * ? : 每天的3点2分34秒、4点2分34秒、3点2分34秒
0 0 3 4 5 ? : 每年5月4日的3点0分0秒
0 0 3 ? * 6 : 每月周六的3点0分0秒

测试用例

1
2
3
4
5
6
7
8
9
10
11
12
13
14
@Component
public class ScheduledTaskDemo {
@Scheduled(cron = "11/10 * 16-20 * * ?")
public void scheduledTask3() {
System.out.println("Scheduled Task 3 Start: " + new Date());
try {
Thread.sleep(3000);
} catch (Exception e) {
System.out.println();
}
System.out.println("Scheduled Task 3 End: " + new Date());
System.out.println();
}
}

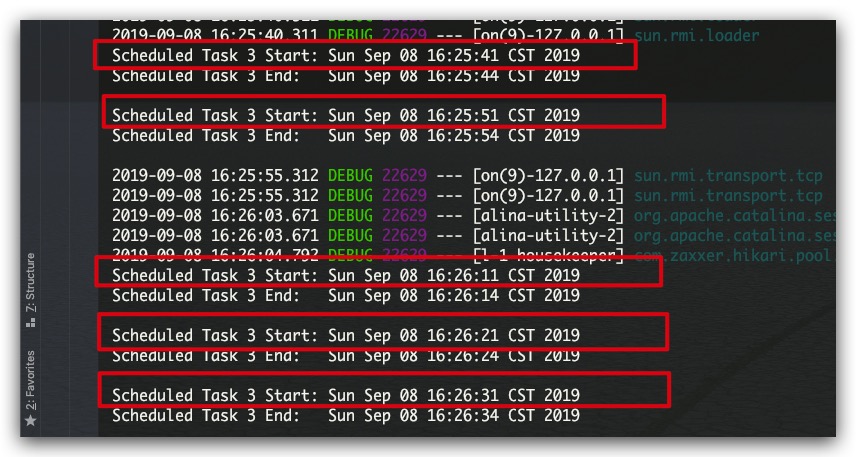
定时任务在每天的16~20点的11、21、31、41、51秒执行:

figure 3.jpeg

与WebSocket集成问题

之前在我的项目中,已经添加WebSocket功能,然后按照上面的配置定时任务后,会启动失败,抛出如下异常:

org.springframework.beans.factory.BeanNotOfRequiredTypeException: Bean named ‘defaultSockJsTaskScheduler’ is expected to be of type ‘org.springframework.scheduling. TaskScheduler’ but was actually of type ‘org.springframework.beans.factory.support.NullBean’

解决方案:

我们需要手动添加一个Scheduled的配置类来创建一个ThreadPoolTaskScheduler对象,此时项目即可成功启动

1
2
3
4
5
6
7
8
9
10
@Configuration
public class ScheduledConfig {
@Bean
public TaskScheduler taskScheduler() {
ThreadPoolTaskScheduler taskScheduler = new ThreadPoolTaskScheduler();
taskScheduler.setPoolSize(10);
taskScheduler.initialize();
return taskScheduler;
}
}
请我喝杯咖啡捏~

欢迎关注我的微信公众号:青灯抽丝