RabbitMQ是一个基于AMQP协议(Advanced Message Queuing Protocol,高级消息队列协议)的开源消息中间件,用于程序之间的消息、数据传递服务。常见的场景是将程序中原有的耗时较长的调用拆分为前-后两部分,即,生产者和消费者。生产者负责向消息队列发送待处理数据,而消费者则从消息队列接收数据,完成原有程序中的长耗时的处理。异步处理的方式,一方面提高了生产者的即时响应能力和整体的处理效率,另一方面也可以实现程序之间的解耦。本文将介绍如何SpringBoot下实践RabbitMQ消息队列

配置RabbitMQ
1. 添加RabbitMQ依赖
在pom.xml中添加RabbitMQ依赖
1
2
3
4
| <dependency>
<groupId>org.springframework.boot</groupId>
<artifactId>spring-boot-starter-amqp</artifactId>
</dependency>
|
2. 添加RabbitMQ配置
在application.properties配置文件中添加RabbitMQ服务的相关配置
1
2
3
4
5
6
7
8
9
|
spring.rabbitmq.host=127.0.0.1
spring.rabbitmq.port=5672
spring.rabbitmq.username=zgh
spring.rabbitmq.password=zgh123456
|
实践
Topic Exchange
1. 写RabbitMQ Config类
在RabbitMQ Config类中声明主题交换机、消息队列,并通过BindingKey实现主题交换机和消息队列的绑定
1
2
3
4
5
6
7
8
9
10
11
12
13
14
15
16
17
18
19
20
21
22
23
24
25
26
27
28
29
30
31
32
33
34
35
36
37
38
39
40
41
42
43
44
45
46
47
48
49
50
51
52
53
54
55
56
57
58
59
60
61
| @Configuration
public class TopicExchangeRabbitMQConfig {
public static final String topicExchangeName = "topicExchange1";
private static final String queue1BindingKey1 = "black.big.*";
private static final String queue1BindingKey2 = "black.*.cat";
private static final String queue2BindingKey = "*.small.*";
private static final String queue3BindingKey = "#";
@Bean
public TopicExchange topicExchange() {
return new TopicExchange(topicExchangeName);
}
@Bean
public Queue messageQueue1() {
return new Queue("queue1");
}
@Bean
public Queue messageQueue2() {
return new Queue("queue2");
}
@Bean
public Queue messageQueue3() {
return new Queue("queue3");
}
@Bean
Binding bindingQueue1Exchange1(Queue messageQueue1, TopicExchange topicExchange) {
return BindingBuilder.bind( messageQueue1 )
.to( topicExchange )
.with( queue1BindingKey1 );
}
@Bean
Binding bindingQueue1Exchange2(Queue messageQueue1, TopicExchange topicExchange) {
return BindingBuilder.bind( messageQueue1 )
.to( topicExchange )
.with( queue1BindingKey2 );
}
@Bean
Binding bindingQueue2Exchange(Queue messageQueue2, TopicExchange topicExchange) {
return BindingBuilder.bind( messageQueue2 )
.to( topicExchange )
.with( queue2BindingKey );
}
@Bean
Binding bindingQueue3Exchange(Queue messageQueue3, TopicExchange topicExchange) {
return BindingBuilder.bind( messageQueue3 )
.to( topicExchange )
.with( queue3BindingKey );
}
}
|
2. 写生产者、消费者
在Spring AMQP 中提供了RabbitTemplate实例用于操作RabbitMQ,故在生产者方法中直接注入使用即可
1
2
3
4
5
6
7
8
9
| @Component
public class TopicExchangeProducer {
@Autowired
private AmqpTemplate rabbitMQTemplate;
public void send(String msg, String routingKey) {
rabbitMQTemplate.convertAndSend(TopicExchangeRabbitMQConfig.topicExchangeName, routingKey, msg);
}
}
|
消费者类的方法上通过@RabbitListener注解用于监听指定名称的消息队列,而标注在方法上的@RabbitHandler则用于指示从指定消息队列收到消息后,使用该方法进行处理
1
2
3
4
5
6
7
8
9
10
11
12
13
14
15
16
17
18
19
20
21
22
23
24
25
26
| import cn.hutool.json.JSONUtil;
...
@Component
public class TopicExchangeConsumer {
@RabbitListener(queues = "queue1")
@RabbitHandler
public void getQueue1Message(String msg) {
Animal animal = JSONUtil.toBean( msg, Animal.class );
System.out.println("Queue 1 Receive [black.big.*, black.*.cat] , Msg: " + animal);
}
@RabbitListener(queues = "queue2")
@RabbitHandler
public void getQueue2Message(String msg) {
Animal animal = JSONUtil.toBean( msg, Animal.class );
System.out.println("Queue 2 Receive [*.small.*] , Msg: " + animal);
}
@RabbitListener(queues = "queue3")
@RabbitHandler
public void getQueue3Message(String msg) {
Animal animal = JSONUtil.toBean( msg, Animal.class );
System.out.println("Queue 3 Receive [#] , Msg: " + animal);
}
}
|
[Note]: 生产者、消费者对对象数据传递采用JSON序列化及反序列
3. 测试用例
这里使用HTTP请求来触发测试 Topic Exchange 的用例
1
2
3
4
5
6
7
8
9
10
11
12
13
14
15
16
17
18
19
20
21
22
23
24
25
26
27
28
29
30
31
32
33
| import cn.hutool.json.JSONObject;
import cn.hutool.json.JSONUtil;
...
@RestController
@RequestMapping("testRabbitMQ")
public class RabbitMQTestController {
@Autowired
private TopicExchangeProducer topicExchangeProducer;
@GetMapping("testTopicExchange")
public String testTopicExchange() {
Animal animal1 = new Animal("black","big","cat");
String routingKey1 = animal1.getColor() + "." + animal1.getSize() + "." + animal1.getKind();
JSONObject jsonObject1 = JSONUtil.parseObj(animal1);
topicExchangeProducer.send(jsonObject1.toString(), routingKey1);
Animal animal2 = new Animal("red","small","pig");
String routingKey2 = animal2.getColor() + "." + animal2.getSize() + "." + animal2.getKind();
JSONObject jsonObject2 = JSONUtil.parseObj(animal2);
topicExchangeProducer.send(jsonObject2.toString(), routingKey2);
Animal animal3 = new Animal("blue","medium","dog");
String routingKey3 = null;
JSONObject jsonObject3 = JSONUtil.parseObj(animal3);
topicExchangeProducer.send(jsonObject3.toString(), routingKey3);
return "test TopicExchange success";
}
}
|
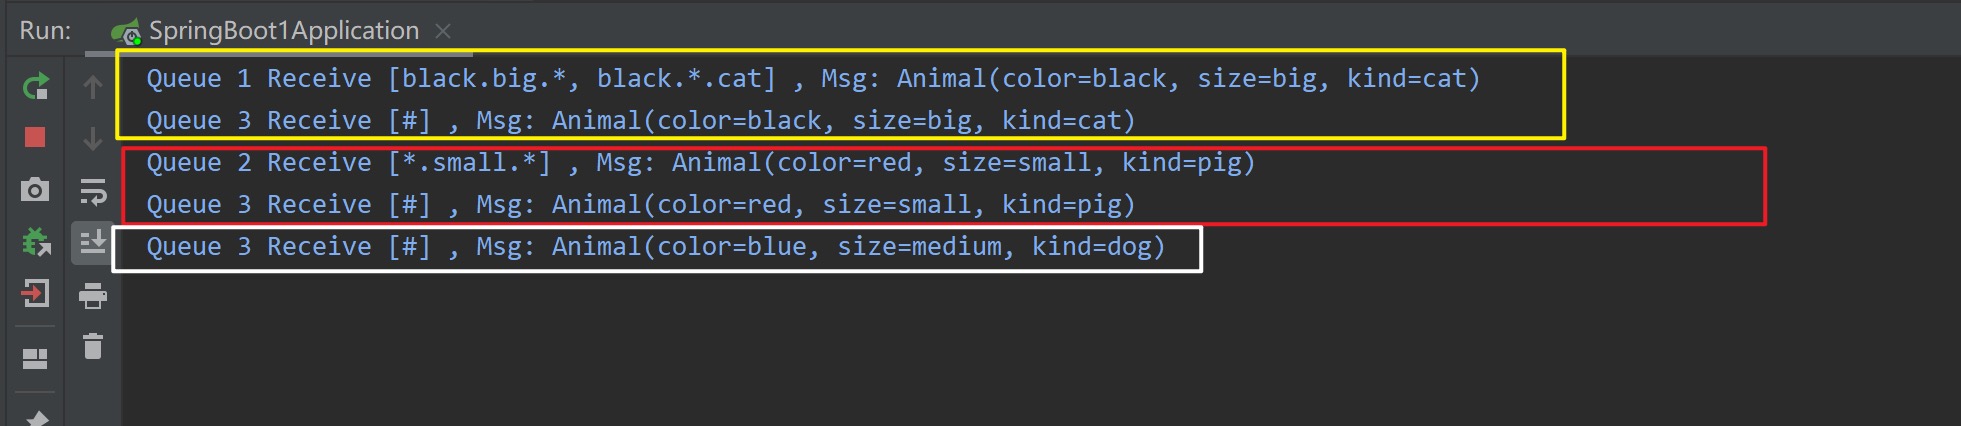
- Test1 发送的消息为: animal1 对象,其routingKey:”black.big.cat”。根据Topic Exchange的路由规则,满足条件的只有Queue1 和 Queue3,测试结果符合预期,如下图黄框所示。值得一提的是,虽然绑定在交换机上的Queue1队列的两个BindingKey均满足路由规则,但是交换机对于一个消息也只会向同一个消息队列仅转发一次
- Test2 发送的消息为: animal2 对象,其routingKey:”red.small.pig”。根据Topic Exchange的路由规则,满足条件的只有Queue2 和 Queue3,测试结果符合预期,如下图红框所示
- Test3 发送的消息为: animal3 对象,其routingKey为空。根据Topic Exchange的路由规则,满足条件的只有Queue3,测试结果符合预期,如下图白框所示
Direct Exchange
1. 写RabbitMQ Config类
在RabbitMQ Config类中声明直连交换机、消息队列,并通过BindingKey实现直连交换机和消息队列的绑定
1
2
3
4
5
6
7
8
9
10
11
12
13
14
15
16
17
18
19
20
21
22
23
24
25
26
27
28
29
30
31
32
33
34
35
36
37
38
39
40
41
42
43
44
45
46
47
48
| @Configuration
public class DirectExchangeRabbitMQConfig {
public static final String directExchangeName = "directExchange1";
private static final String queue4BindingKey1 = "big";
private static final String queue4BindingKey2 = "small";
private static final String queue5BindingKey = "cat";
@Bean
public DirectExchange directExchange() {
return new DirectExchange(directExchangeName);
}
@Bean
public Queue messageQueue4() {
return new Queue("queue4");
}
@Bean
public Queue messageQueue5() {
return new Queue("queue5");
}
@Bean
Binding bindingQueue4Exchange1(Queue messageQueue4, DirectExchange directExchange) {
return BindingBuilder.bind( messageQueue4 )
.to( directExchange )
.with( queue4BindingKey1 );
}
@Bean
Binding bindingQueue4Exchange2(Queue messageQueue4, DirectExchange directExchange) {
return BindingBuilder.bind( messageQueue4 )
.to( directExchange )
.with( queue4BindingKey2 );
}
@Bean
Binding bindingQueue5Exchange(Queue messageQueue5, DirectExchange directExchange) {
return BindingBuilder.bind( messageQueue5 )
.to( directExchange )
.with( queue5BindingKey );
}
}
|
2. 写生产者、消费者
在Spring AMQP 中提供了RabbitTemplate实例用于操作RabbitMQ,故在生产者方法中直接注入使用即可
1
2
3
4
5
6
7
8
9
10
| @Component
public class DirectExchangeProducer {
@Autowired
private AmqpTemplate rabbitMQTemplate;
public void send(String msg, String routingKey) {
rabbitMQTemplate.convertAndSend(DirectExchangeRabbitMQConfig.directExchangeName, routingKey, msg);
}
}
|
消费者类的方法上通过@RabbitListener注解用于监听指定名称的消息队列,而标注在方法上的@RabbitHandler则用于指示从指定消息队列收到消息后,使用该方法进行处理
1
2
3
4
5
6
7
8
9
10
11
12
13
14
15
16
17
18
19
| import cn.hutool.json.JSONUtil;
...
@Component
public class DirectExchangeConsumer {
@RabbitListener(queues = "queue4")
@RabbitHandler
public void getQueue1Message(String msg) {
Animal animal = JSONUtil.toBean( msg, Animal.class );
System.out.println("Queue 4 Receive [big, small] , Msg: " + animal);
}
@RabbitListener(queues = "queue5")
@RabbitHandler
public void getQueue2Message(String msg) {
Animal animal = JSONUtil.toBean( msg, Animal.class );
System.out.println("Queue 5 Receive [cat] , Msg: " + animal);
}
}
|
[Note]: 生产者、消费者对对象数据传递采用JSON序列化及反序列
3. 测试用例
这里使用HTTP请求来触发测试 Direct Exchange 的用例
1
2
3
4
5
6
7
8
9
10
11
12
13
14
15
16
17
18
19
20
21
22
23
24
25
26
27
28
29
30
31
32
33
| import cn.hutool.json.JSONObject;
import cn.hutool.json.JSONUtil;
...
@RestController
@RequestMapping("testRabbitMQ")
public class RabbitMQTestController {
@Autowired
private DirectExchangeProducer directExchangeProducer;
@GetMapping("testDirectExchange")
public String testDirectExchange() {
Animal animal1 = new Animal("black","big","dog");
String routingKey1 = "big";
JSONObject jsonObject1 = JSONUtil.parseObj(animal1);
directExchangeProducer.send(jsonObject1.toString(), routingKey1);
Animal animal2 = new Animal("red","small","dog");
String routingKey2 = "small";
JSONObject jsonObject2 = JSONUtil.parseObj(animal2);
directExchangeProducer.send(jsonObject2.toString(), routingKey2);
Animal animal3 = new Animal("blue","medium","cat");
String routingKey3 = "cat";
JSONObject jsonObject3 = JSONUtil.parseObj(animal3);
directExchangeProducer.send(jsonObject3.toString(), routingKey3);
return "test DirectExchange success";
}
}
|
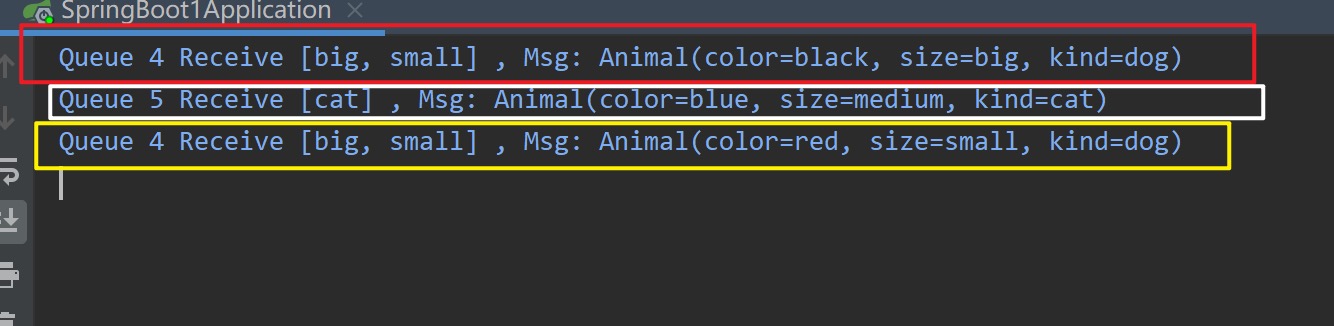
- Test1 发送的消息为: animal1 对象,其routingKey:”big”。根据Direct Exchange的路由规则,满足条件的只有Queue4,测试结果符合预期,如下图红框所示
- Test2 发送的消息为: animal2 对象,其routingKey:”small”。根据Direct Exchange的路由规则,满足条件的只有Queue4,测试结果符合预期,如下图黄框所示
- Test3 发送的消息为: animal3 对象,其routingKey:”cat”。根据Direct Exchange的路由规则,满足条件的只有Queue5,测试结果符合预期,如下图白框所示
Fanout Exchange
在RabbitMQ Config类中声明扇形交换机、消息队列,并将扇形交换机和消息队列的绑定
1
2
3
4
5
6
7
8
9
10
11
12
13
14
15
16
17
18
19
20
21
22
23
24
25
26
27
28
29
30
31
32
33
34
35
| @Configuration
public class FanoutExchangeRabbitMQConfig {
public static final String fanoutExchangeName = "fanoutExchange1";
@Bean
public FanoutExchange fanoutExchange() {
return new FanoutExchange(fanoutExchangeName);
}
@Bean
public Queue messageQueue6() {
return new Queue("queue6");
}
@Bean
public Queue messageQueue7() {
return new Queue("queue7");
}
@Bean
Binding bindingQueue6Exchange1(Queue messageQueue6, FanoutExchange fanoutExchange) {
return BindingBuilder.bind( messageQueue6 )
.to( fanoutExchange );
}
@Bean
Binding bindingQueue7Exchange(Queue messageQueue7, FanoutExchange fanoutExchange) {
return BindingBuilder.bind( messageQueue7 )
.to( fanoutExchange );
}
}
|
2. 写生产者、消费者
在Spring AMQP 中提供了RabbitTemplate实例用于操作RabbitMQ,故在生产者方法中直接注入使用即可
1
2
3
4
5
6
7
8
9
10
| @Component
public class FanoutExchangeProducer {
@Autowired
private AmqpTemplate rabbitMQTemplate;
public void send(String msg, String routingKey) {
rabbitMQTemplate.convertAndSend(FanoutExchangeRabbitMQConfig.fanoutExchangeName, routingKey, msg);
}
}
|
消费者类的方法上通过@RabbitListener注解用于监听指定名称的消息队列,而标注在方法上的@RabbitHandler则用于指示从指定消息队列收到消息后,使用该方法进行处理
1
2
3
4
5
6
7
8
9
10
11
12
13
14
15
16
17
18
19
| import cn.hutool.json.JSONUtil;
...
@Component
public class FanoutExchangeConsumer {
@RabbitListener(queues = "queue6")
@RabbitHandler
public void getQueue1Message(String msg) {
Animal animal = JSONUtil.toBean( msg, Animal.class );
System.out.println("Queue 6 Receive , Msg: " + animal);
}
@RabbitListener(queues = "queue7")
@RabbitHandler
public void getQueue2Message(String msg) {
Animal animal = JSONUtil.toBean( msg, Animal.class );
System.out.println("Queue 7 Receive , Msg: " + animal);
}
}
|
[Note]: 生产者、消费者对对象数据传递采用JSON序列化及反序列
3. 测试用例
这里使用HTTP请求来触发测试 Fanout Exchange 的用例
1
2
3
4
5
6
7
8
9
10
11
12
13
14
15
16
17
18
19
20
21
22
23
24
25
26
27
| import cn.hutool.json.JSONObject;
import cn.hutool.json.JSONUtil;
...
@RestController
@RequestMapping("testRabbitMQ")
public class RabbitMQTestController {
@Autowired
private FanoutExchangeProducer fanoutExchangeProducer;
@GetMapping("testFanoutExchange")
public String testFanoutExchange() {
Animal animal1 = new Animal("black","big","dog");
String routingKey1 = "big";
JSONObject jsonObject1 = JSONUtil.parseObj(animal1);
fanoutExchangeProducer.send(jsonObject1.toString(), routingKey1);
Animal animal2 = new Animal("red","small","dog");
String routingKey2 = null;
JSONObject jsonObject2 = JSONUtil.parseObj(animal2);
fanoutExchangeProducer.send(jsonObject2.toString(), routingKey2);
return "test FanoutExchange success";
}
}
|
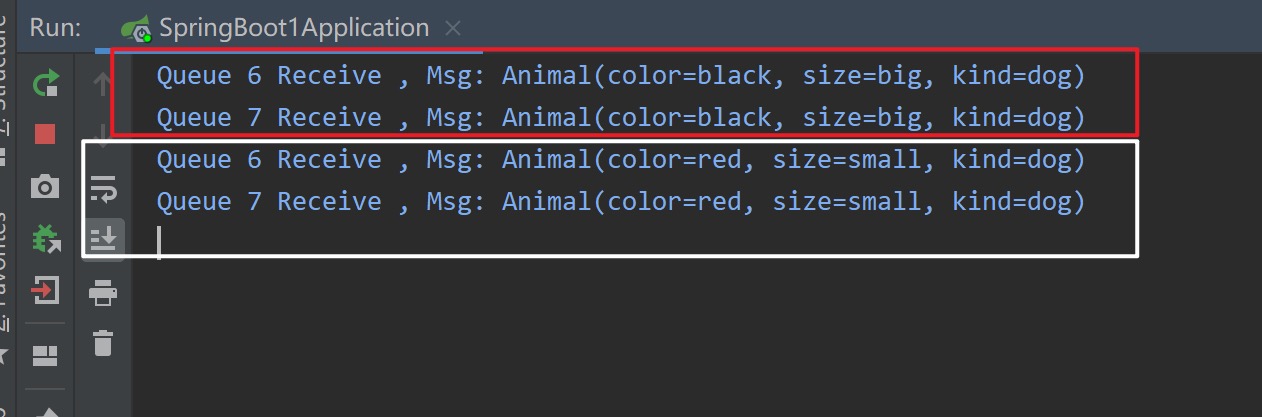
- Test1 发送的消息为: animal1 对象,其routingKey:”big”。根据Fanout Exchange的路由规则,满足条件的有Queue6、Queue7,测试结果符合预期,如下图红框所示
- Test2 发送的消息为: animal2 对象,其routingKey为空。根据Fanout Exchange的路由规则,满足条件的有Queue6、Queue7,测试结果符合预期,如下图白框所示