Redis,目前非常流行的内存数据库,其广泛应用于Web场景的缓存技术下。本文简要介绍在SpringBoot下的Redis的实践应用

配置Redis
1. 添加Redis依赖
在pom.xml中添加Redis依赖
1
2
3
4
5
6
7
8
9
10
11
12
|
<dependency>
<groupId>org.springframework.boot</groupId>
<artifactId>spring-boot-starter-data-redis</artifactId>
<version>2.0.4.RELEASE</version>
</dependency>
<dependency>
<groupId>org.apache.commons</groupId>
<artifactId>commons-pool2</artifactId>
<version>2.6.1</version>
</dependency>
|
2. 添加Redis服务器配置
在application.properties配置文件中添加Redis服务器参数配置。
1
2
3
4
5
6
7
8
9
|
spring.redis.database=0
spring.redis.host=127.0.0.1
spring.redis.port=6379
spring.redis.password=123456
|
3. 添加Redis客户端配置
Spring Boot从2.X版本开始引入新的客户端——Lettuce。较之前的Jedis相比而言,Lettuce是一个基于Netty的线程安全的Redis客户端。故,我们这里推荐使用Lettuce,并在application.properties配置文件中对Lettuce客户端进行配置
[Note]:
- 配置文件中的Redis客户端配置可以不写,则Spring Boot(2.X及以上版本)会默认使用Lettuce客户端
- 当我们在配置文件显式地配置Redis客户端时,需要添加commons-pool2连接池依赖
1
2
3
4
5
6
7
8
9
|
spring.redis.lettuce.pool.max-active=8
spring.redis.lettuce.pool.max-wait=-1
spring.redis.lettuce.pool.max-idle=8
spring.redis.lettuce.pool.min-idle=0
|
4. 编写Java Config类
- 自定义RedisTemplate Bean用于直接操作Reids,而不使用SpringBoot默认提供的,故该Bean实例名称必须要为redisTemplate,这样才可以避免Spring生成默认的RedisTemplate实例。对于Redis中的Key使用String序列化,而对于Value则使用更通用的Json序列化,而不是默认的JDK序列化
- 自定义Spring Cache的缓存管理器CacheManager,配置其使用redis数据库中间件,这样我们即可利用Spring Cache的注解快速操作缓存的查询和删除,而不是直接去使用redisTemplate来访问redis数据库
[Note]:
- 值得一提的是,这里虽然为了方便将RedisTemplate的配置类和CacheManager的配置类写在了一起,但是显然两者是两个相对独立的东西,Spring Cache是对各种缓存中间件(包含但不止于Redis)的抽象,通过注解统一缓存的操作方式,而Redis则是一种具体的缓存实现方案
- 需要在配置类上添加@EnableCaching注解,以使能Spring Cache
1
2
3
4
5
6
7
8
9
10
11
12
13
14
15
16
17
18
19
20
21
22
23
24
25
26
27
28
29
30
31
32
33
34
35
36
37
38
39
40
41
42
43
44
45
46
47
48
49
50
51
| @Slf4j
@Configuration
@EnableCaching
public class RedisConfig extends CachingConfigurerSupport{
private Duration timeToLive = Duration.ofDays(1);
@Bean(name="cacheManager")
public CacheManager cacheManager(RedisConnectionFactory factory){
RedisCacheConfiguration redisCacheConfiguration = RedisCacheConfiguration.defaultCacheConfig()
.entryTtl( timeToLive )
.computePrefixWith(cacheName -> cacheName + ":")
.serializeKeysWith( RedisSerializationContext.SerializationPair.fromSerializer( getKeySerializer() ) )
.serializeValuesWith( RedisSerializationContext.SerializationPair.fromSerializer( getValueSerializer() ) )
.disableCachingNullValues();
RedisCacheManager redisCacheManager = RedisCacheManager.builder(factory)
.cacheDefaults( redisCacheConfiguration )
.build();
log.info(" 自定义Spring Cache Manager配置完成 ... ");
return redisCacheManager;
}
@Bean(name = "redisTemplate")
public RedisTemplate<String, String> redisTemplate(RedisConnectionFactory redisConnectionFactory) {
RedisTemplate<String, String> template = new RedisTemplate<>();
template.setConnectionFactory(redisConnectionFactory);
template.setKeySerializer( getKeySerializer() );
template.setValueSerializer( getValueSerializer() );
template.setHashKeySerializer( getKeySerializer() );
template.setHashValueSerializer( getValueSerializer() );
log.info("自定义RedisTemplate配置完成 ... ");
return template;
}
private RedisSerializer<String> getKeySerializer() {
return new StringRedisSerializer();
}
private RedisSerializer<Object> getValueSerializer() {
return new GenericJackson2JsonRedisSerializer();
}
}
|
缓存操作
直接使用RedisTemplate操作缓存
1. 封装RedisTemplate操作
将redisTemplate常用方法封装到RedisService中,便于我们后面使用
1
2
3
4
5
6
7
8
9
10
11
12
13
14
15
16
17
18
19
20
21
22
23
24
25
26
27
28
29
30
31
32
33
34
35
36
37
38
39
40
41
42
43
44
45
46
47
48
49
50
51
52
53
54
55
56
57
58
59
60
61
62
63
64
65
66
67
68
69
70
71
72
73
74
75
76
77
78
79
80
81
82
83
84
85
86
87
88
89
90
91
92
93
94
95
96
97
98
99
100
101
102
103
104
105
106
107
108
109
110
111
112
113
114
115
116
117
118
119
120
121
122
123
124
125
126
127
128
129
130
131
132
133
134
135
136
137
138
139
140
141
142
143
144
145
146
147
148
149
150
151
152
153
154
155
156
157
158
159
160
161
|
@Service
public class RedisService {
@Autowired
private RedisTemplate redisTemplate;
public Boolean existKey(String key) {
return redisTemplate.hasKey(key);
}
public Boolean deleteKey(String key) {
return redisTemplate.delete(key);
}
public DataType typeKey(String key) {
return redisTemplate.type(key);
}
public Boolean setExpire(String key, long timeout, TimeUnit unit) {
return redisTemplate.expire(key, timeout, unit);
}
public Long getExpire(String key, TimeUnit unit){
return redisTemplate.getExpire(key, unit);
}
public Long getExpire(String key) {
return redisTemplate.getExpire(key);
}
public Boolean persistExpire(String key) {
return redisTemplate.persist(key);
}
public Boolean move(String key, int dbIndex) {
return redisTemplate.move(key, dbIndex);
}
public void setStringKey(String key, Object value) {
redisTemplate.opsForValue().set(key, value);
}
public Object getStringKey(String key) {
return redisTemplate.opsForValue().get(key);
}
public void setHashKey(String key, String field, Object value) {
redisTemplate.opsForHash().put(key, field, value);
}
public Object getHashKey(String key, String field) {
return redisTemplate.opsForHash().get(key, field);
}
public Map<Object, Object> getHashKeyAll(String key) {
return redisTemplate.opsForHash().entries(key);
}
public Boolean existField(String key, String field) {
return redisTemplate.opsForHash().hasKey(key, field);
}
public String getField(String methodName, Map map){
StringBuilder sb = new StringBuilder(methodName);
if (!MapUtil.isEmpty(map)) {
sb.append(JSONUtil.parseObj(map));
}
return sb.toString();
}
}
|
2. 编写测试用例
这里分别提供了一个String Key的写、读缓存测试用例,验证我们的Redis缓存服务是否设置成功
1
2
3
4
5
6
7
8
9
10
11
12
13
14
15
16
17
18
19
20
21
22
23
24
25
26
27
| @Controller
@ResponseBody
@RequestMapping(value = "testRedis")
public class TestRedisController {
@Autowired
private RedisService redisService;
@GetMapping("/testSetStringKey/{id}")
public String testSetStringKey(@PathVariable Integer id) {
Student stu = new Student();
stu.setId(id);
stu.setSex("女:" + id);
stu.setUsername("Amy");
redisService.setStringKey("testStringKey-" + id, stu);
return "缓存写入成功";
}
@GetMapping("/testGetStringKey/{id}")
public Student testGetStringKey(@PathVariable Integer id) {
Student stu = (Student)redisService.getStringKey("testStringKey-" + id);
return stu;
}
}
|
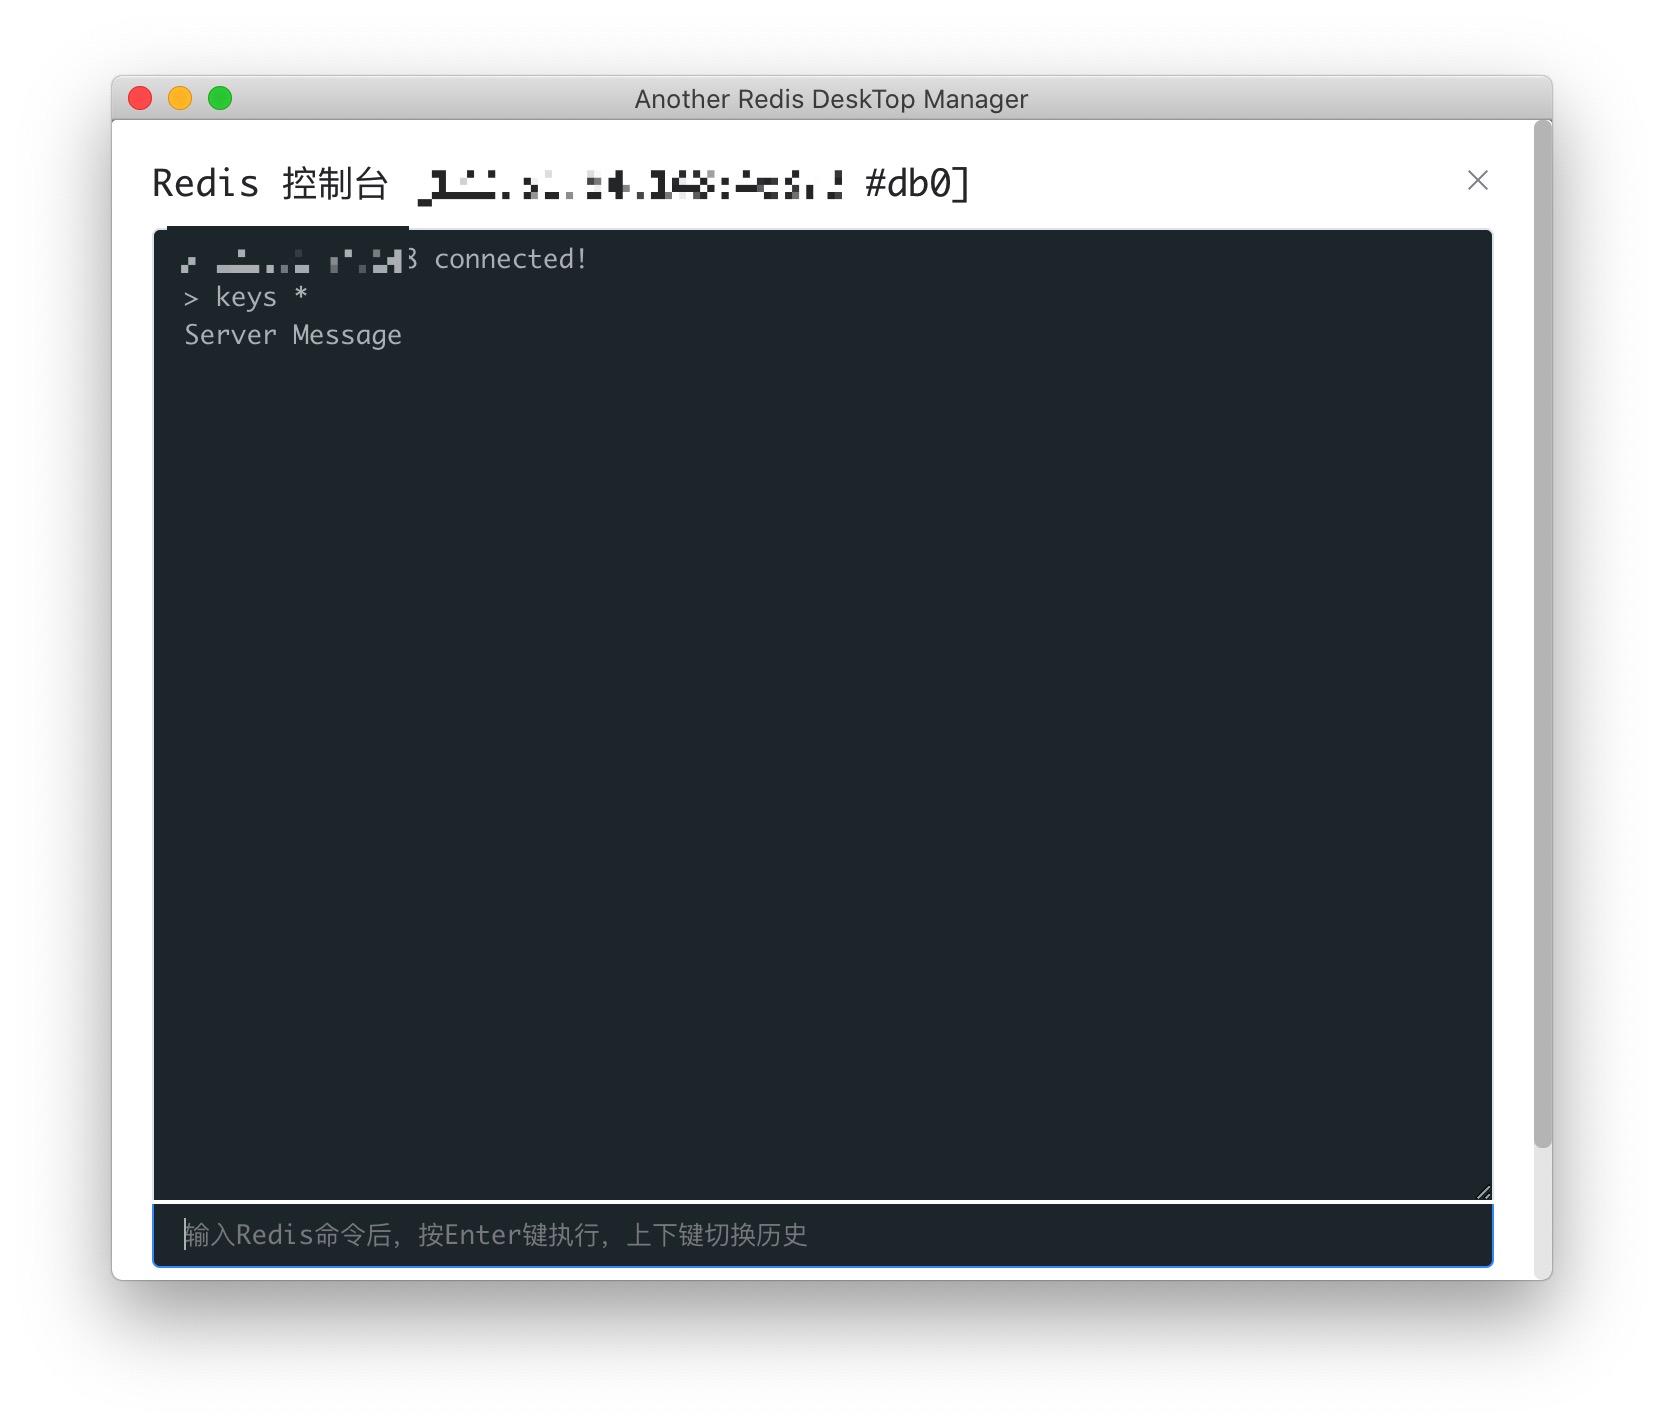
3. 测试
在Redis控制台中执行 keys * 命令,查看Redis中当前存在Key
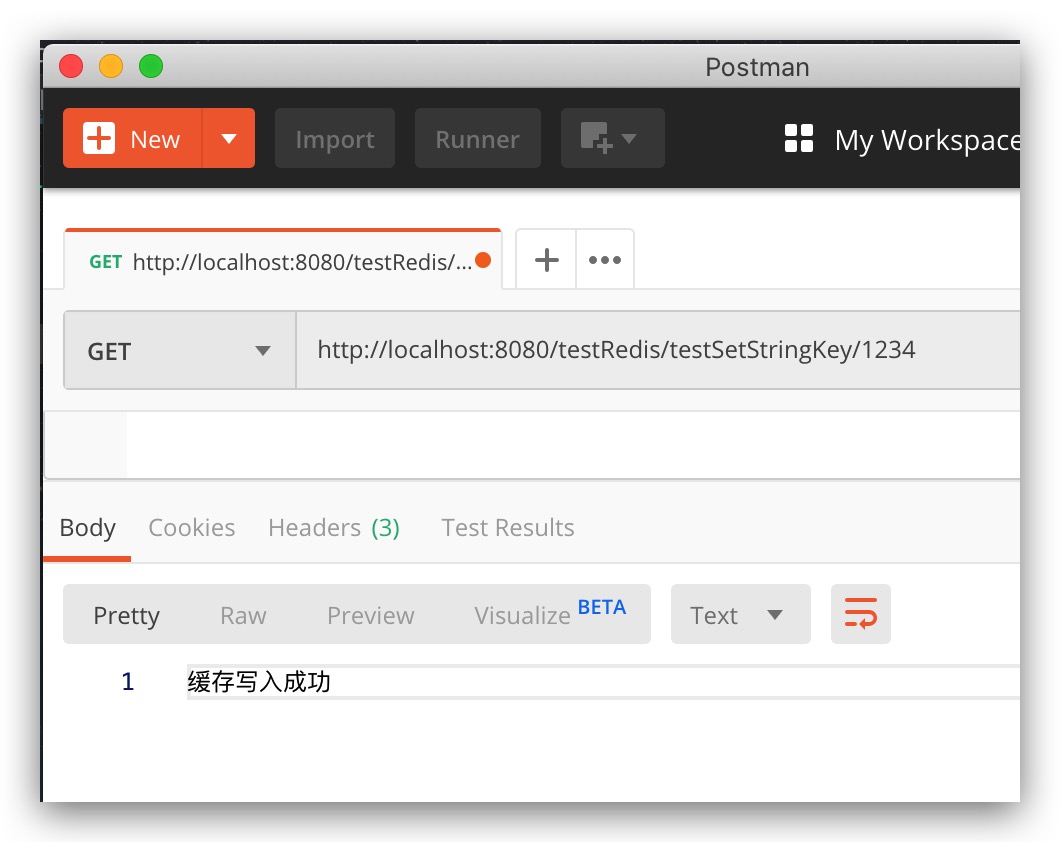
向 http://localhost:8080/testRedis/testSetStringKey/1234 发送请求以实现向Redis中写入缓存
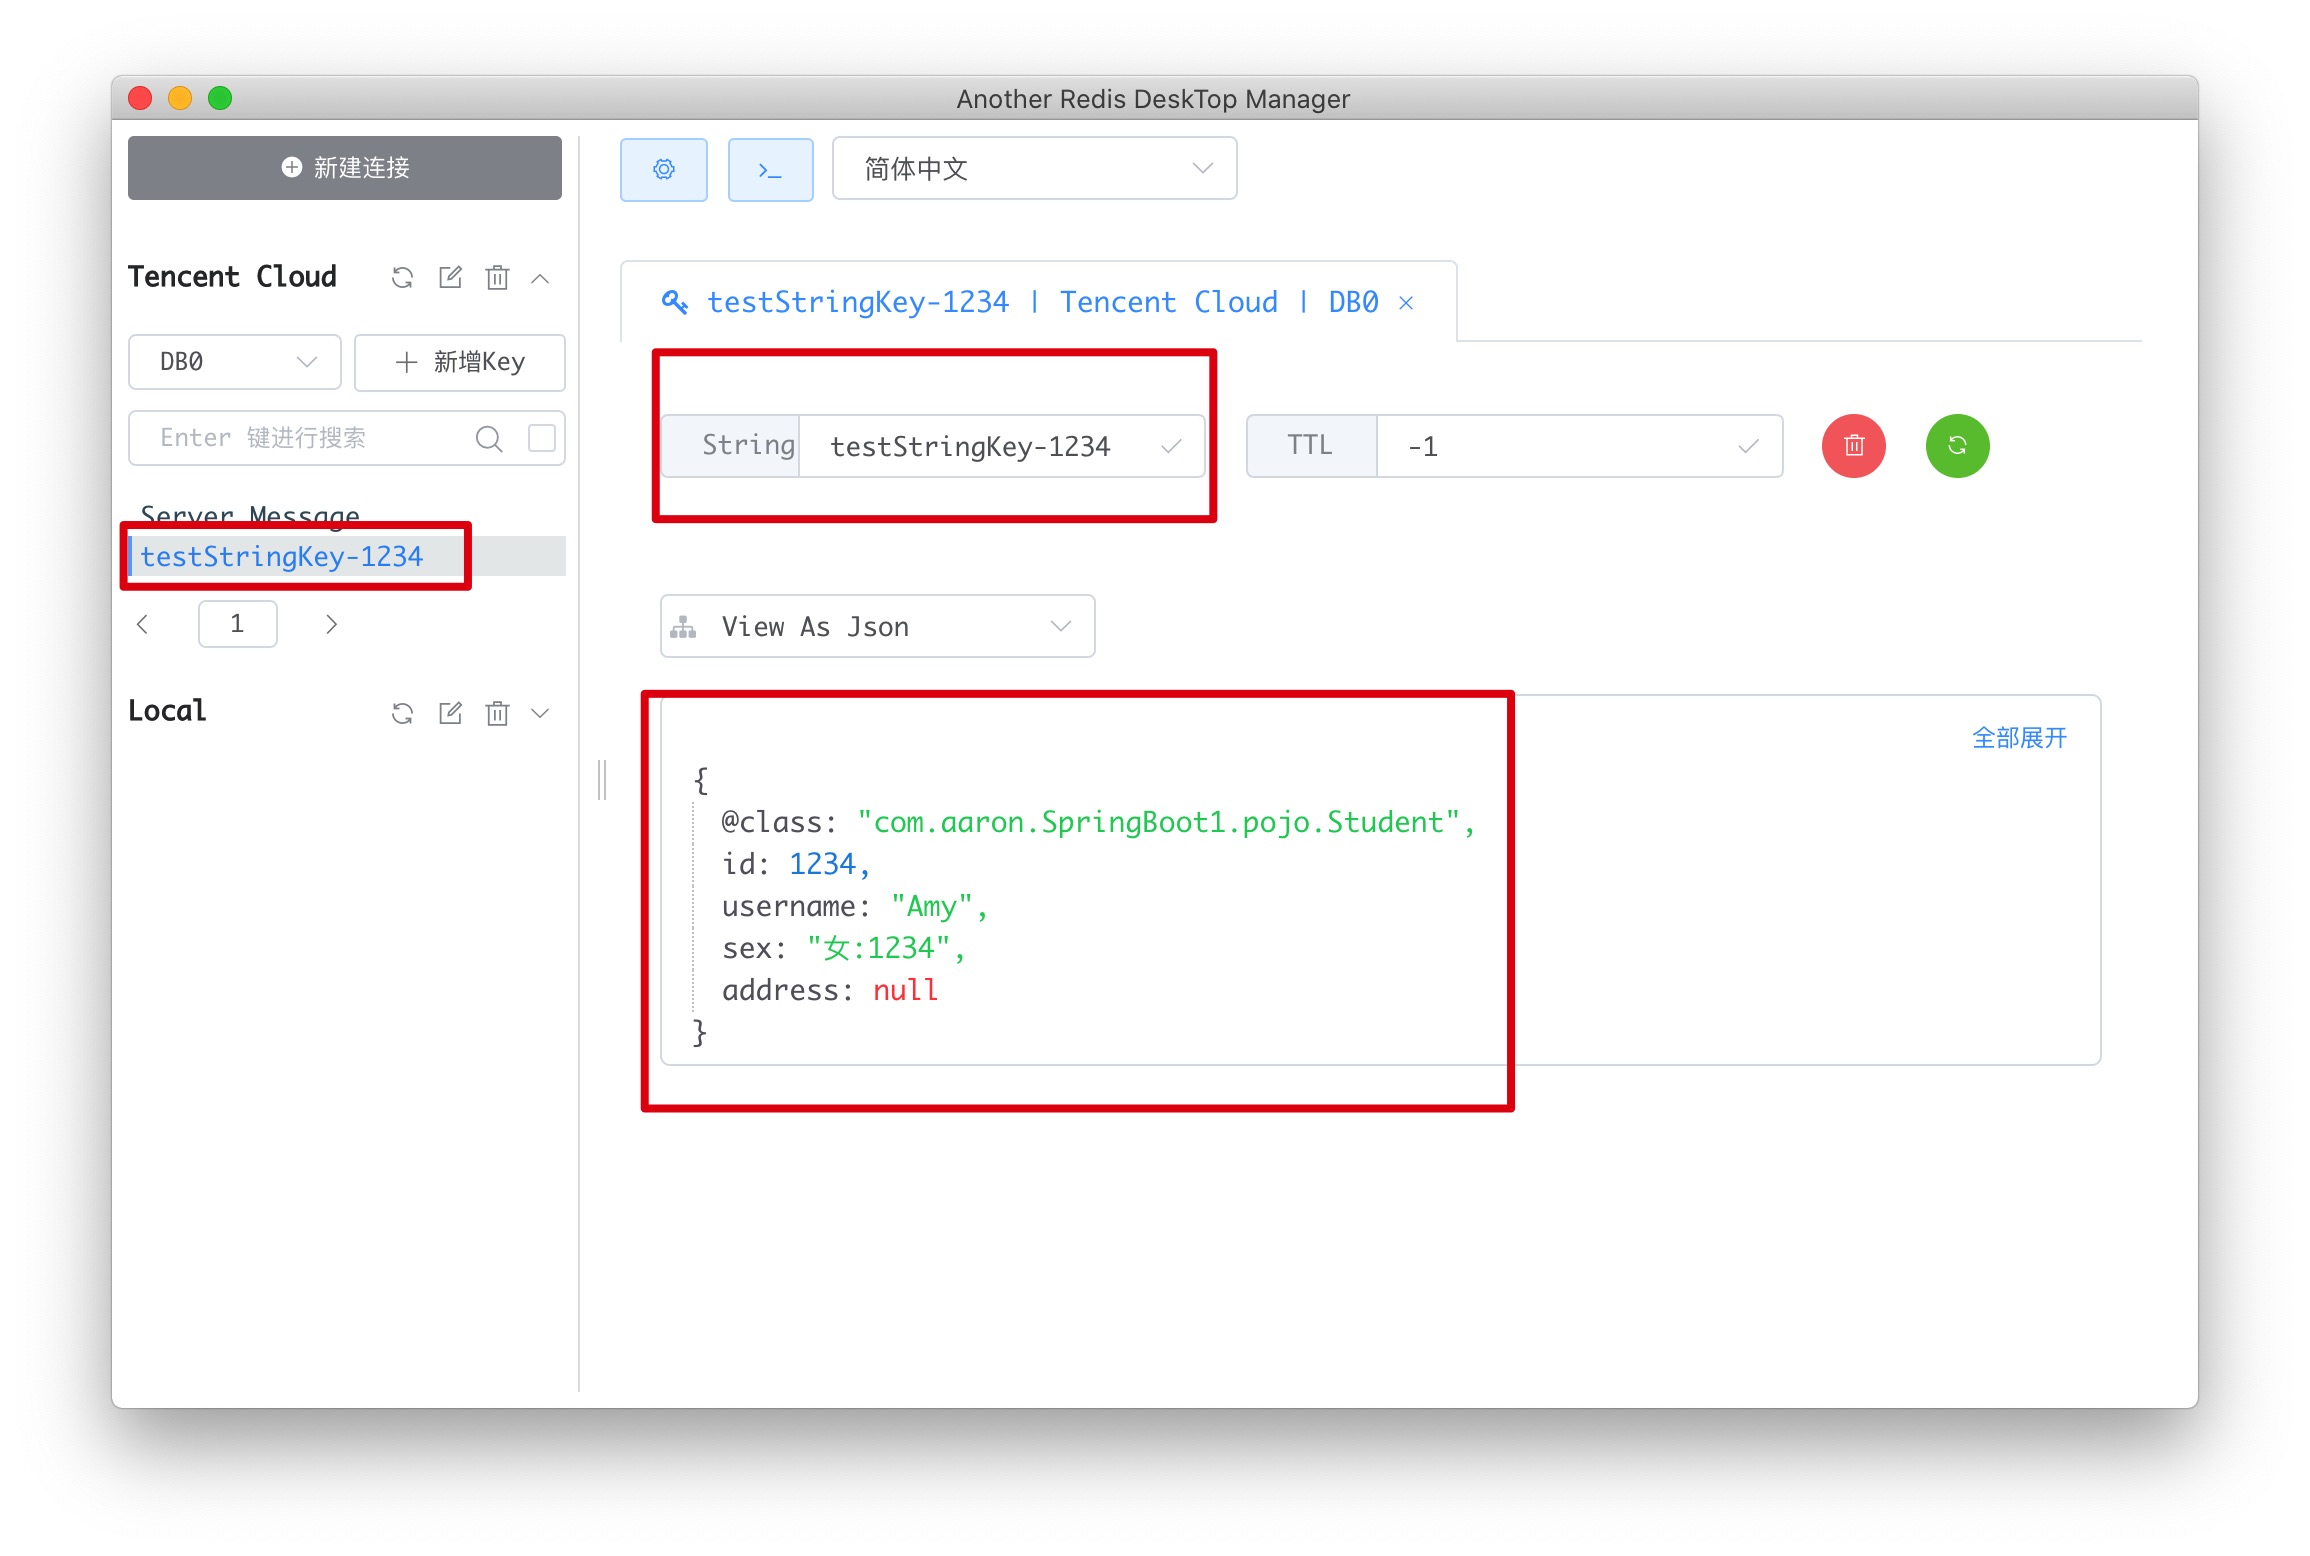
看看Redis数据库是否发生了变化,从下图可以看到,新加入了一个名为testStringKey-1234的String Key,其值为Student对象Json序列化后的字符串,此时,说明缓存写入成功
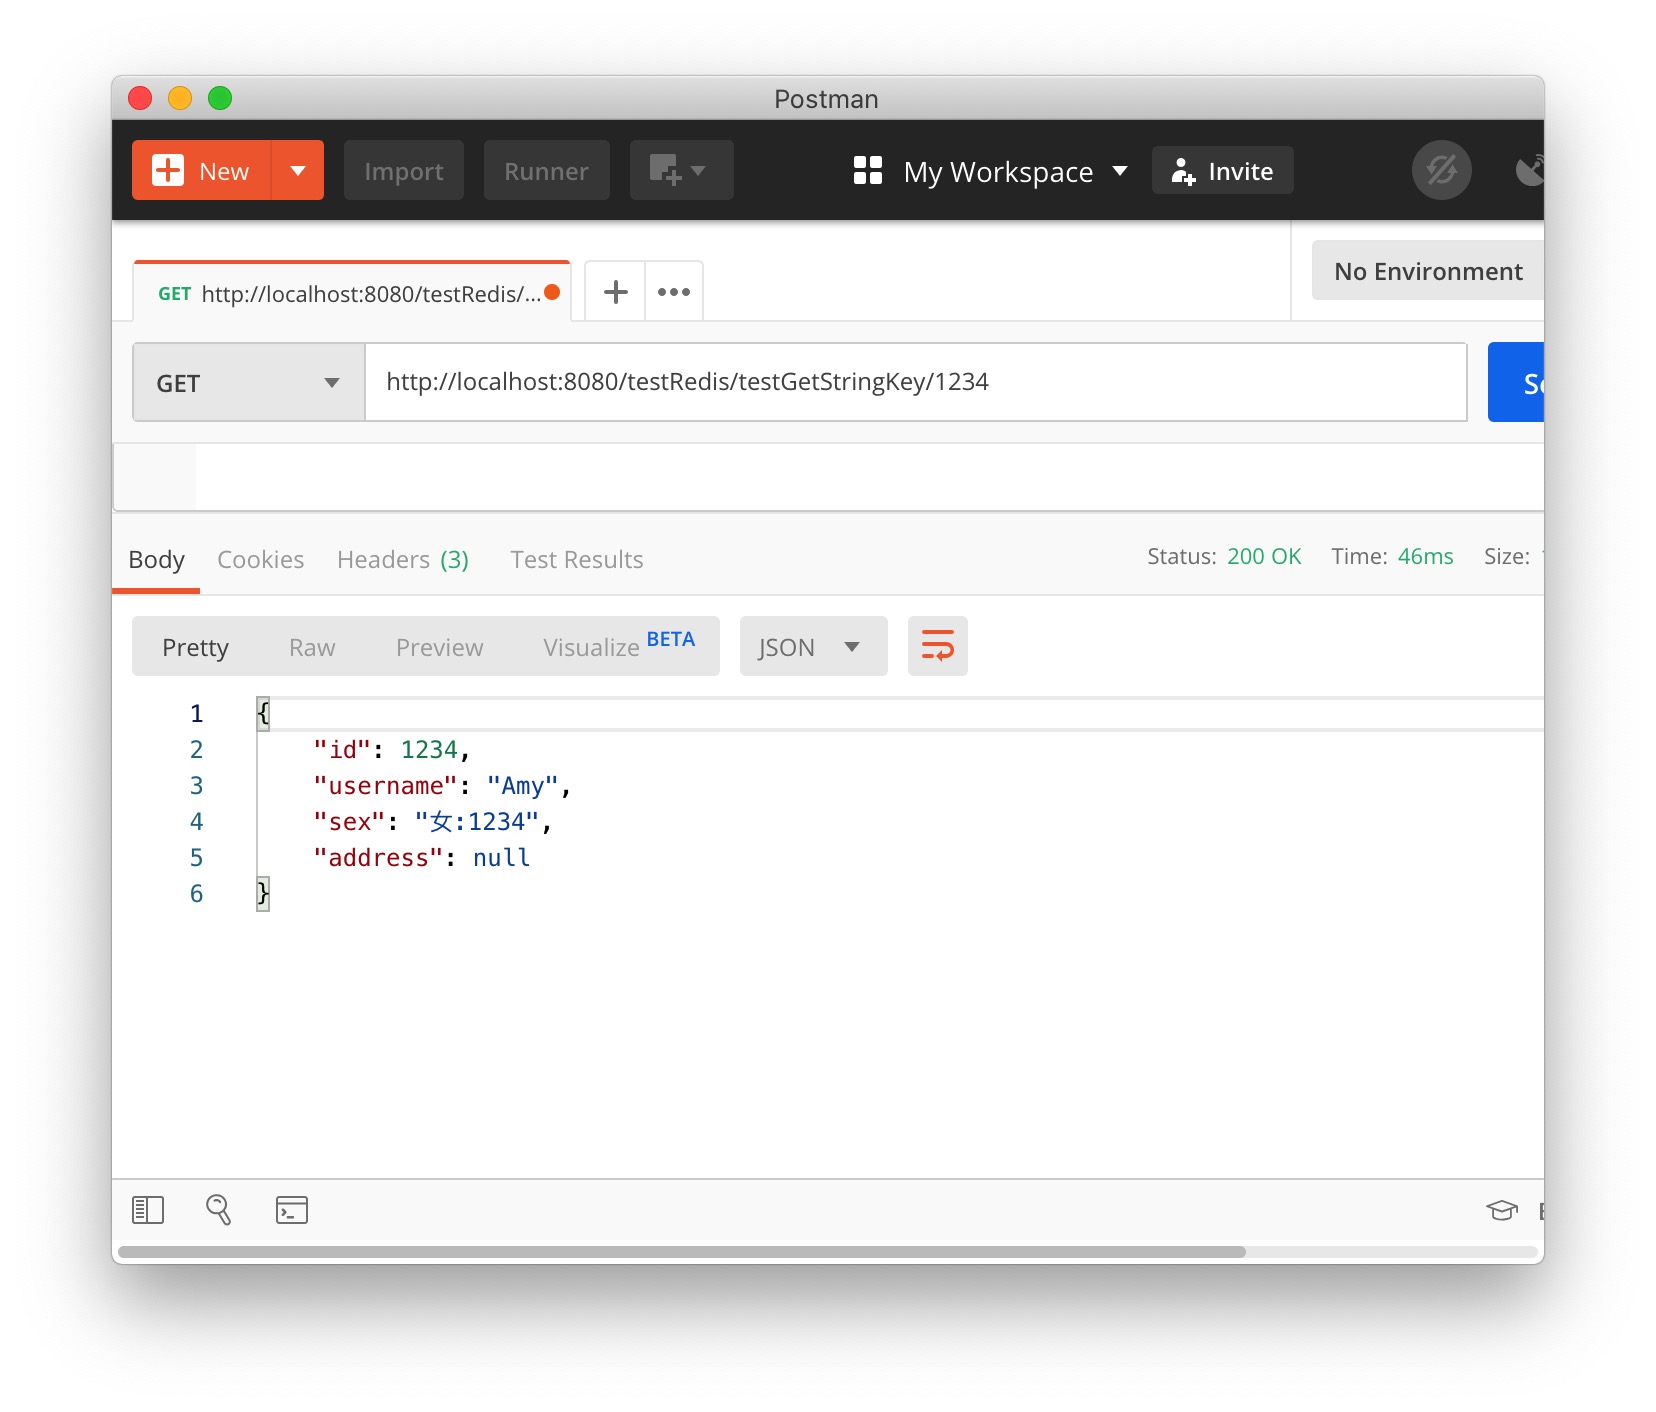
向 http://localhost:8080/testRedis/testGetStringKey/1234 发送请求以实现从Redis中读取相应的缓存数据,下图结果表明缓存读取成功
通过管道Pipeline批量操作
Reids会对每条命令建立一个连接来进行操作。故对于大量命令来说,建议通过管道Pipeline来一次性发送多条命令。此举可以大幅度提高效率。避免频繁建立连接引起的时间消耗。这里我们以批量操作String类型的数据为例进行说明。代码如下所示
1
2
3
4
5
6
7
8
9
10
11
12
13
14
15
16
17
18
19
20
21
22
23
24
25
26
27
28
29
30
31
32
33
34
35
36
37
38
39
40
41
42
43
44
45
46
47
|
@Service
public class PipelineService {
@Autowired
private RedisTemplate redisTemplate;
public void setStringKeyByPipeline(Map map, Long seconds) {
RedisSerializer keySerializer = redisTemplate.getKeySerializer();
RedisSerializer valueSerializer = redisTemplate.getValueSerializer();
RedisCallback redisCallback = connection -> {
map.forEach( (key, value) ->
connection.set(keySerializer.serialize(key), valueSerializer.serialize(value), Expiration.seconds(seconds), RedisStringCommands.SetOption.UPSERT)
);
return null;
};
redisTemplate.executePipelined(redisCallback);
}
public <E> List<E> getStringKeyByPipeline(List<String> list) {
RedisSerializer keySerializer = redisTemplate.getKeySerializer();
RedisCallback redisCallback = connection -> {
list.forEach( key -> connection.get(keySerializer.serialize(key)) );
return null;
};
List<E> result = redisTemplate.executePipelined(redisCallback);
return result;
}
}
|
可以看到redisTemplate对于管道的支持也是非常简便、好用的。测试代码如下所示
1
2
3
4
5
6
7
8
9
10
11
12
13
14
15
16
17
18
19
20
21
22
23
24
25
26
27
28
29
30
31
32
33
34
35
36
37
38
39
40
41
42
43
44
45
46
47
48
49
50
51
52
53
54
55
56
57
58
59
60
61
| @RunWith(SpringRunner.class)
@SpringBootTest
public class PipelineTest {
@Autowired
private PipelineService pipelineService;
@Test
public void test1() {
Long ttl = 24*3600L;
Integer num = 1000*1000;
Map map = new HashMap( (int)Math.ceil(num/0.75) );
Long start = System.currentTimeMillis();
for (Integer i=0; i<num; i++) {
String name = "Msg" + i;
Msg msg = new Msg(name, i);
map.put(name, msg);
}
pipelineService.setStringKeyByPipeline(map, ttl);
Long end = System.currentTimeMillis();
double time = (end-start) / 1000;
System.out.println("Time: " + time);
}
@Test
public void test2() {
Integer num = 1000*1000;
List<String> keyList = new LinkedList<>();
Long start = System.currentTimeMillis();
for (Integer i=0; i<num; i++) {
String name = "Msg" + i;
keyList.add(name);
}
List<Msg> valueList = pipelineService.getStringKeyByPipeline(keyList);
Long end = System.currentTimeMillis();
double time = (end-start) / 1000;
System.out.println("Time: " + time);
}
@AllArgsConstructor
@Data
@NoArgsConstructor
public static class Msg {
private String name;
private Integer code;
}
}
|
通过Sping Cache注解操作缓存
@Cacheable注解
该注解可以标记在方法、类上,表明该方法是支持缓存的。当调用该方法时,Spring Cache会首先检查该方法对应的缓存。如果缓存中该Key存在,则直接将缓存Key中的Value作为方法的结果返回,而无需进入并执行方法;如果缓存中无指定Key,则进入并执行方法,在将返回值返回的同时将其存入缓存中,以便下次调用该方法时,直接从缓存中获取方法的执行结果,而无需再进入方法执行
可用属性:
- value: 缓存名称。在Redis中其实际上即为命名空间。默认使用::作为命名空间的分隔符,上文的RedisConfig配置类的cacheManager()方法中,自定义:作为Redis的命名空间
- key: 缓存Key名。自定义缓存Key名中可以使用“#参数”方式引用形参中的值
- unless: 方法返回值不存入缓存的条件, 使用#result引用方法的返回值
测试代码如下:
1
2
3
4
5
6
7
8
9
10
11
12
13
14
15
16
| @Controller
@ResponseBody
@RequestMapping("testSpringCache")
public class TestSpringCacheController {
private static final String cacheName = "SpringCacheTest";
@RequestMapping(value = "/testCacheable")
@Cacheable(value = cacheName, key = "#name+'-'+#age", unless = "#result == null")
public User testCacheable(@RequestParam String name, @RequestParam Integer age) {
User user = new User();
user.setName(name);
user.setAge(age);
return user;
}
}
|
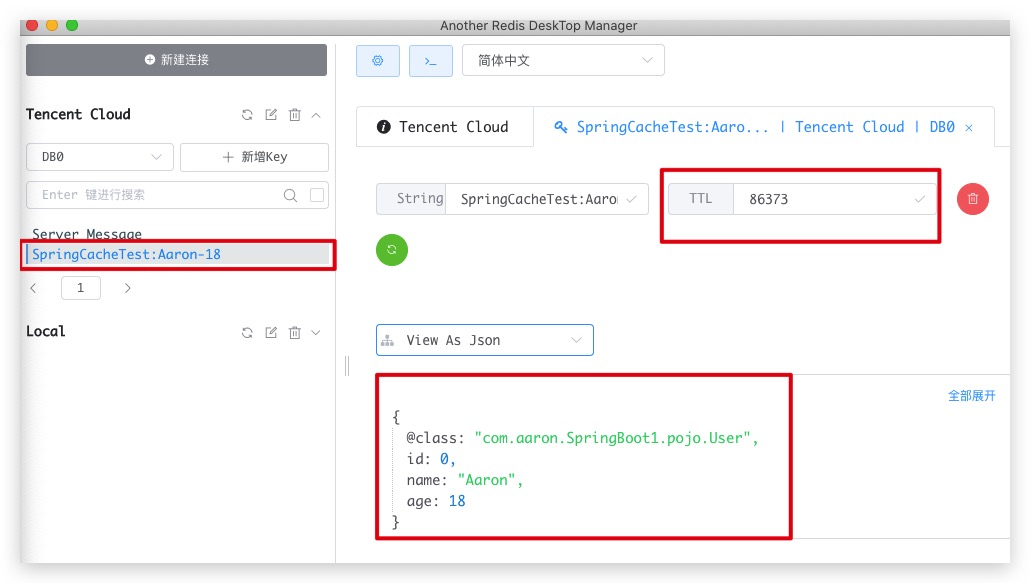
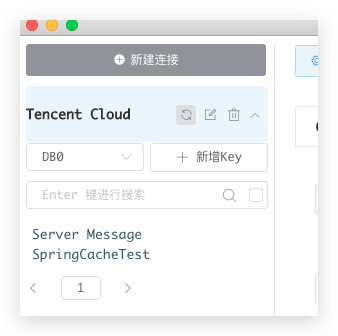
Redis数据库中的情况
我们向 http://localhost:8080/testSpringCache/testCacheable?name=Aaron&age=18 发送请求后,再查看此时Redis数据库中的情况,即可看到多了一个Key为SpringCacheTest:Aaron-18的缓存,如上所述,将SpringCacheTest作为命名空间的名称,使用:作为命名空间的分隔符,而该缓存的过期时间TTL也为上文配置的RedisConfig.timeToLive值
@CacheEvict注解
该注解可以标记在方法、类上,表明调用该方法是即清除指定缓存。当调用该方法时,Spring Cache即会清除指定的缓存
可用属性:
- value: 指定欲清除key所在的缓存名称(命名空间名)
- key: 指定欲清除的缓存Key名
- allEntries: 是否清除指定命名空间下的所有key的缓存,默认为false。当其为true时,将忽略key属性配置指定key
- beforeInvocation: 是否在调用方法前去清除指定缓存。当其为true时,将会在方法执行前清除缓存;当其为false时,将会在方法成功执行后清除缓存,如果方法未成功执行(抛出异常)将无法清除缓存
测试代码如下:
1
2
3
4
5
6
7
8
9
10
11
12
13
14
15
16
17
18
19
20
21
| @Controller
@ResponseBody
@RequestMapping("testSpringCache")
public class TestSpringCacheController {
private static final String cacheName = "SpringCacheTest";
@RequestMapping(value = "/testOneCacheEvict")
@CacheEvict(value = cacheName, key="'Tony'",beforeInvocation = true)
public void testOneCacheEvict() {
System.out.println("清除cacheNamem[SpringCacheTest]命名空间下的key[Tony]缓存");
return;
}
@RequestMapping(value = "/testAllCacheEvict")
@CacheEvict(value = cacheName, allEntries = true,beforeInvocation = true)
public void testAllCacheEvict() {
System.out.println("清除cacheNamem[SpringCacheTest]命名空间下的所有缓存");
return;
}
}
|
Redis数据库中的情况:
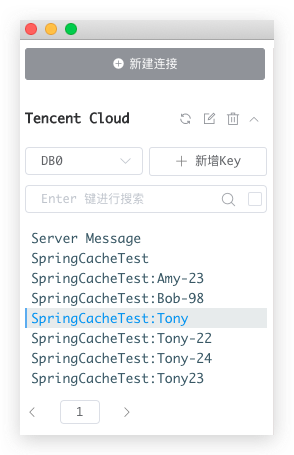
我们向 http://localhost:8080/testSpringCache/testOneCacheEvict 发送请求后,再查看此时Redis数据库中的情况,即可发现命名空间SpringCacheTest下key为Tony的缓存已经被成功清除
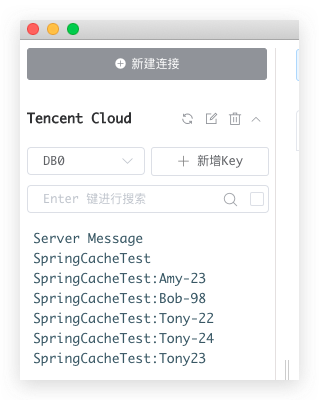
我们再向 http://localhost:8080/testSpringCache/testAllCacheEvict 发送请求,再查看此时Redis数据库中的情况,即可发现命名空间SpringCacheTest下所有key的缓存全部被清除完毕
[Note]:
- allEntries为true时,只能清除命名空间value下所有key的缓存,并不会清除缓存名恰好为命名空间value的缓存,如上图所示,调用testAllCacheEvict()方法后,SpringCacheTest缓存依然保留,不会被清除。欲清除该缓存,可通过redisTemplate操作
- Redis下key的TTL(剩余生存时间)含义如下:
- -2:表示该key不存在
- -1:表示该key存在,但未设置剩余生存时间。即永久存在
- >=0:对于不小于0的TTL值,表示该key的剩余生存时间,Unit:s。当为0时,即被自动删除
