这里就如何在SpringCloud中利用Sleuth进行链路追踪做相关介绍
简介 在分布式环境中,用户的一次请求会经过多个不同的内部服务并最终产生结果。基于这样的大背景下,我们很多时候需要对分布式服务的调用链路进行追踪、监控。Spring Cloud为此推出了Sleuth组件,其内部使用的是Zipkin。这里就链路追踪相关方面的术语做一些介绍与说明
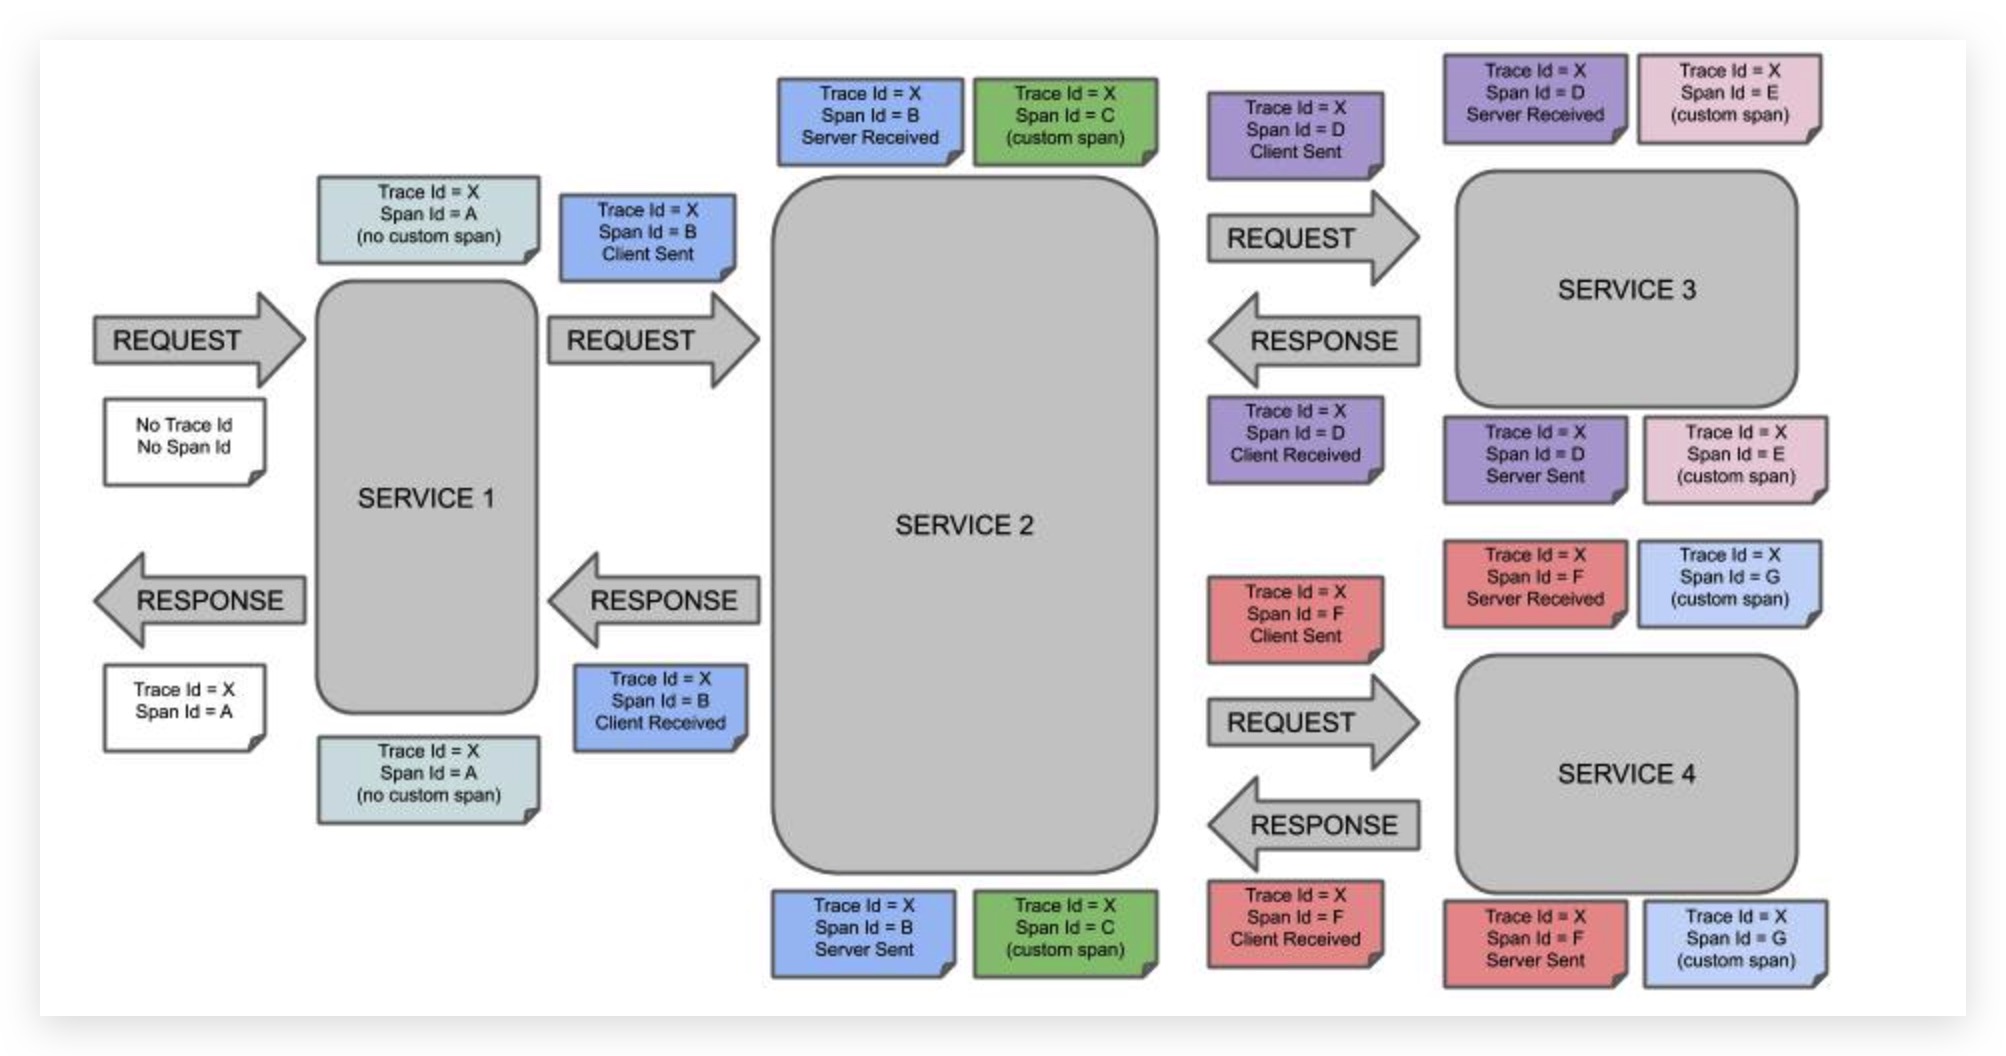
Trace ID :用户的一次从请求到响应的过程,会通过Trace ID进行唯一标识。如下图示例所示,由于均为同一次用户请求,所以Trace ID都是相同的Span ID :前面说了,分布式中服务间的调用非常繁多,仅仅靠Trace ID无法反应出服务间调用的相互关系。故这里引入了Span的概念,其代表的是一次RPC过程,即一次服务间的调用。具体地,其使用Span ID 来标识本次服务调用。同时为了更好反应服务调用的先后次序,每次Span过程还会记录其父Span ID
Zipkin服务搭建 前面提到Sleuth内部是通过Zipkin实现服务的链路追踪,故我们需先搭建、提供一个Zipkin服务。这里利用Docker来进行搭建,相关命令如下所示
1
2
3
docker run -d -p 9411:9411 \ --name Zipkin-Server \ openzipkin/zipkin
实践 payment服务 为了更好的演示,这里先搭建一个payment服务。可以看到我们在POM中引入了Sleuth的依赖
1 2 3 4 5 6 7 8 9 10 11 12 13 14 15 16 17 18 19 20 21 22 23 24 25 26 27 28 29 30 31 32 33 <dependencyManagement > <dependencies > <dependency > <groupId > org.springframework.boot</groupId > <artifactId > spring-boot-dependencies</artifactId > <version > 2.2.2.RELEASE</version > <type > pom</type > <scope > import</scope > </dependency > <dependency > <groupId > org.springframework.cloud</groupId > <artifactId > spring-cloud-dependencies</artifactId > <version > Hoxton.SR1</version > <type > pom</type > <scope > import</scope > </dependency > </dependencies > </dependencyManagement > <dependencies > <dependency > <groupId > org.springframework.cloud</groupId > <artifactId > spring-cloud-starter-zipkin</artifactId > </dependency > </dependencies >
相关配置如下所示
1
2
3
4
5
6
7
8
9
10
11
12
13
server: port: 8009 spring: application: name: payment zipkin: base-url: http://localhost:9411 sleuth: sampler: probability: 1
然后提供一个Controller,如下所示
1
2
3
4
5
6
7
8
9
10
11
12
13
@RestController @RequestMapping("pay") public class PaymentController { @Value("${server.port}") private String serverPort; @GetMapping("/hello") public String hello (@RequestParam String name) { String msg = "[Payment Service-" + serverPort +"]: " + name; return msg; } }
order服务 同理,再搭建另外一个order服务。这里关于依赖及Sleuth、Zipkin相关配置不再赘述,其与payment服务中的均一致。这里我们在order服务的Controller中来调用payment服务的接口,如下所示
1
2
3
4
5
6
7
8
9
10
11
12
13
14
15
16
17
18
19
20
21
22
23
24
25
26
27
28
@RestController @RequestMapping("order") public class OrderController { @Autowired private RestTemplate restTemplate; @GetMapping("/test1") public String test1 (@RequestParam String name) { String msg = restTemplate.getForObject("http://localhost:8009/pay/hello?name={1}" , String.class, name); String result = "[Order Service #test1]: " + msg; return result; } } ... @Configuration public class RestTemplateConfig { @Bean public RestTemplate restTemplate () { return new RestTemplate (); } }
验证 至此,分别在8009、84端口启动payment、order服务。然后通过curl工具进行用户请求。如下所示,符合预期
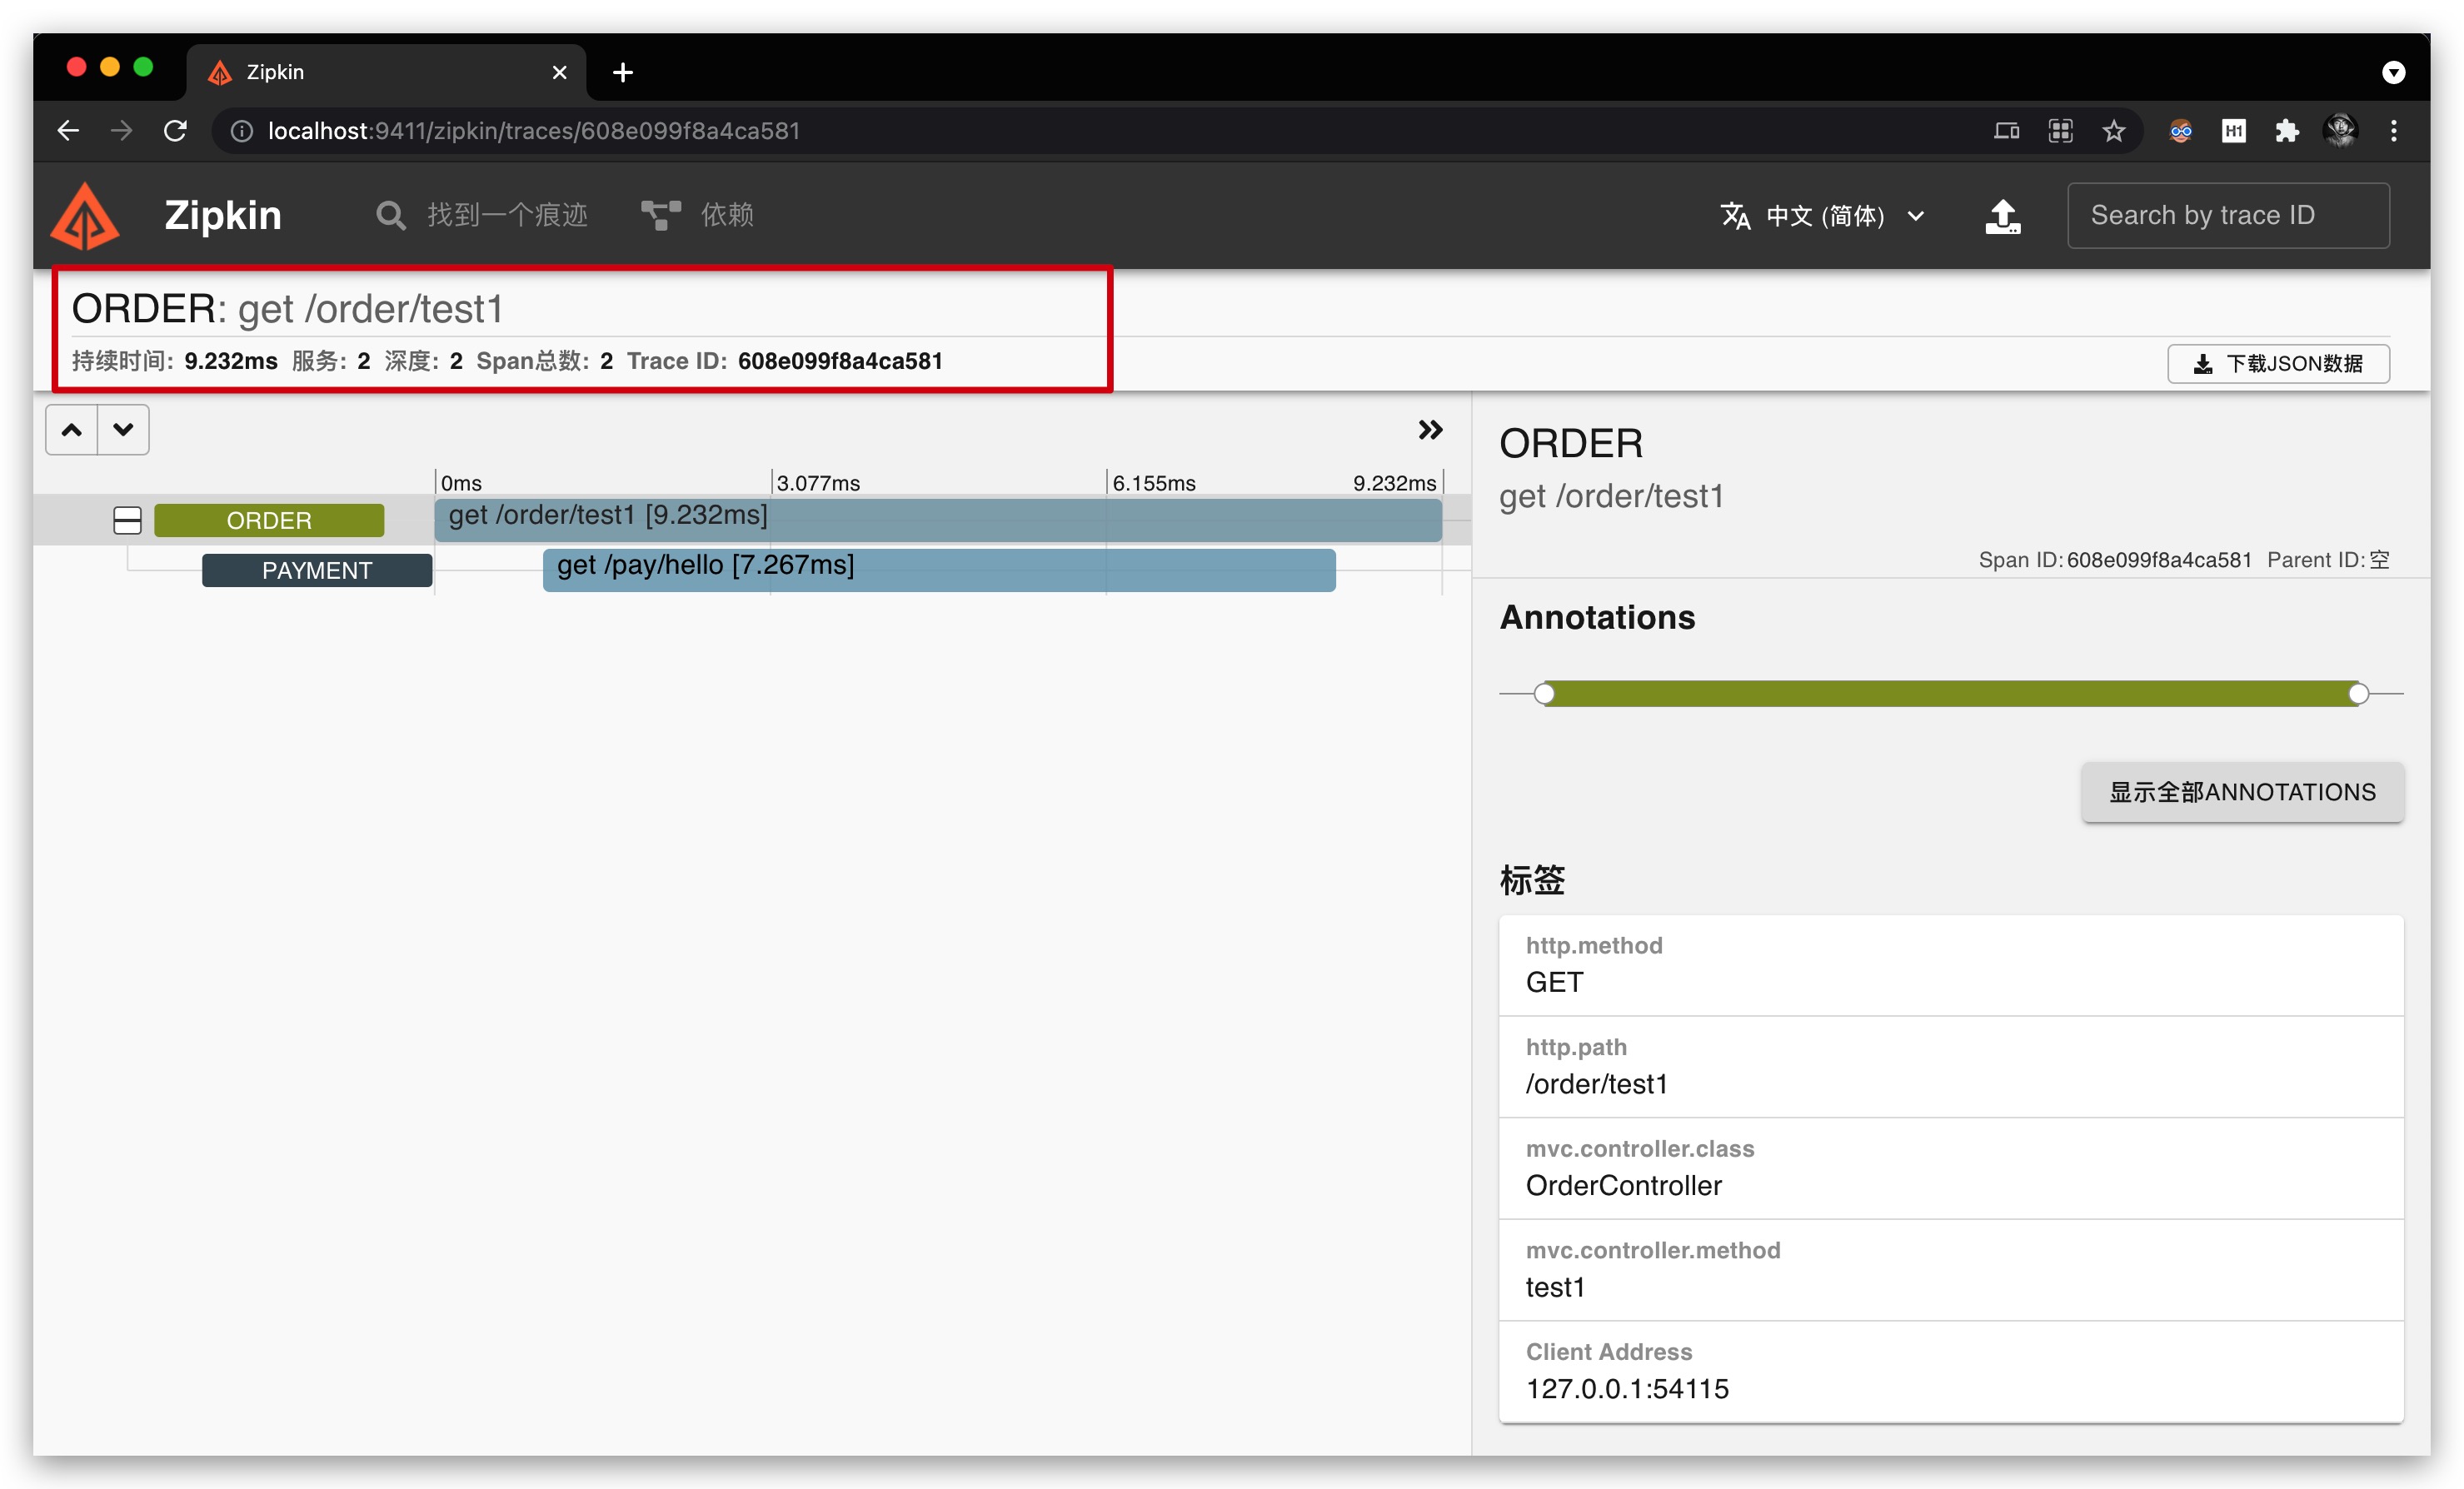
然后进入Zipkin的Web管理页面 http://localhost:9411/zipkin 查看。进一步可以发现该用户请求时内部各服务调用关系及耗时等信息
参考文献
Spring微服务实战 John Carnell著
凤凰架构 周志明著


